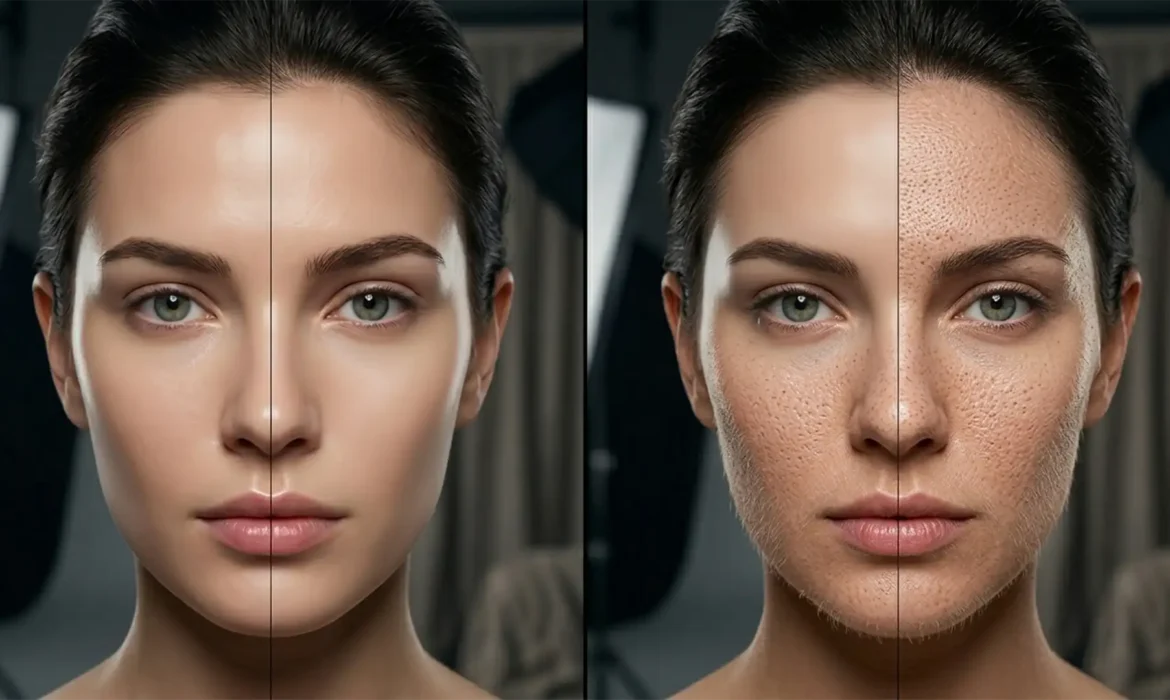
You apply a quick edit to remove a stray hair or extend a background, and suddenly your high-end beauty portrait looks like a plastic mannequin. Preserve skin texture with Photoshop Generative Fill is the biggest hurdle for modern retouchers. The micro-contrast is gone, the pores are erased, and you are left with a smoothed, artificial patch that completely ruins the photograph.
Adobe Firefly’s AI is incredibly powerful, but it notoriously destroys high-frequency details. If you are tired of Photoshop’s AI ruining your professional edits, you are not alone. In this guide, we will show you exactly how to merge AI efficiency with traditional retouching techniques to maintain flawless, realistic skin texture.
The Problem: Why Generative Fill Destroys Skin Details
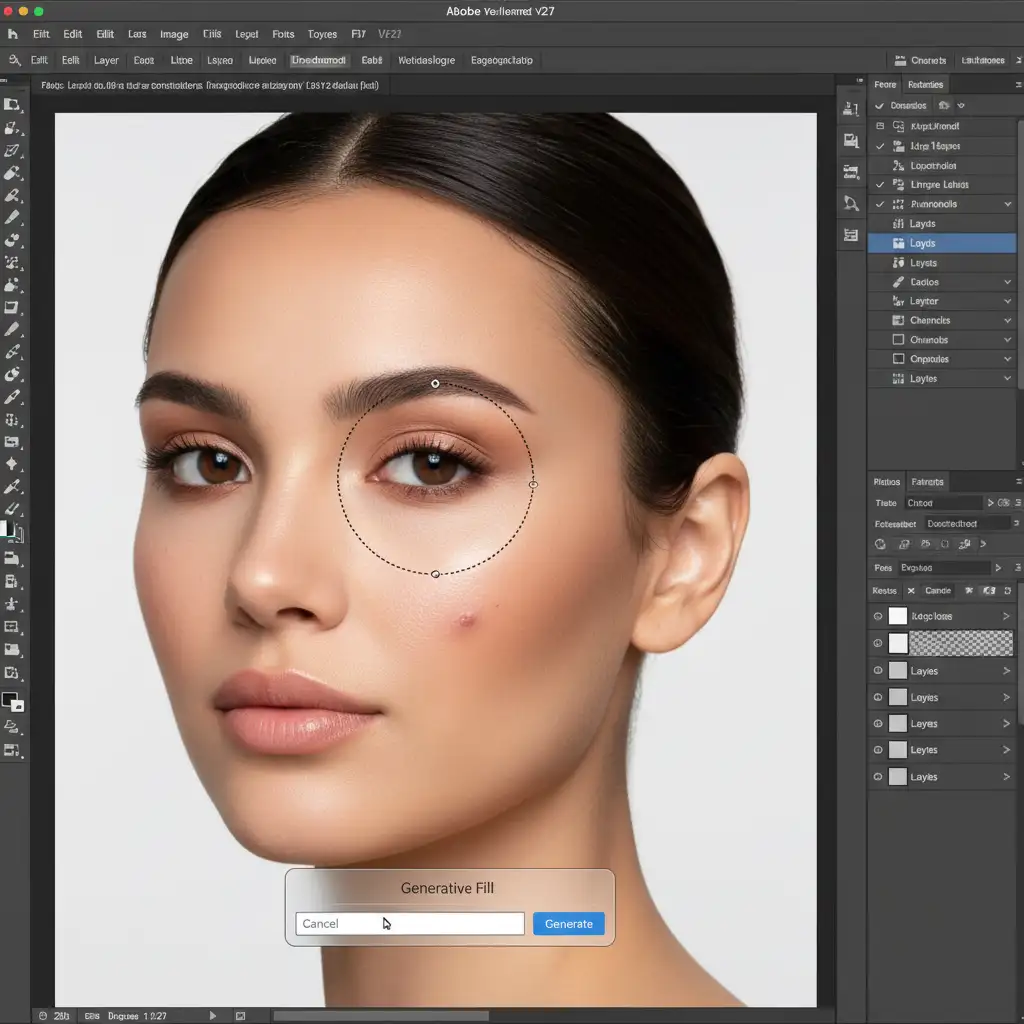
In recent versions of Adobe Photoshop (v24.6 through v25.x+), Generative Fill struggles significantly with high-end beauty retouching. When asked to generate or replace skin, the underlying Adobe Firefly engine prioritizes color and basic lighting over micro-contrast and noise structure.
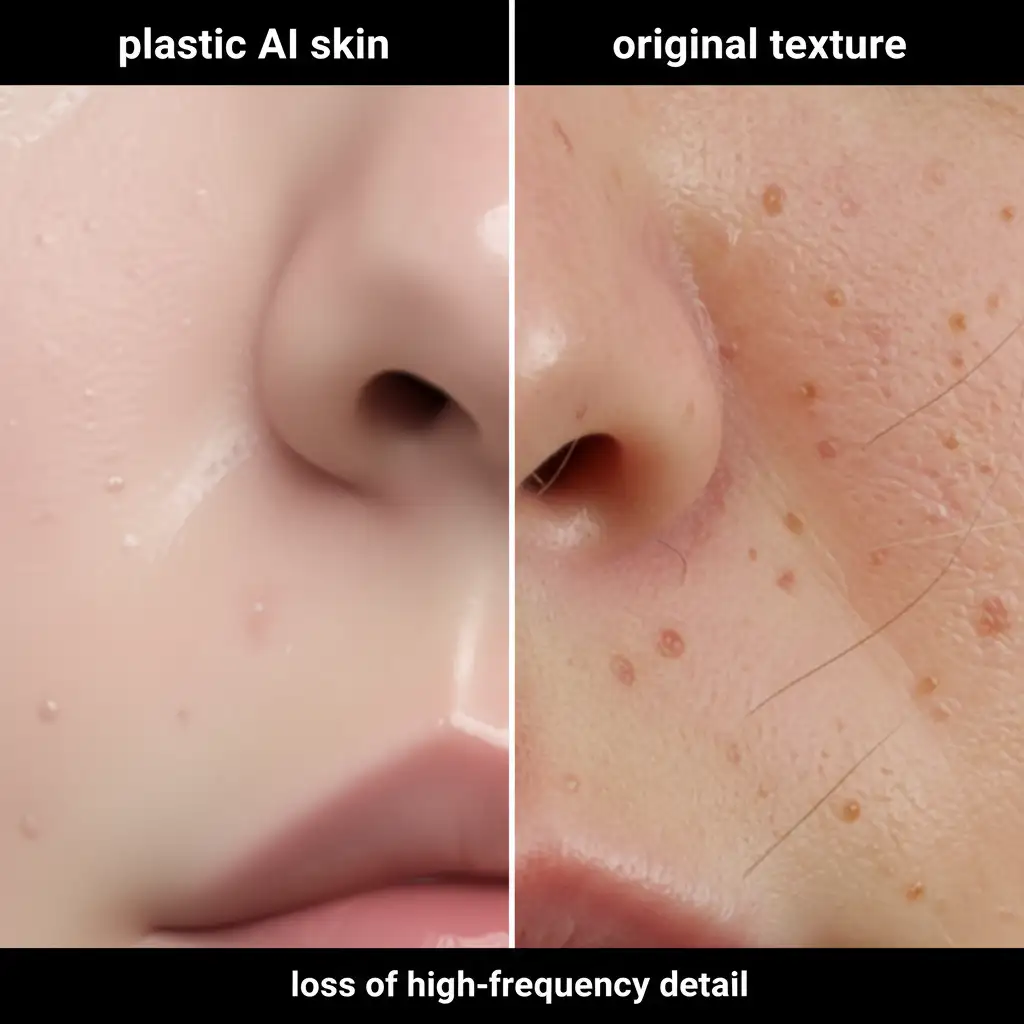
The result is a severe mismatch: the original photograph retains its beautiful, natural high-frequency details (pores, fine hairs, natural grain), while the AI-generated area looks smoothed and synthetic. Professional retouching requires non-destructive editing that respects the original image’s integrity, making this “plastic AI skin” unacceptable for commercial work.
3 Pro Methods for Preserving Skin Texture with Photoshop Generative Fill
To achieve flawless skin texture matching, you cannot rely on Generative Fill alone. You must integrate it into a structured, non-destructive editing workflow. Here are three methods ranging from quick fixes to advanced commercial techniques.
Method 1: The Quick Fix (Opacity and Noise Matching)
If you are working on a tight deadline and the generated patch is relatively small, you can use transparency and artificial grain to blend the AI edit into the surrounding skin.
- Make your selection and apply Generative Fill to remove the blemish or distraction.
- Navigate to the Layers panel and lower the Generative Fill layer opacity to 80–90%. This allows a fraction of the original skin texture to bleed through the generated pixels.
- Because the AI area will still lack grain, create a new blank layer, fill it with 50% gray, and set the blend mode to Overlay.
- Go to Filter > Noise > Add Noise and adjust the amount to perfectly match the natural grain and micro-contrast of the original photograph.
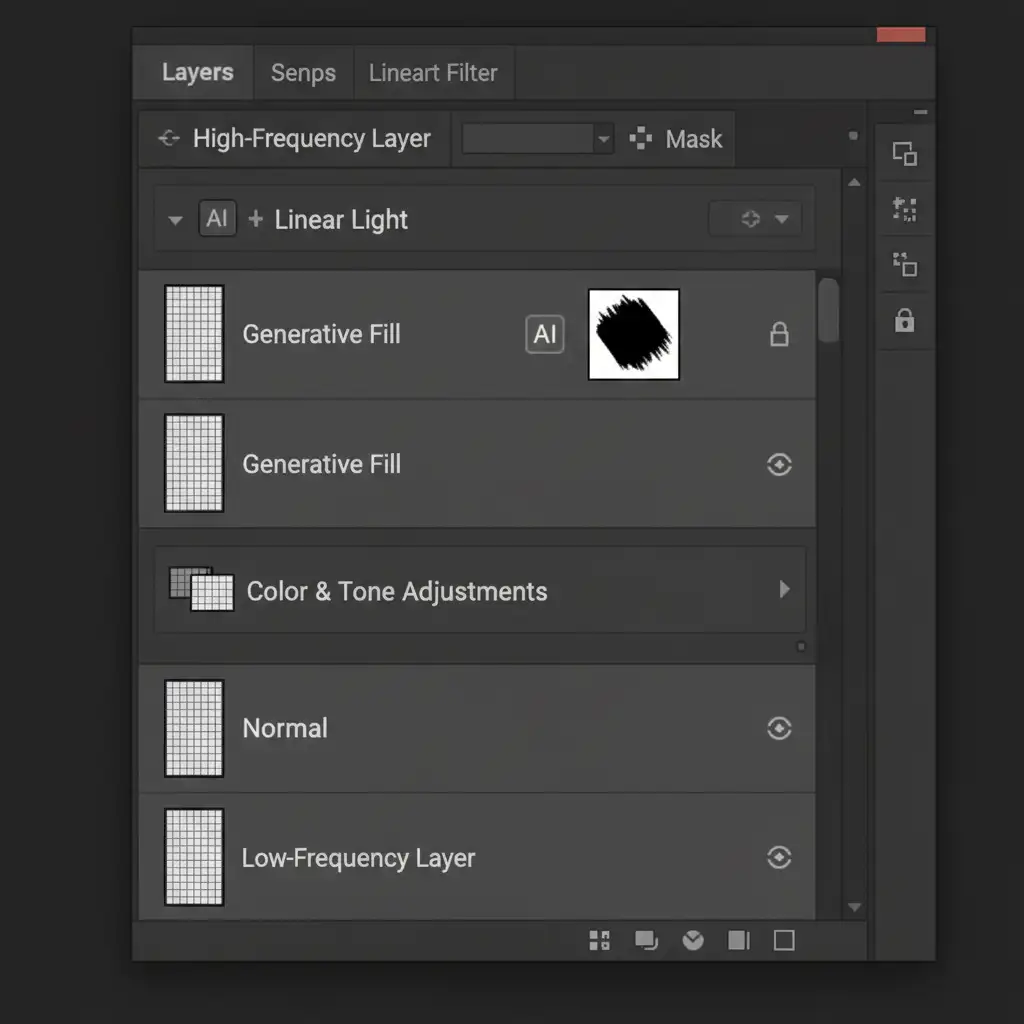
Method 2: The Pro Workaround (Frequency Separation Integration)
For high-end beauty retouching, Frequency Separation is the industry standard. By separating your image into a Low-Frequency Layer (color and tone) and a High-Frequency Layer (texture), you can isolate where the AI applies its edits.
- Run your standard Frequency Separation action on the original image.
- Make your selection on the Low-Frequency (color) layer.
- Apply Generative Fill.
- Crucial Step: Ensure your Generative Fill layer is placed below the High-Frequency texture layer in the Layers panel.
By stacking the layers this way, the AI only alters the underlying color and shading. The original, unedited skin texture remains perfectly intact on top, completely masking the synthetic look of the AI.
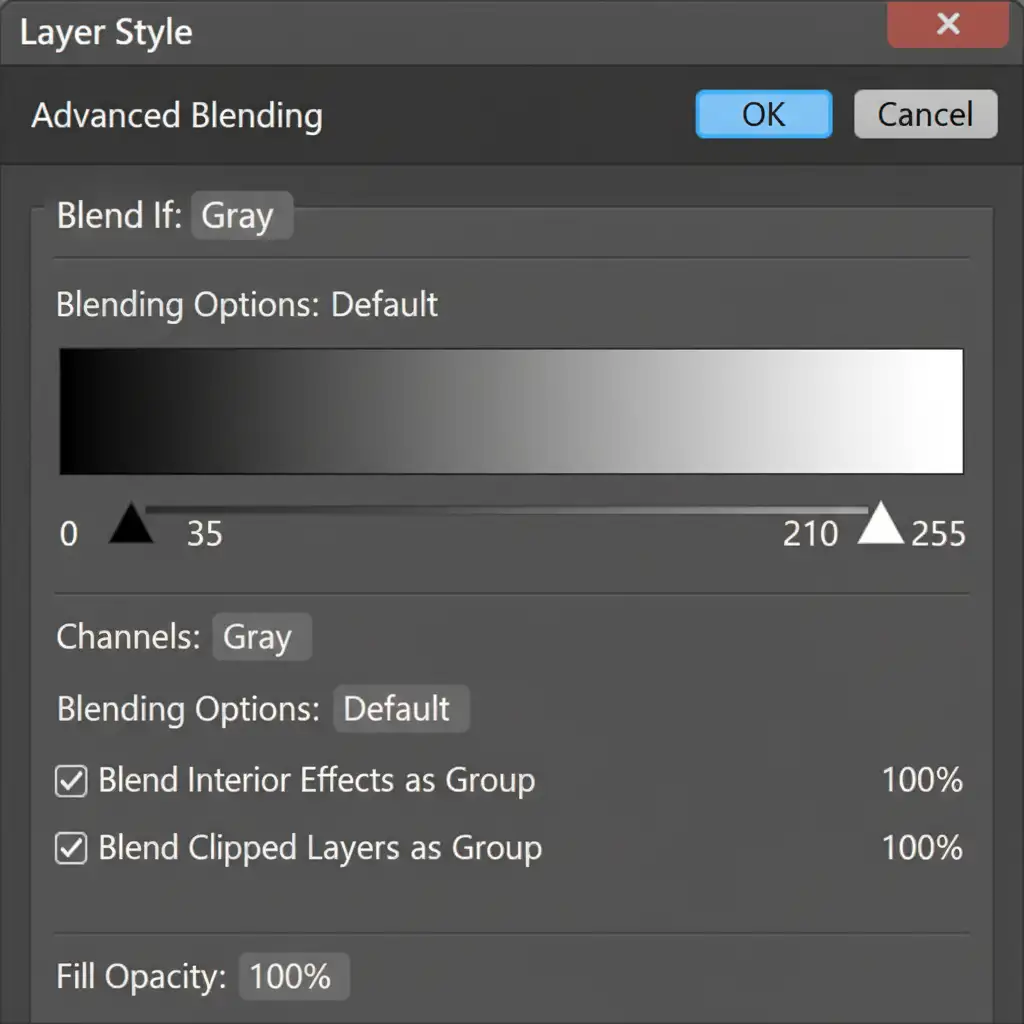
Method 3: The Technical Deep-Dive (Luminosity Masking and Blend If)
When dealing with complex lighting or extending skin areas where Frequency Separation isn’t viable, advanced Luminosity Masking via the ‘Blend If’ sliders is your best option.
- Apply your Generative Fill edit as usual.
- Double-click the Generative Fill layer to open the Layer Style dialog box.
- Look at the bottom for the Blend If section, specifically the Underlying Layer slider.
- Hold Alt (Windows) or Option (Mac) and click the slider nodes to split them.
- Drag the split nodes inward. By adjusting the dark and light sliders, you force the deepest shadows (pores/texture) and brightest highlights (specular micro-contrast) of the original skin to punch directly through the generated pixels.
Stop Struggling with AI: Outsource to the Retouching Experts
Mastering the art of preserving skin texture with Photoshop Generative Fill requires a deep understanding of Frequency Separation, micro-contrast, and advanced masking. If you are a commercial photographer or agency struggling to balance the speed of AI with the meticulous quality required for high-end beauty retouching, you don’t have to do it alone.
At Image Work India and Cloud Retouch, our expert retouchers combine cutting-edge AI technology with decades of manual, pixel-perfect editing experience. We guarantee flawless, natural beauty edits that retain 100% of the original skin texture. Focus on capturing stunning images, and let us handle the tedious technical post-production.
Contact us today to elevate your commercial portfolio with industry-leading retouching services.


