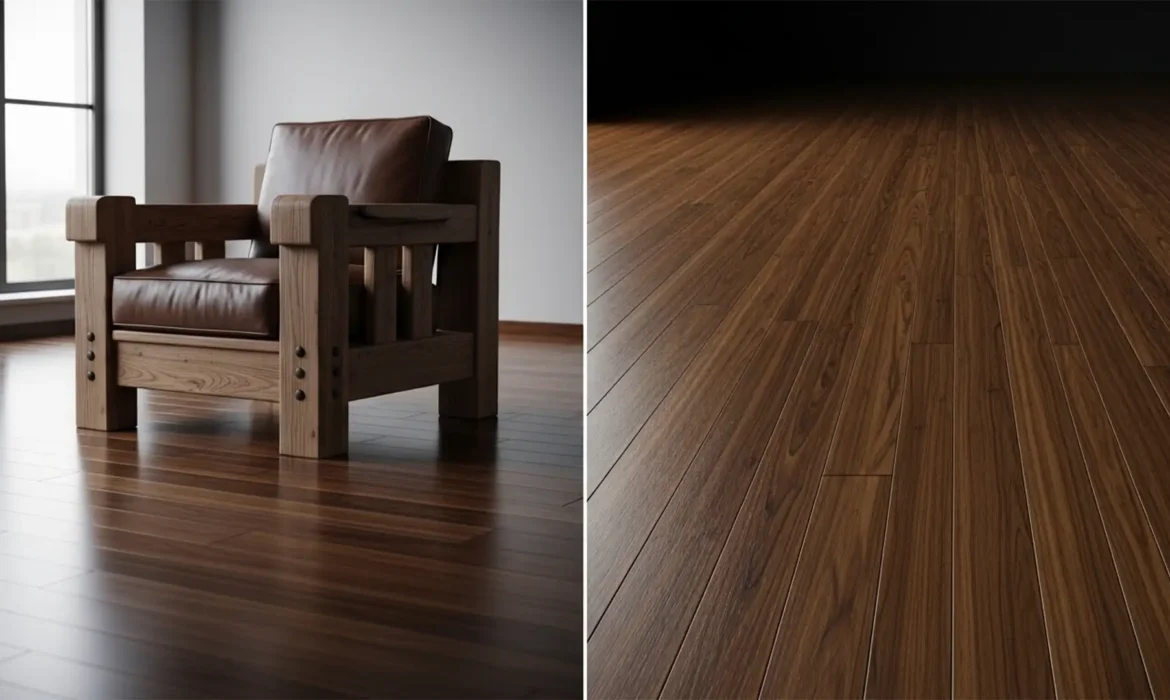
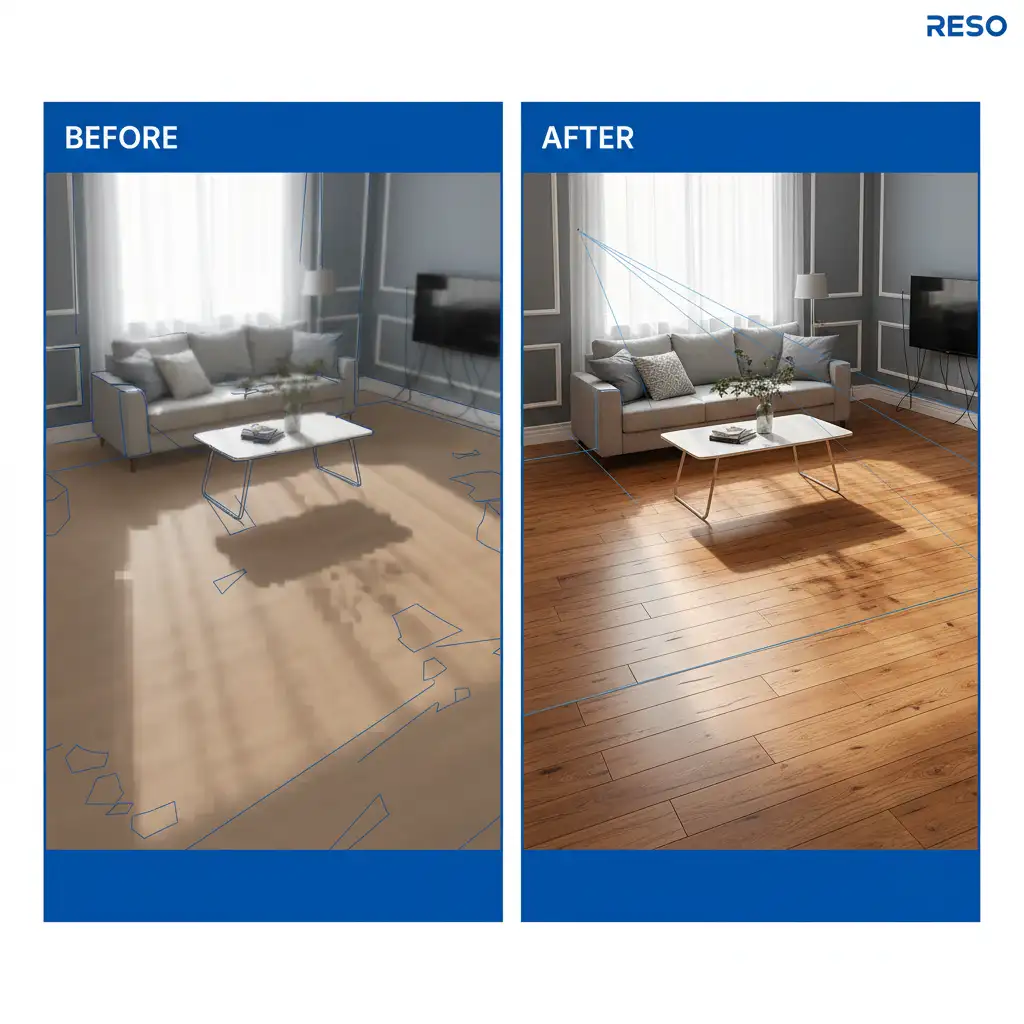
Have you ever tried removing a bulky sofa from a real estate photo, only to be left with a smudged, blurry mess on the hardwood floor? It is a massive headache for interior photographers and retouchers. Standard Content-Aware Fill often fails here, lacking the depth awareness to match the shrinking scale of floorboards. Even advanced AI can hallucinate incorrect directions when dealing with steep focal lengths. If you are struggling with furniture removal and wood floor texture recovery, you are not alone. Let’s explore the exact professional workflows needed to rebuild missing floorboards with perfect perspective and microscopic grain detail.
Why Standard Tools Fail at Wood Grain Alignment
When working in Adobe Photoshop v24.x through v26.x, removing large objects from patterned or textured surfaces like hardwood floors frequently results in ‘texture smudging’ or broken perspective lines.
The core issue is Z-axis depth. Standard healing tools and Content-Aware Fill operate on a 2D plane. They lack the spatial awareness required to understand that floorboards get narrower and closer together as they recede into the background. This results in parallax distortion, where cloned floorboards look flat, mismatched in scale, or entirely disconnected from the room’s geometry.
To accurately reconstruct the floor, retouchers must utilize perspective-aware tools to maintain the parallel lines and microscopic grain details of the wood.
3 Pro Methods for Flawless Floor Reconstruction
Depending on the complexity of the interior and the version of Photoshop you are running, there are three distinct ways to handle complex floor texture mapping.
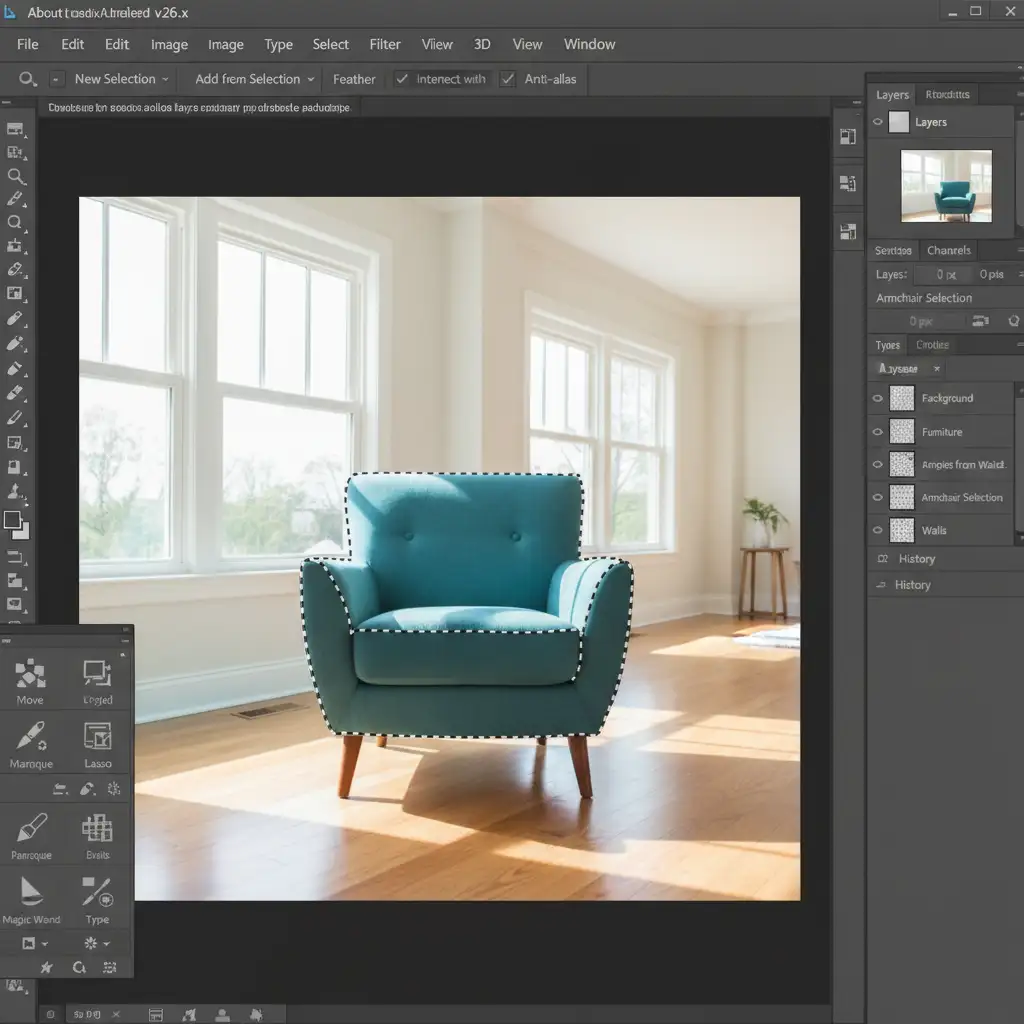
Method 1: Guided Generative Fill (The Quick Fix)
If you are using Photoshop v25.x or newer, Generative Fill is a powerful asset—but it needs strict guidance to avoid hallucinating incorrect floorboards.
- Create a Guide Layer: Create a new, blank layer above your image.
- Draw Perspective Lines: Use the Line tool (1px weight, contrasting color) to draw straight lines that extend from the visible, existing floorboards directly across the furniture you want to remove. These act as perspective rails.
- Select and Generate: Make a selection that encompasses both the furniture and your guide lines.
- Prompt the AI: Enter the prompt “continuous wood floorboards” into the Generative Fill taskbar. The AI will read your drawn lines as structural constraints, drastically improving the perspective accuracy of the generated wood grain.
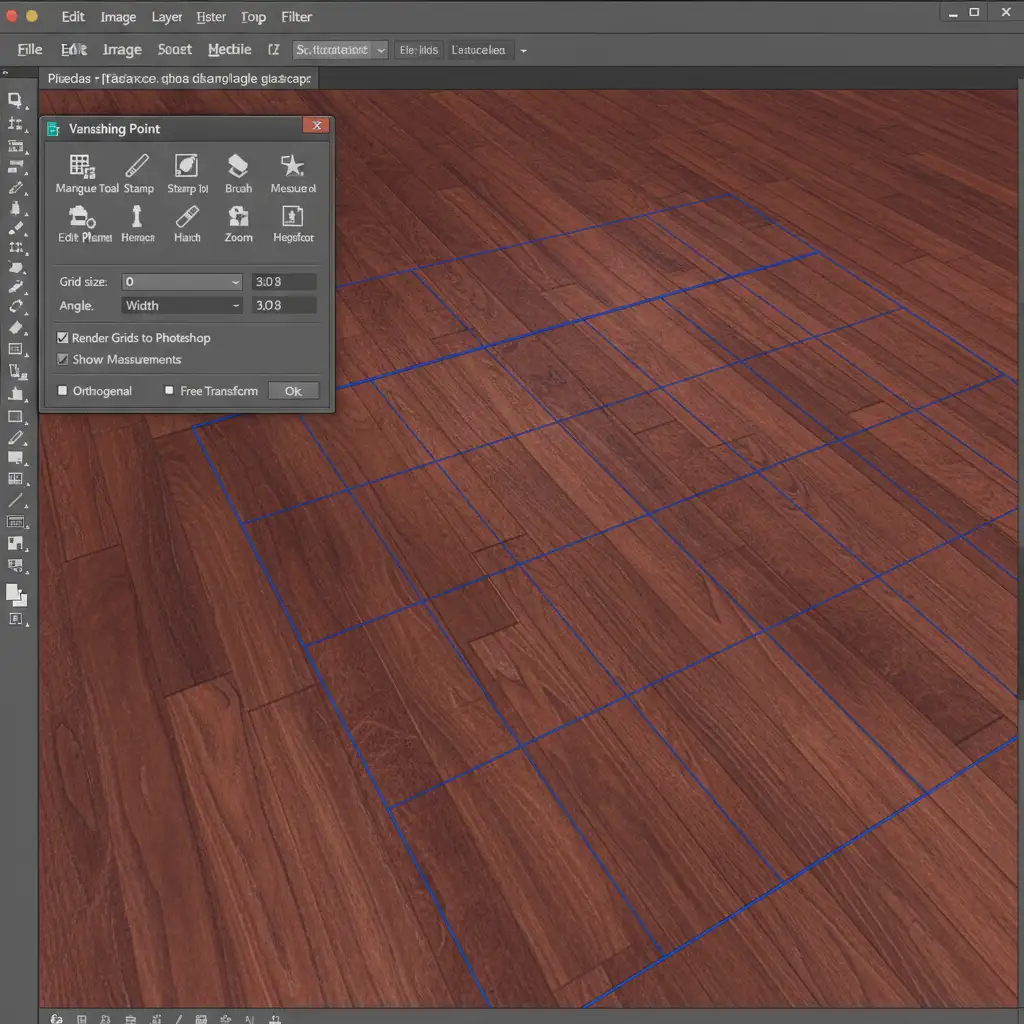
Method 2: The Vanishing Point Filter (The Pro Workaround)
When AI fails to capture the microscopic grain details, the Vanishing Point filter is the most reliable tool for structural cloning.
- Open the Filter: Go to Filter > Vanishing Point.
- Map the Grid: Use the Create Plane tool to draw a grid that perfectly matches the perspective angle of the hardwood floor. The grid will turn blue when Photoshop detects a valid perspective plane.
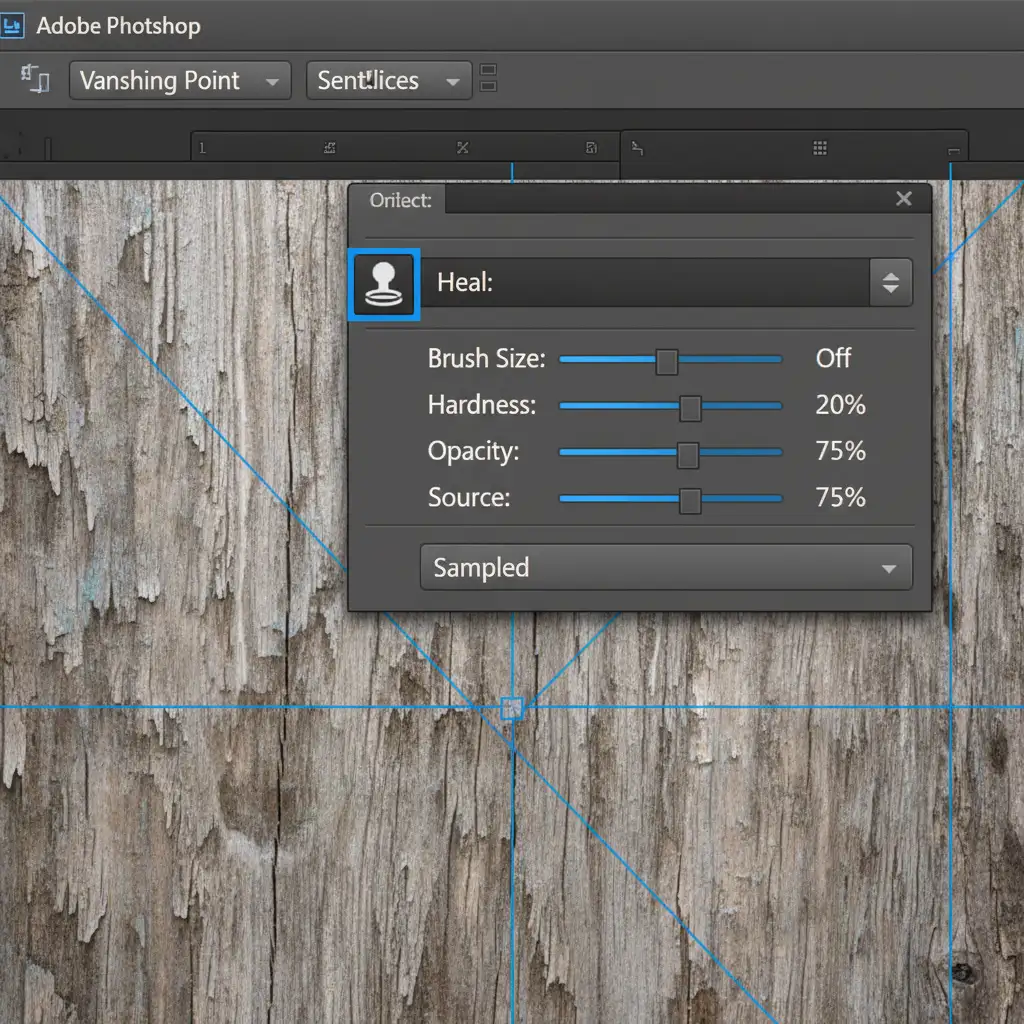
- Configure the Clone Stamp: Select the Vanishing Point Clone Stamp tool (shortcut S). Crucial step: Turn ‘Heal’ off in the top toolbar to prevent the tool from blending and smudging your high-frequency textures.
- Clone the Floorboards: Alt-click (Option-click on Mac) a clean section of the floor closer to the camera. As you paint over the area where the furniture used to be, Photoshop will automatically scale and angle the wood grain based on your blue perspective grid.
Method 3: Frequency Separation & Distort Transform (The Technical Deep-Dive)
For the most demanding high-end real estate photo editing, separating the texture from the lighting allows for pixel-perfect control.
Step 1: Separate the Frequencies
Split your image into a High-frequency layer (which holds the wood grain texture) and a Low-frequency layer (which holds the room’s color, shadows, and light).
Step 2: Fix the Lighting (Low Layer)
On the Low layer, select a soft Mixer Brush. Gently blend the harsh shadows and highlight areas left behind by the removed furniture. This ensures the floor’s lighting looks natural without affecting the texture.
Step 3: Rebuild the Grain (High Layer)
On your High layer, you can utilize the Pattern Stamp tool or manual transformations to rebuild the grain:
- Use the Lasso tool to copy a clean section of existing wood grain from another part of the floor.
- Convert this copied section into a Smart Object.
- Go to Edit > Transform > Distort. Manually pull the corner nodes to match the depth and angle of the surrounding floorboards.
- Apply a layer mask and use a soft brush to feather the edges for a seamless transition.
Outsource Your Complex Real Estate Photo Editing
Furniture removal wood floor texture recovery is a time-consuming, highly technical process. When you are managing high-volume real estate shoots or demanding commercial interior campaigns, spending hours rebuilding floorboards in the Vanishing Point filter eats into your profitability.
Complex interior retouching requires a delicate touch. Outsource your high-end real estate photo editing to Image Work India and Cloud Retouch. Our expert retouchers specialize in pixel-perfect object removal, flawless floor reconstruction, and precise wood grain alignment. Focus on shooting your next property, and let our team deliver mathematically perfect, magazine-ready interiors. Contact us today to streamline your post-production workflow.


