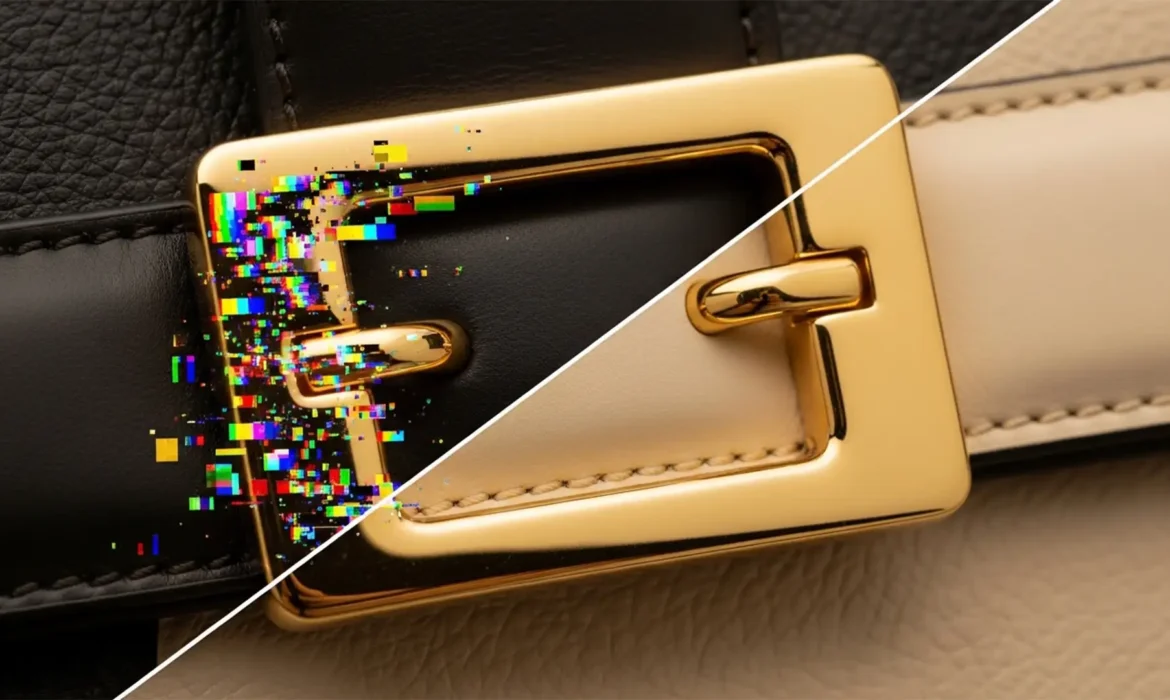
You are finalizing the edits on a luxury handbag, and everything looks perfect—until you zoom in on the metal buckle. You use Photoshop v25.0’s Generative Fill or the Remove Tool to clean up a distracting studio reflection on the hardware. But instead of a pristine, shiny surface, the software leaves behind a cluster of chaotic, multi-colored rainbow pixels.
This chromatic noise is a known hallucination in Adobe’s AI diffusion models. When dealing with the hard transitions between specular highlights and deep shadows on highly reflective, non-uniform materials, the AI struggles to interpolate the data, defaulting to randomized color splotches.
If you are tired of these glitches ruining your macro retouching workflow, here is the definitive guide to mastering the bag hardware reflection removal artifacts fix.
Why Photoshop’s AI Struggles with Metallic Reflections
In Adobe Photoshop v25.0 and later, AI tools revolutionized object removal. However, luxury bag hardware—like zippers, brass rivets, and polished buckles—presents a unique challenge.
Metals don’t have a single inherent color; their appearance is entirely dictated by environmental reflections, luminance, and contrast. When the AI attempts to reconstruct a removed reflection, it misinterprets the sharp, high-contrast gradients. Instead of generating a clean, monochromatic gradient, the model hallucinates, resulting in chaotic magenta, green, blue, and yellow chromatic noise.
Fortunately, you don’t have to abandon the AI tools entirely. By using the AI to generate the underlying physical texture and applying targeted color-correction techniques, you can achieve a flawless finish.
3 Professional Methods for the Bag Hardware Reflection Removal Artifacts Fix
Depending on the severity of the chromatic noise and your specific workflow, here are three proven techniques to neutralize the rainbow artifacts while preserving the metal’s structural integrity.
Method 1: The Quick Fix (Color Blending Mode)
This is the fastest way to eliminate localized rainbow blotches without destroying the AI-generated luminosity.
- Create a new blank layer directly above your AI-generated layer.
- Change the blending mode of this new layer to Color.
- Select the Brush Tool (B) with a soft edge.
- Hold Alt/Option to sample a clean, neutral tone from an adjacent, unaffected area of the metal hardware.
- Paint directly over the rainbow artifacts.
This instantly neutralizes the erratic colors, forcing the glitchy pixels to inherit the correct metallic hue while keeping the AI’s underlying light and shadow values intact.

Method 2: The Pro Workaround (Frequency Separation)
When the artifacts are accompanied by slight textural inconsistencies, Frequency Separation is the ideal bag hardware reflection removal artifacts fix.
- Run your standard Frequency Separation action to split your image into a Low layer (Color/Tone) and a High layer (Texture).
- Select the Low layer.
- Equip the Mixer Brush Tool with a clean, wet setting (e.g., Wet: 20%, Load: 20%, Mix: 20%, Flow: 20%).
- Gently brush over the rainbow blotches, blending the chaotic colors into the surrounding metallic tone.
Because the AI’s physical texture (scratches, metallic grain) is safely isolated on the High layer, blending the Low layer removes the chromatic noise without making the metal look plasticky or blurred.

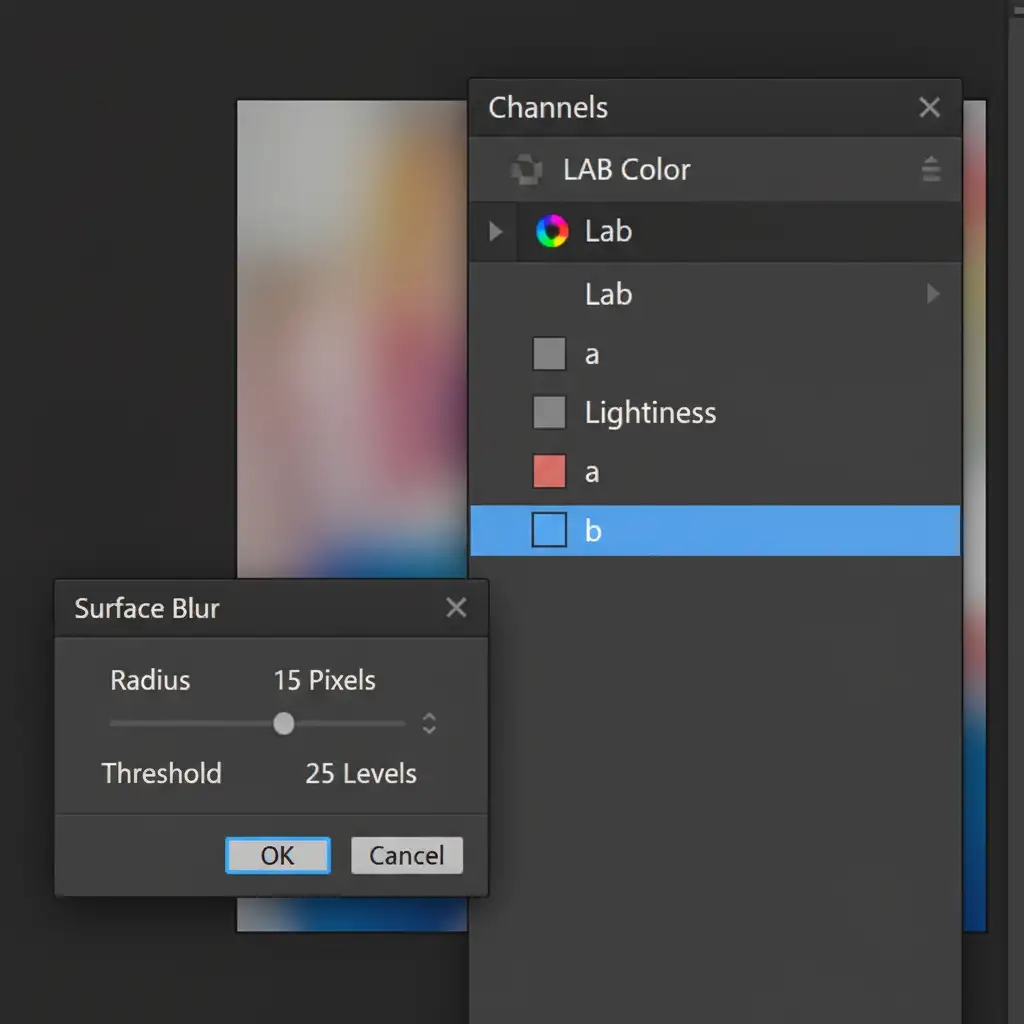
Method 3: The Technical Deep-Dive (LAB Color Mode Blur)
For severe, widespread chromatic noise across complex zippers or large buckles, LAB color mode offers mathematical precision. LAB separates image data into Lightness (L) and color channels (a and b), allowing you to destroy color noise without touching the structural detail.
- Create a Stamp Visible layer (Ctrl/Cmd + Shift + Alt/Option + E).
- Navigate to Image > Mode > Lab Color. (Flatten if prompted, or keep layers if you prefer working destructively on the stamped layer).
- Open the Channels panel and select only the ‘a’ channel (which controls magenta/green values).
- Go to Filter > Blur > Surface Blur. Adjust the radius and threshold until the magenta/green noise smooths out completely.
- Select the ‘b’ channel (which controls blue/yellow values) and apply the exact same Surface Blur.
- Click the composite Lab channel to view the result. The Lightness channel remains untouched, preserving all specular highlights and deep shadows.
- Navigate back to Image > Mode > RGB Color.
Outsource Your Luxury Accessory Retouching
Executing the perfect bag hardware reflection removal artifacts fix requires a deep understanding of light, texture, and advanced Photoshop techniques. When dealing with high-volume e-commerce catalogs or high-end editorial campaigns, spending hours fixing AI hallucinations simply isn’t viable.
Need pixel-perfect luxury product photos without the hassle? Outsource your complex accessory and hardware retouching to the experts at Image Work India and Cloud Retouch. Our specialized team of macro retouching professionals ensures flawless, artifact-free results that elevate your brand’s visual standard.
Contact us today to streamline your post-production workflow and let us handle the technical heavy lifting.


