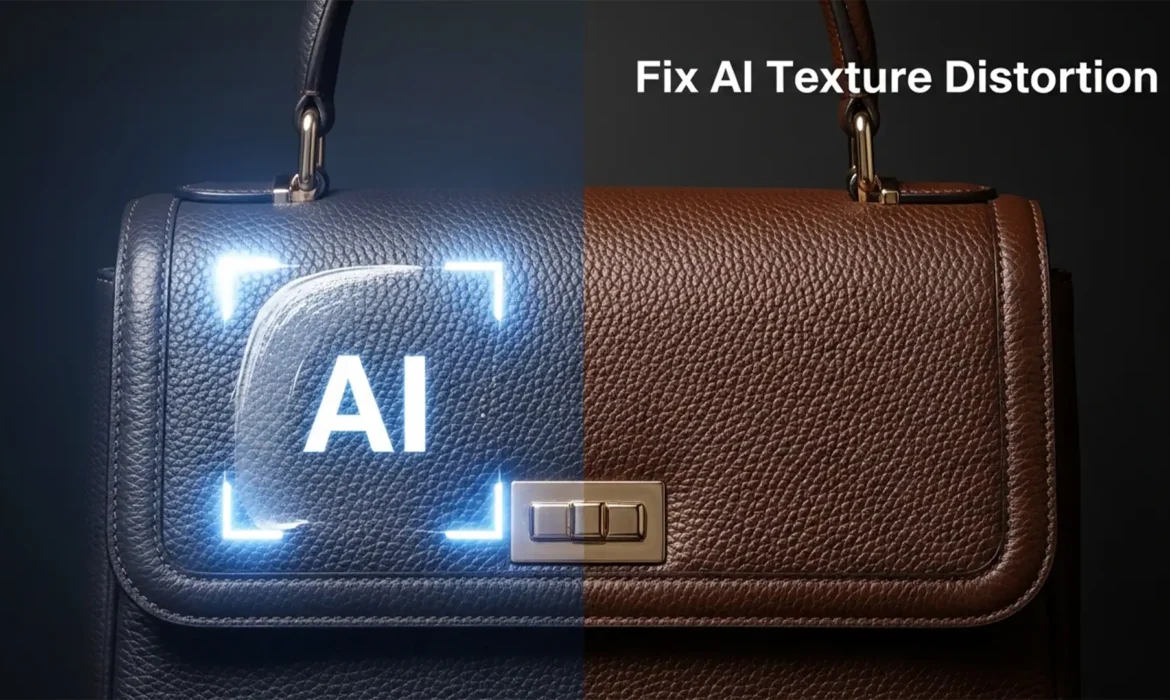
You are retouching a $2,000 luxury leather bag in Photoshop 2025. You use Generative Fill to remove a stray strap or extend the canvas. The color matches perfectly, but the texture? It looks like melted plastic.
The Adobe Firefly Image 3 Model is incredible for global lighting, but it notoriously fails at replicating structured organic micro-textures like pebbled leather grain. If you are tired of AI ruining your high-end product photos with blurred, smudged patches, you are in the right place.
Here is the exact professional workflow to fix Photoshop Generative Fill leather texture distortion and restore flawless realism to your e-commerce imagery.
Why Generative Fill Blurs Leather Textures
Before fixing the issue, it is vital to understand why it happens. Photoshop 2025 (v26.0+) utilizes the Firefly Image 3 Model. Like most diffusion models, Firefly prioritizes global lighting, color matching, and broad structural coherence over localized high-frequency detail.
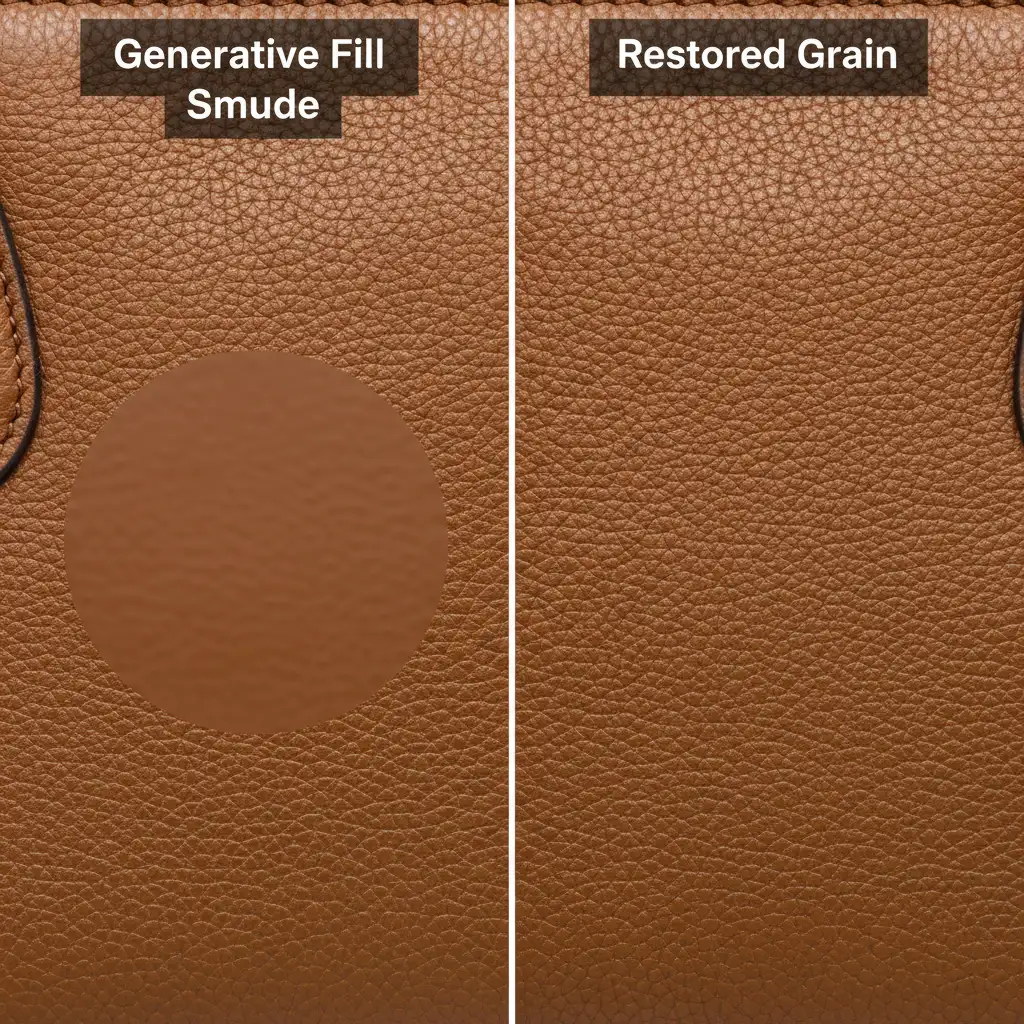
When applied to structured organic surfaces—such as pebbled leather grain, suede, or canvas—the AI interpolates the pixels too smoothly. The result is a loss of micro-texture, leaving a glaringly obvious “AI smudge” that destroys the luxury feel of the accessory.
To fix this, we must separate the texture from the tone, or force the AI to respect the grain.
Method 1: The Quick Fix (Texture Grafting via High Pass)
If you need a rapid solution to restore micro-texture over a small AI-generated patch, texture grafting using the High Pass filter is the most efficient method.
Step-by-Step High Pass Workflow
- Sample Clean Texture: Locate a clean, unedited patch of leather texture from the original image. Use the Marquee Tool to select it, and press Ctrl/Cmd + J to duplicate it onto a new layer.
- Position and Desaturate: Drag this copied texture over the smooth, AI-generated patch. Press Ctrl/Cmd + Shift + U to desaturate the layer.
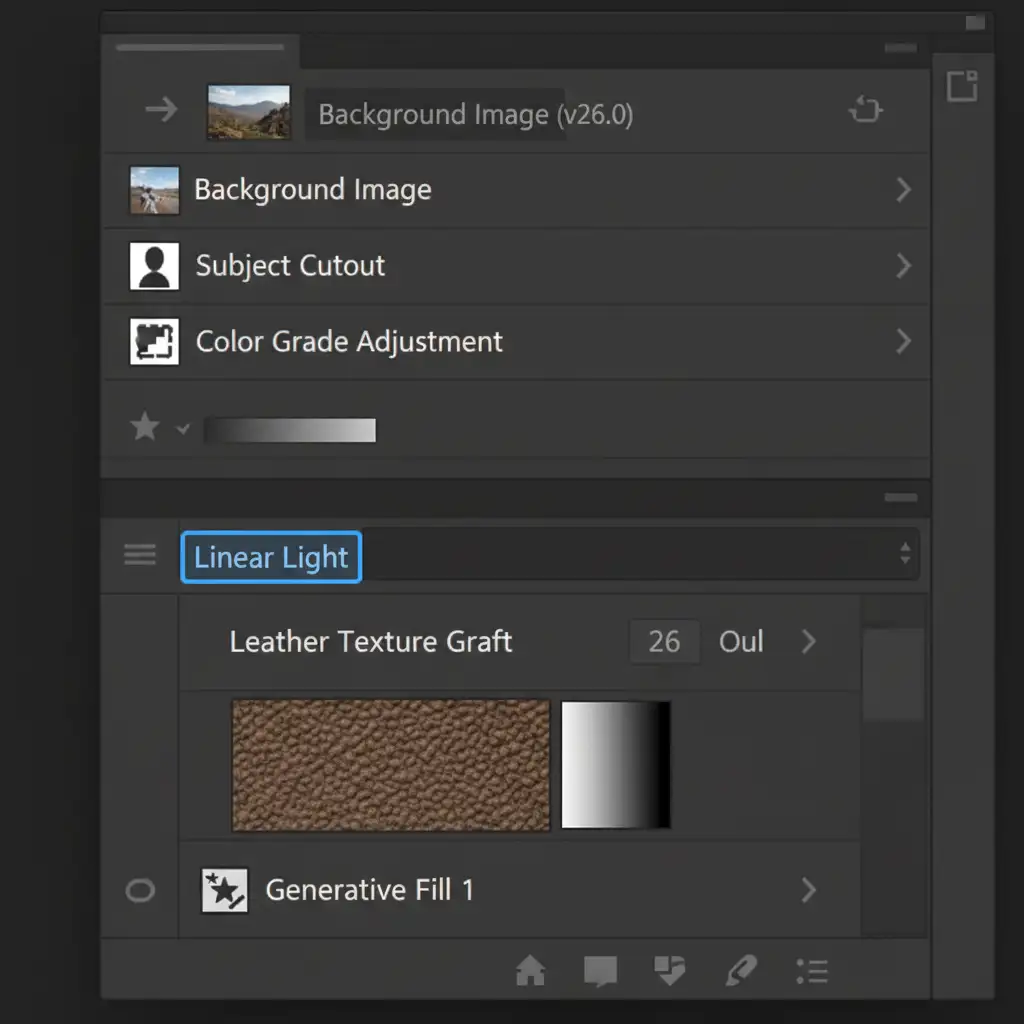
- Apply High Pass: Navigate to Filter > Other > High Pass. Set the radius between 2.0px and 4.0px. You want to see the sharp edges of the pebbled leather grain, but no underlying color.
- Change Blending Modes: Change the layer’s blend mode to Linear Light. The gray disappears, leaving only the crisp texture seamlessly grafted over the Generative Fill color.
- Masking: Add a black layer mask and carefully paint with a soft white brush to reveal the texture exactly where the AI smudged the image.
Method 2: The Pro Workaround (Frequency Separation)
For complex product photo retouching where lighting and texture gradients shift drastically, Frequency Separation is the industry-standard failsafe. This technique allows you to use Generative Fill for color correction without destroying the original grain.
Splitting Your Frequencies
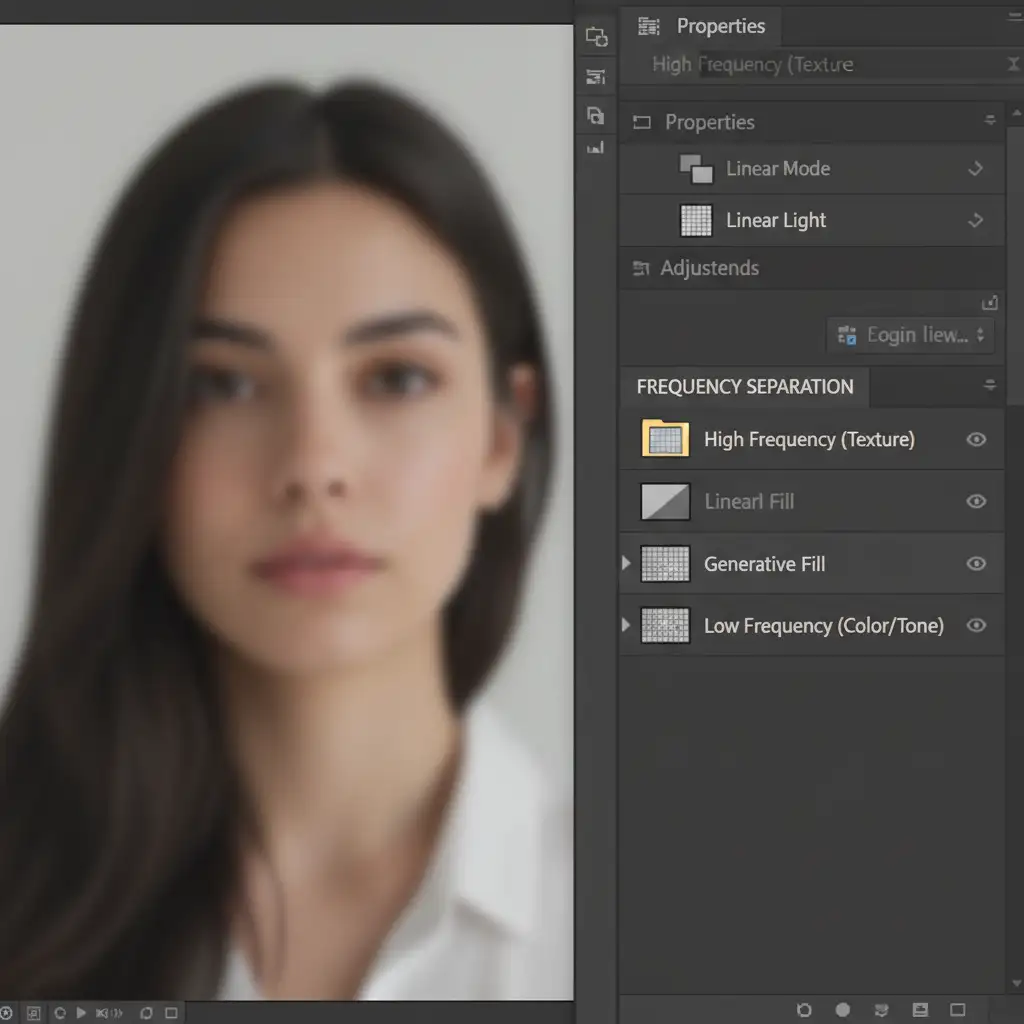
- Duplicate your base image twice. Name the bottom layer “Low Frequency” (Color/Tone) and the top layer “High Frequency” (Texture).
- Blur the Low Frequency layer just enough to hide the leather grain.
- Apply the Apply Image command to the High Frequency layer (subtracting the Low Frequency layer) and set its blend mode to Linear Light.
The Retouching Process
Instead of running AI on the flattened image, run Generative Fill ONLY on the Low-Frequency layer. This allows Firefly to fix the color, lighting, and underlying structure perfectly.
Next, select the High-Frequency layer and use the Clone Stamp Tool to manually tile real leather grain over the affected area. Because you are only cloning texture (not color or shadow), the clone stamping will be completely invisible, resulting in a flawless, non-destructive repair.
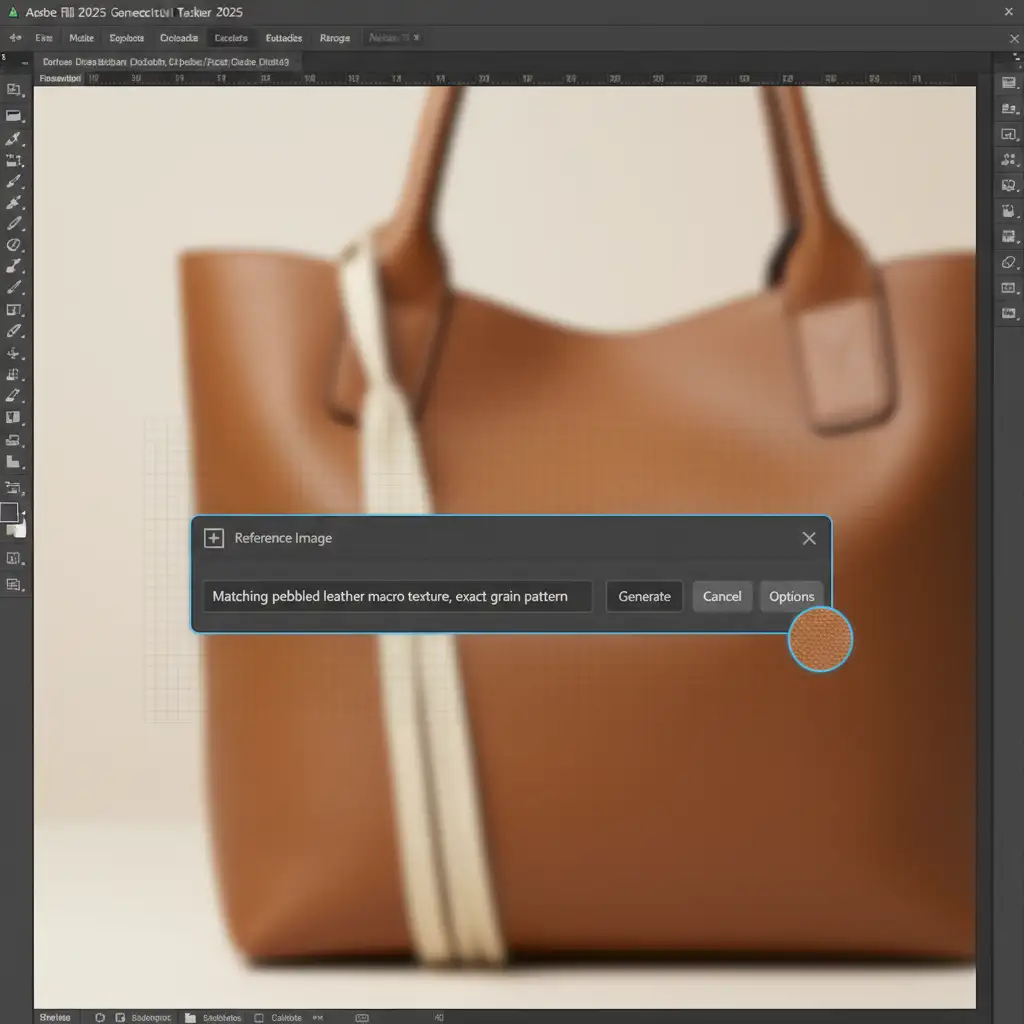
Method 3: The Technical Deep-Dive (Reference Image & Prompt Engineering)
Adobe introduced powerful new contextual tools in Photoshop 2025 (v26.0+). If you want the AI to do the heavy lifting from the start, you must utilize the new Reference Image feature combined with strict prompt engineering.
Forcing Firefly to Respect Micro-Texture
- Crop a Sample: Before using Generative Fill, crop a high-resolution, extreme close-up of the exact leather grain you want to replicate. Save this as a separate JPEG.
- Upload Reference: Make your selection on the main image and click Generative Fill. In the Contextual Taskbar, click the Reference Image icon and upload your cropped macro texture.
- Prompt Engineering: Do not leave the prompt blank. Use precise, structural keywords to guide the Firefly Image 3 Model.
- Effective Prompt Example: “Matching pebbled leather macro texture, exact grain pattern, highly detailed organic surface.”
By providing both a visual map and strict text parameters, you prevent the diffusion model from defaulting to smooth interpolation, drastically reducing the plastic distortion effect.
Video Tutorial: Mastering Leather Texture Recovery
Watch the complete workflow in action to see how these three methods seamlessly integrate into a professional high-end retouching pipeline.
Scale Your E-Commerce Retouching with Image Work India & Cloud Retouch
Fixing Photoshop Generative Fill leather texture distortion is critical for maintaining luxury brand standards, but manual texture grafting and frequency separation take valuable time. When you are processing hundreds of product SKUs a day, AI blunders create massive workflow bottlenecks.
Struggling to keep your product textures perfect at scale? Let Image Work India and Cloud Retouch handle your e-commerce and luxury retouching needs with pixel-perfect precision. Our expert retouching teams specialize in high-end product editing, ensuring every micro-texture, shadow, and color profile is flawless—without the plastic AI look.
Stop wasting hours fixing AI mistakes. Contact Image Work India today for a free trial and let our professionals elevate your product photography to the highest industry standards.


