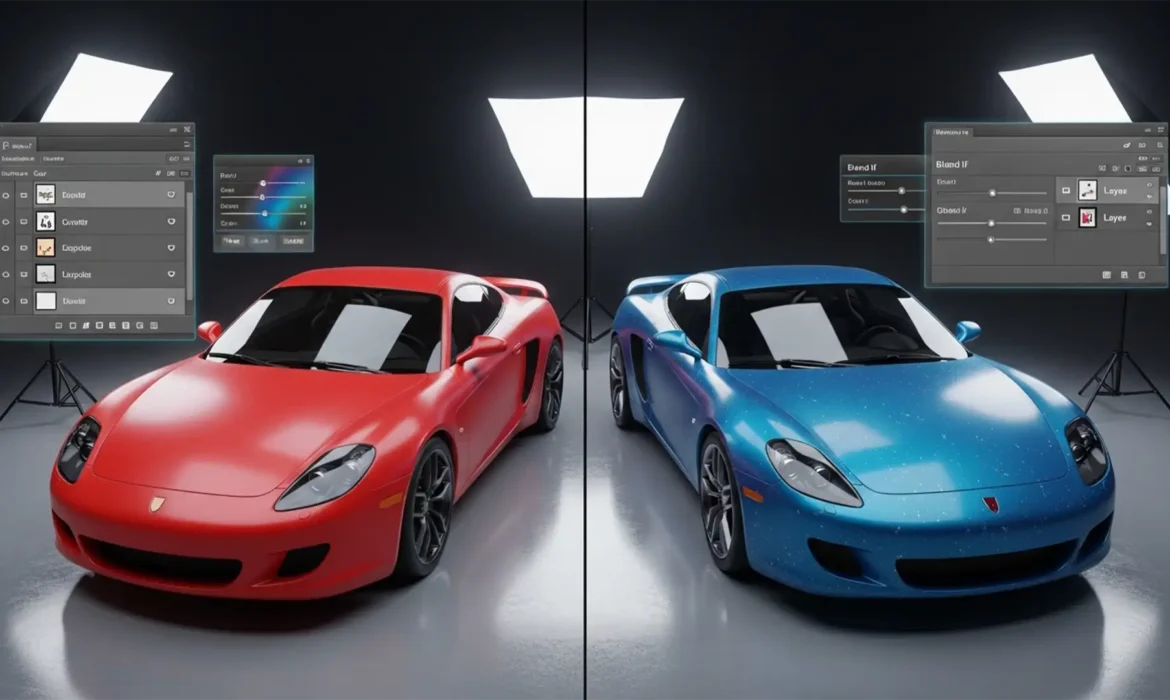
Have you ever tried change car color in Adobe Photoshop CC, only to end up with a vehicle that looks like a cheap plastic toy? You’re not alone. When automotive retouchers rely solely on basic Hue/Saturation adjustments, they indiscriminately replace hues, instantly destroying the tonal variance. This wipes out the specular highlights, metallic flakes, and environmental reflections that give a car its realistic, glossy clear coat.
If you are struggling with retaining reflections when changing car color in Photoshop, this guide is your definitive solution. We will walk you through the professional techniques required to separate color data from luminosity data, ensuring your automotive edits look showroom-ready every single time.
Why Basic Hue/Saturation Fails Automotive Edits
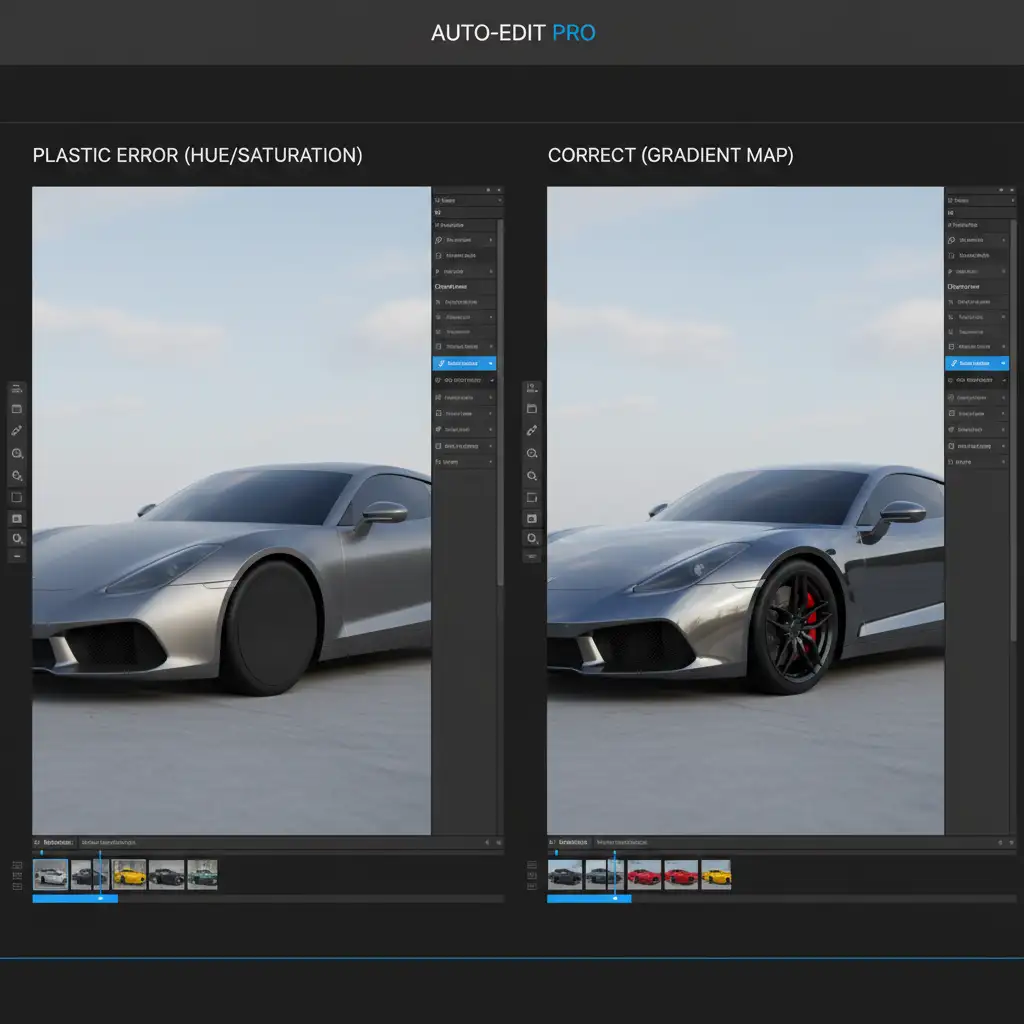
In Adobe Photoshop CC (specifically v24.x and v25.x), applying a standard Hue/Saturation adjustment layer to change a car’s paint job often results in a ‘flat’ or ‘plastic’ appearance.
The core technical issue lies in the loss of environmental reflections and specular highlights. These elements naturally map to the luminosity values of the original paint layer. A basic hue shift applies color blindly over these bright and dark zones, flattening the dynamic range of the vehicle’s curves and clear coat. To fix this, you must learn to manipulate the luminance map of the image.
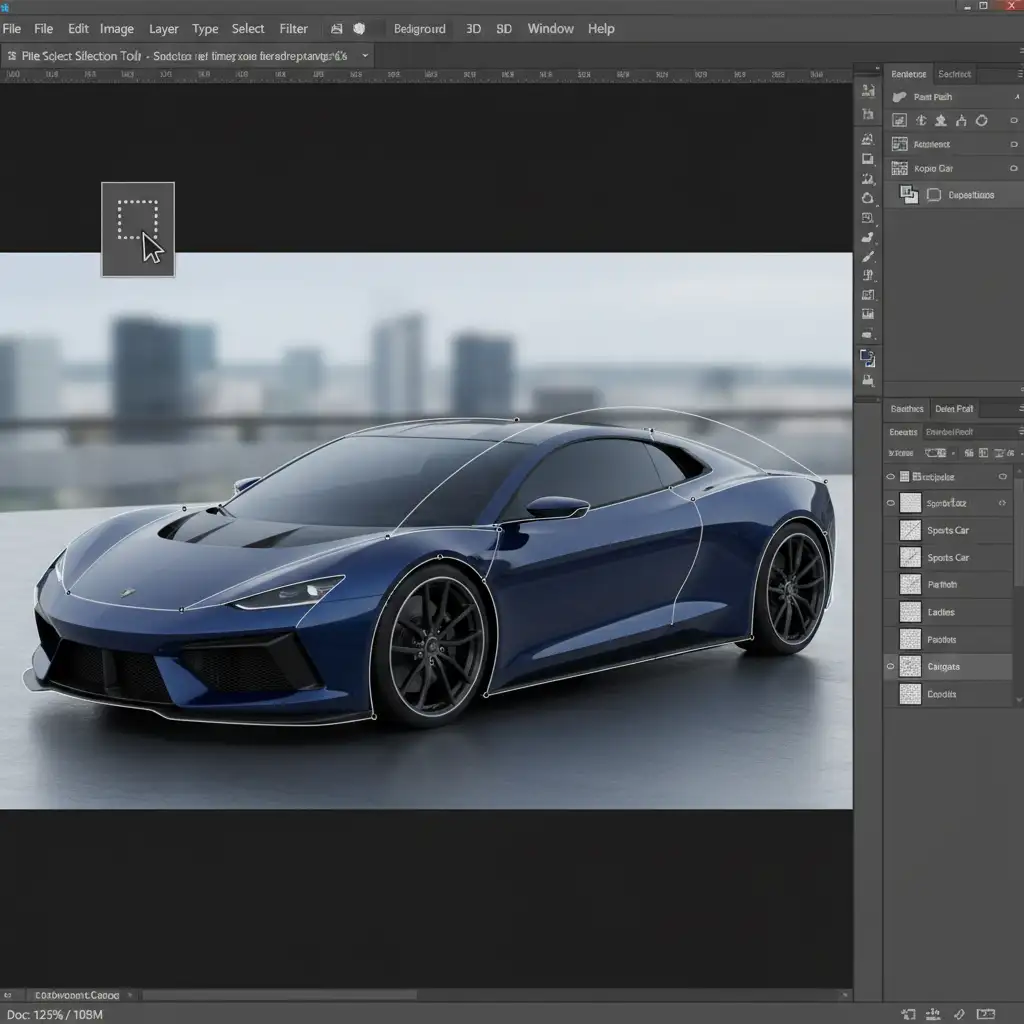
Step 1: The Crucial Foundation – Precision Masking
Before applying any color adjustments, you must isolate the car body perfectly. Any bleed onto windows, chrome trims, or tires will instantly ruin the illusion.
- Select the Pen Tool (for maximum precision) or the Object Selection Tool (for speed in newer Photoshop versions).
- Carefully trace the painted surfaces of the car body.
- Exclude headlights, grilles, windows, and rubber trims.
- Save this selection as a layer mask for your upcoming adjustments.
The Pro Workflows: Retaining Reflections When Changing Car Color in Photoshop
Depending on the complexity of the original paint (e.g., matte vs. heavy metallic flake), you have three distinct methods to achieve a flawless color swap.
Method A: The Quick Fix – Blend Modes
If you are working on a tight deadline, you can modify the standard Hue/Saturation method using Blend Modes.
- Create a Hue/Saturation adjustment layer and apply your car body mask.
- Ensure it functions as a Clipping Mask if you have the car isolated on its own layer.
- Change the adjustment layer’s Blend Mode from ‘Normal’ to ‘Color’.
- This explicitly tells Photoshop to replace the hue while retaining the underlying luminosity of the original paint. Tweak the Lightness slider cautiously to avoid washing out the shadows.
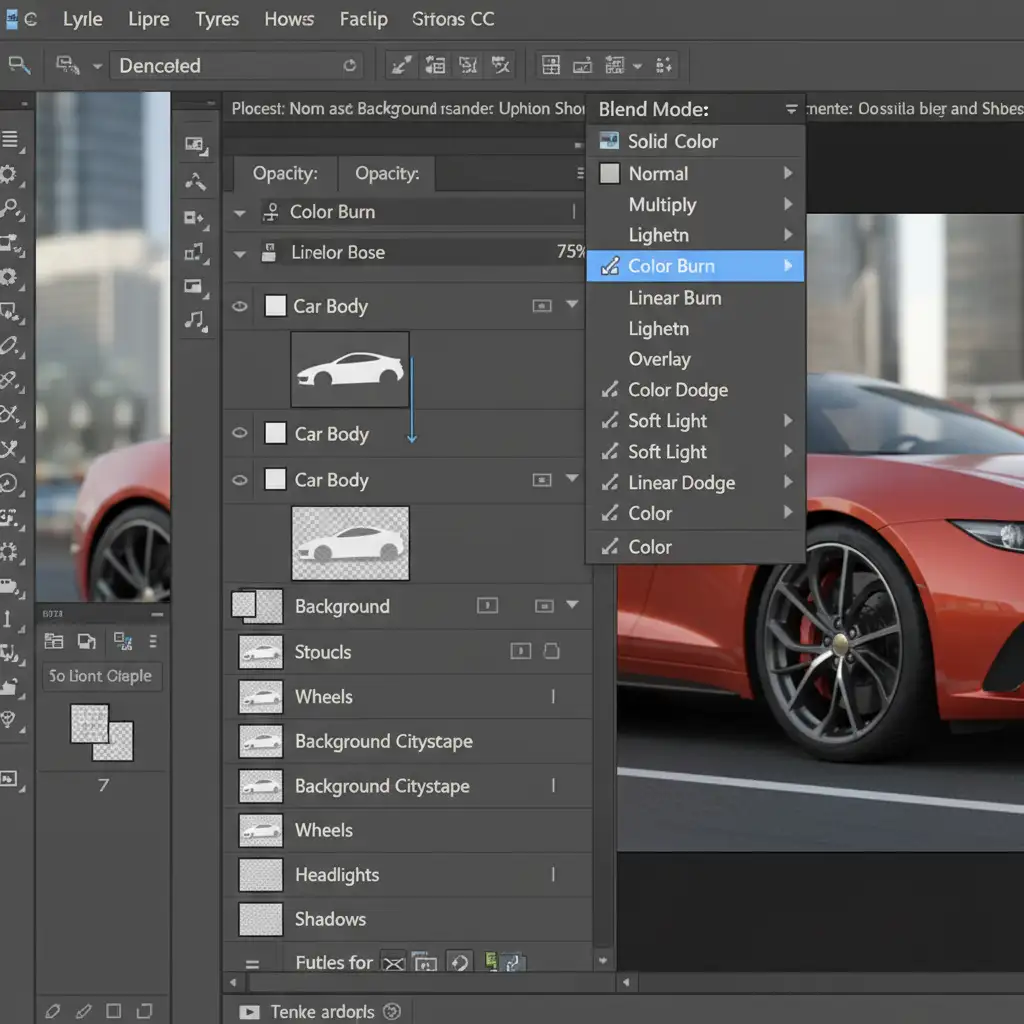
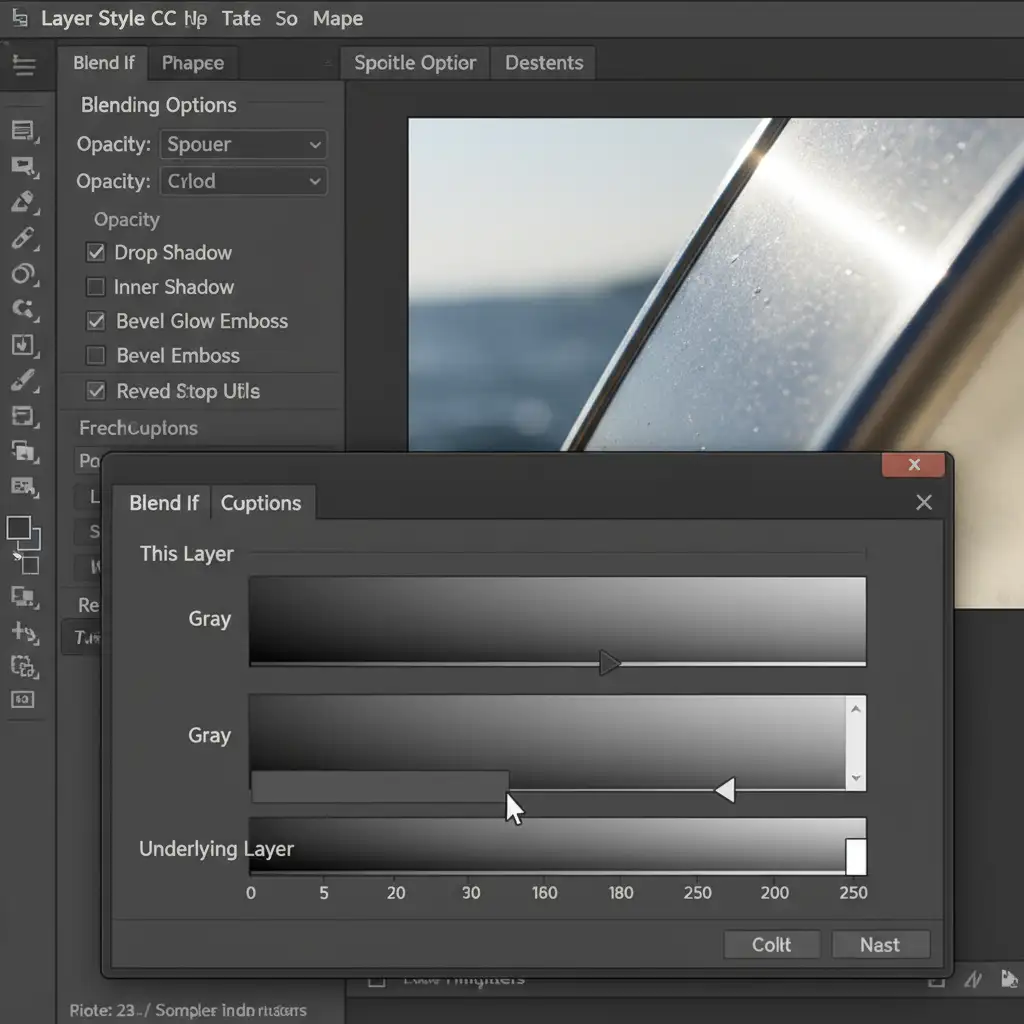
Method B: The Industry Standard – Solid Color Layers & “Blend If”
For a more robust and realistic result, automotive retouchers rely on Layer Style manipulation, specifically the Blend If function.
- Create a Solid Color adjustment layer using your precise car body mask. Choose your new target color.
- Change the Blend Mode to ‘Multiply’ (for darker colors) or ‘Color’ (for mid-tones).
- Double-click the Solid Color layer to open the Layer Style dialogue box.
- Navigate to the bottom section labeled Blend If.
- Go to the Underlying Layer gradient bar. Hold Alt (Windows) or Option (Mac) and click the right (white) slider to split it in half.
- Drag the left half of the split slider toward the left. You will watch the bright specular highlights and environmental reflections magically punch through the new color, restoring the glossy clear coat finish.
Method C: The Ultimate Precision – Gradient Maps & Luminosity Masking
When you need absolute perfection—such as turning a black car white or vice versa—you must utilize a Gradient Map coupled with Luminosity Masking.
- Duplicate your base car layer and desaturate it entirely (Ctrl/Cmd + Shift + U). This creates a pure luminance map of the vehicle’s lighting.
- Create a Gradient Map adjustment layer and clip it to this black-and-white base.
- Click the gradient bar to edit the colors. Map your shadows (left side) to a dark version of your target color, midtones (center) to the true hex code of the target color, and highlights (right side) to pure white or very light gray.
- Because the Gradient Map forces the new colors to adhere strictly to the tonal values of the desaturated base, your peak whites remain pure. This guarantees that every single reflection, metallic flake, and highlight is perfectly preserved.
High-Volume Dealership Edits? Let the Experts Handle It
Retaining reflections when changing car color in Photoshop is a meticulous process. While mastering Blend If, Luminosity Masking, and Gradient Maps will elevate your portfolio, executing these techniques flawlessly across hundreds of dealership inventory photos takes massive amounts of time.
If you are struggling to get showroom-quality results at scale, it’s time to outsource. Image Work India and Cloud Retouch specialize in flawless, high-volume automotive photo editing. From exact manufacturer color matching to deep background replacements and reflection preservation, our expert retouchers deliver pixel-perfect vehicles that drive conversions.
Stop wrestling with plastic-looking car edits. Contact Image Work India or Cloud Retouch today and let us transform your automotive inventory into stunning, true-to-life imagery.


