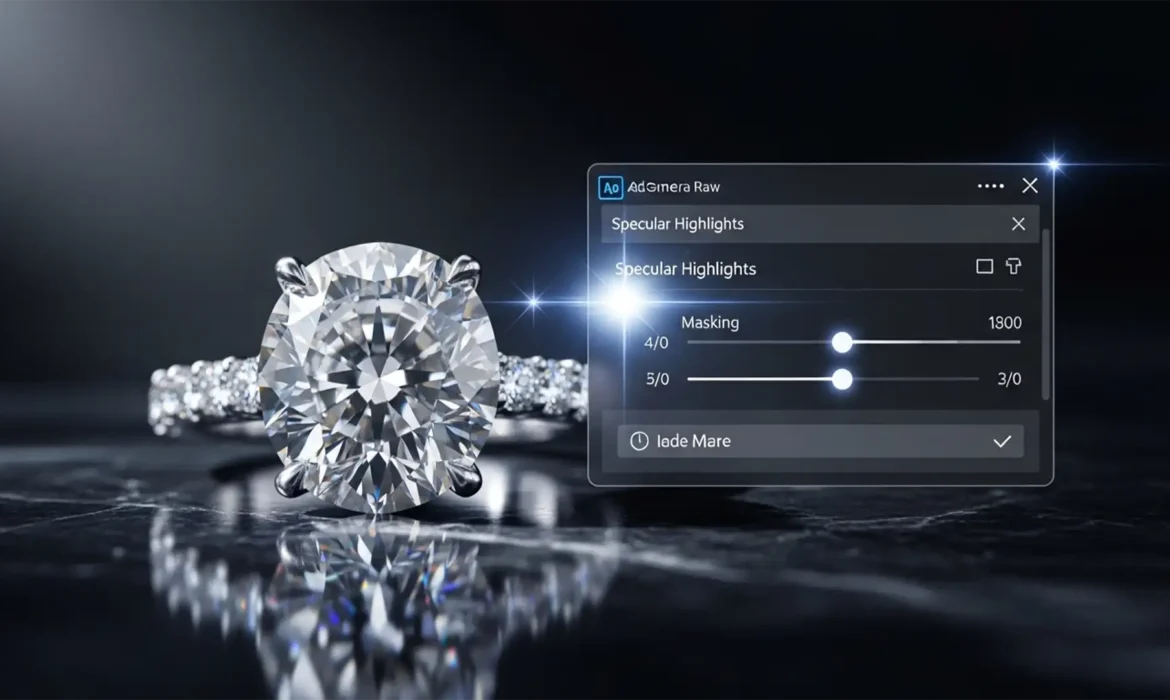
Nothing ruins a high-end jewelry photo faster than blown-out specular highlights. As a jewelry photographer or retoucher, you know the struggle: you try to pull down the harsh glare on a diamond, and suddenly, the stone looks flat, dull, and lifeless. Historically, making global exposure adjustments destroyed the gem’s natural fire and altered its refractive index.
But with Adobe Camera Raw v16.x and Photoshop v25.x, mastering Camera Raw reflections control for jewelry is easier than ever. Thanks to advanced AI-powered masking and selective tonal adjustments, you can now erase distracting glare while perfectly preserving the brilliant sparkle of your diamonds.
In this guide, we will walk you through three professional techniques to control reflections, ranging from quick AI fixes to advanced frequency separation.
The Challenge: Taming Specular Highlights Without Losing the Sparkle
Diamonds and precious metals are highly reflective. When shooting jewelry, studio strobes inevitably create bright white hotspots. While a slight clipping warning in your histogram is normal for diamonds, massive blocks of pure white glare obscure the facets and introduce unwanted color fringing.
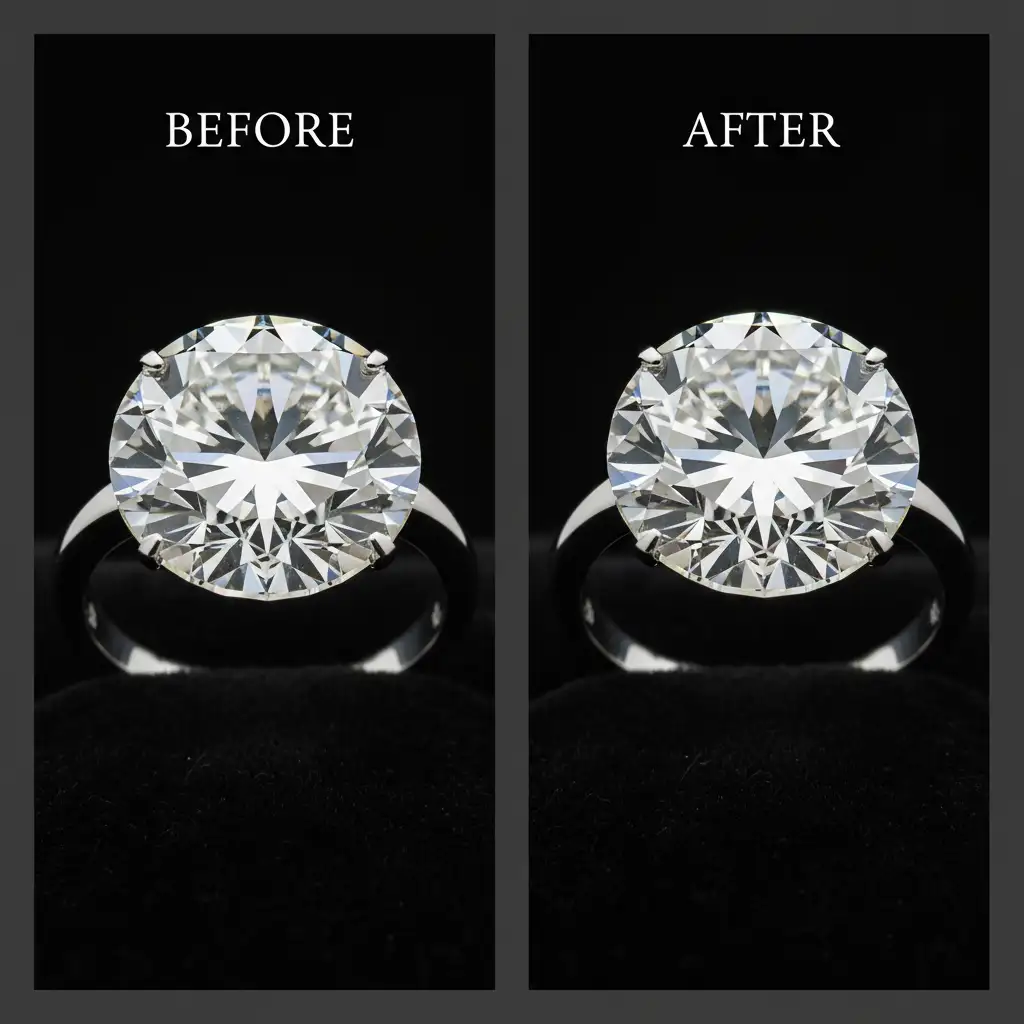
The goal of professional retouching is to dampen these highlights selectively. Here are the three best methods to achieve flawless reflection control.
Method 1: The Quick Fix Using ACR’s AI Object Selection
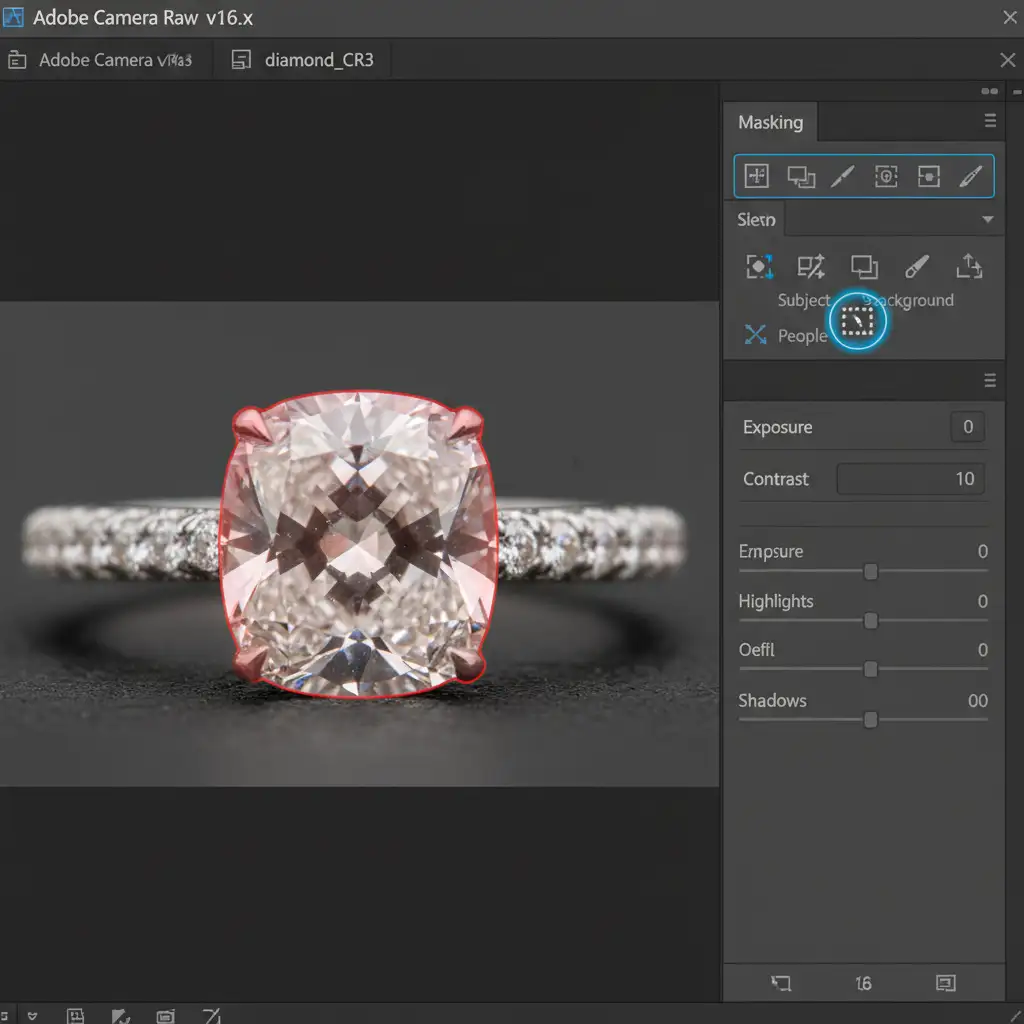
If you are processing batches of images and need a fast, effective solution, the Camera Raw filter offers a powerful AI-driven masking tool. This method works perfectly for isolating the gemstone from the metal band and background.
Step-by-Step AI Masking
- Open your raw image in Adobe Camera Raw (or apply the Camera Raw filter in Photoshop).
- Navigate to the Masking panel on the right toolbar.
- Click on Select Object (the AI object selection tool).
- Paint a rough brush stroke over the diamond. Photoshop will automatically snap the mask to the edges of the gemstone.
- With the mask active, lower the Highlights and Whites sliders slightly.
- To ensure the diamond doesn’t lose its life, bump up the Clarity slider. This enhances midtone contrast, restoring the sharp, sparkling facets.
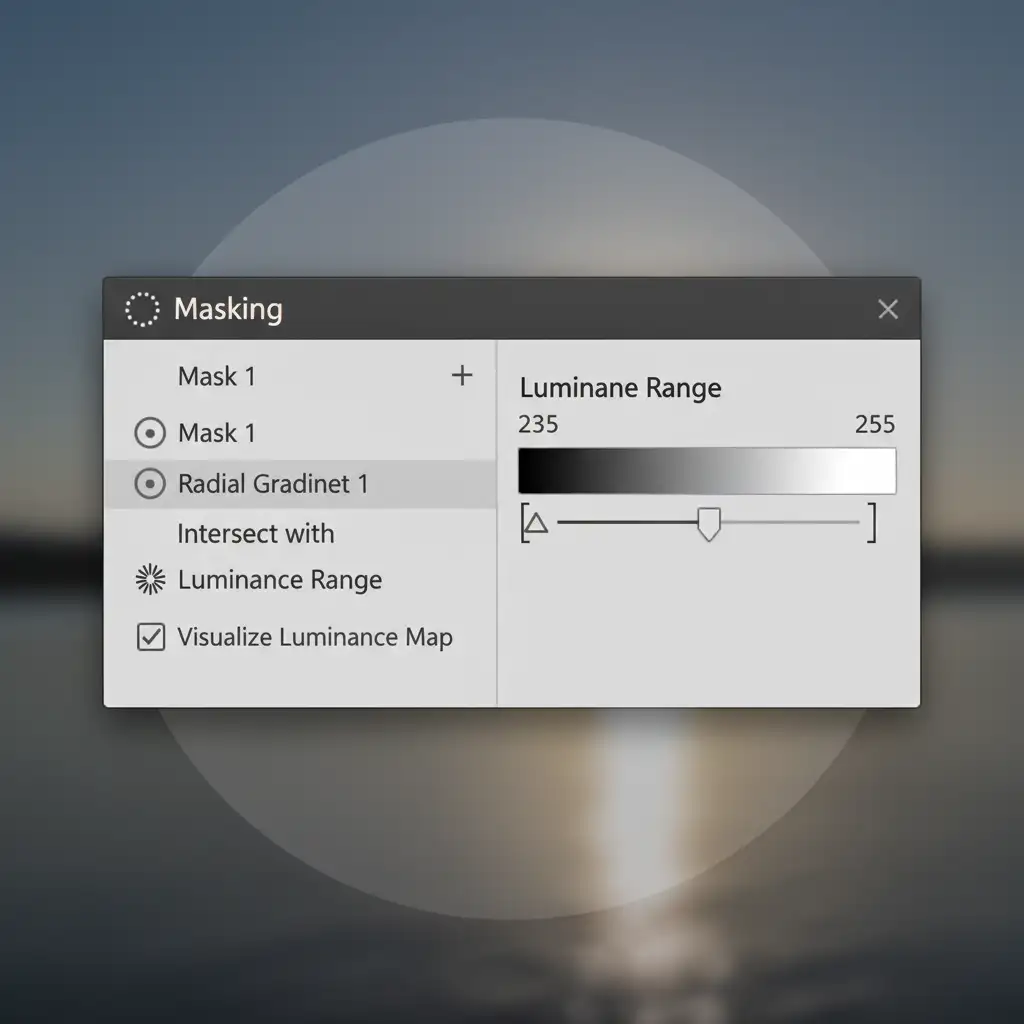
Method 2: The Pro Workaround with Luminance Range Masking
Sometimes, AI object selection grabs the entire diamond, but you only want to target a specific glaring facet. This is where combining Radial Gradients with a Luminance Range mask gives you surgical precision.
Targeting the Glare
- In the Masking panel, create a Radial Gradient and position it directly over the distracting glare on the diamond.
- In the mask settings, click the three dots to open the mask menu and choose Intersect Mask With > Luminance Range.
- Use the eyedropper or the luminance slider to restrict the mask only to the brightest specular highlights.
- Reduce the Exposure and Highlights sliders to pull back the glare.
- The Pro Secret: Increase the Dehaze slider. While it sounds counterintuitive, adding Dehaze to a bright highlight restores micro-contrast and structure to the blown-out facet, preventing it from looking like a dull gray smudge.
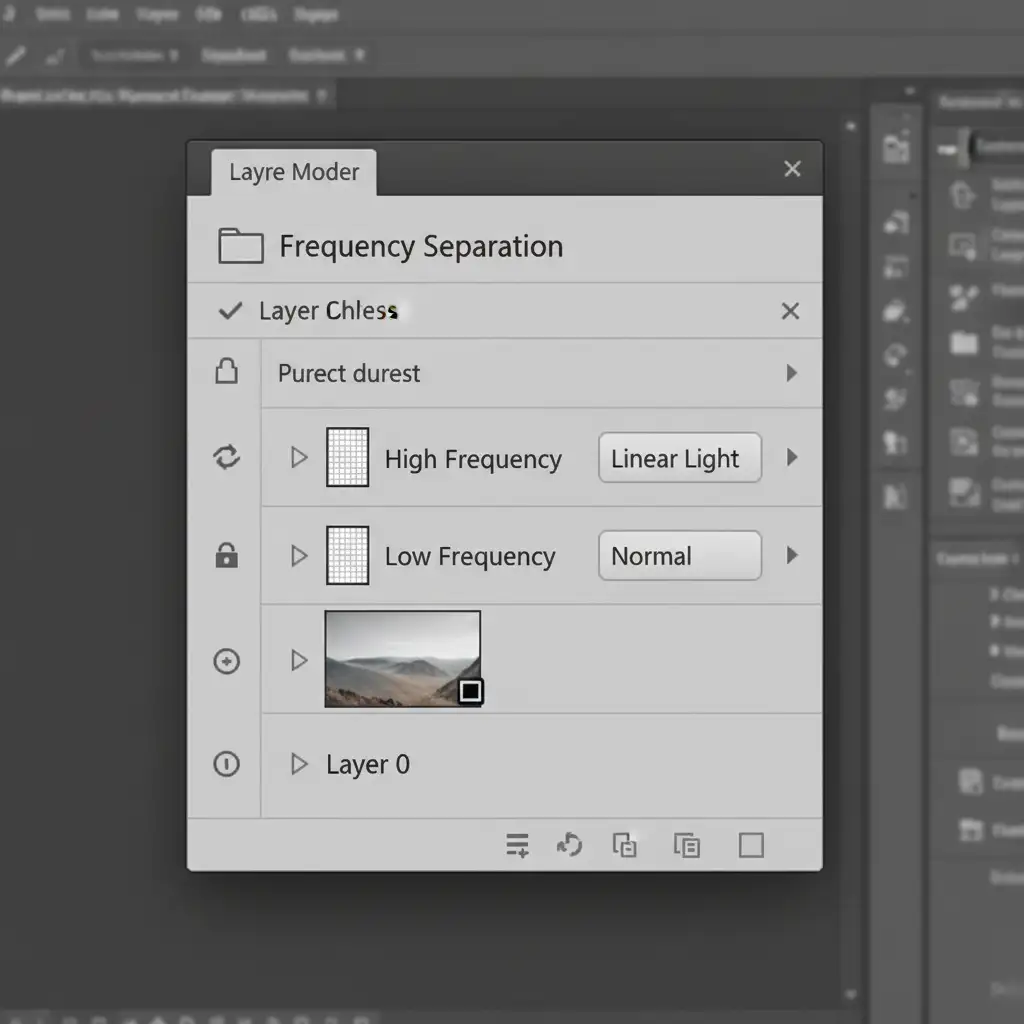
Method 3: The Technical Deep-Dive into Frequency Separation
When Camera Raw adjustments aren’t enough to fix completely blown-out pixels, you must move into Photoshop for advanced pixel-level retouching.
Preserving Texture and Fire
To perform non-destructive retouching, always open your raw file as a Smart Object. This allows you to jump back into Camera Raw if you need to tweak the base exposure later.
- Open your image in Photoshop as a Smart Object.
- Set up your frequency separation layers. This technique separates the image into two layers: a Low-Frequency layer (containing color and tone) and a High-Frequency layer (containing texture, sharp edges, and sparkle).
- Select the Low-Frequency layer. Use the Mixer Brush or Clone Stamp tool to gently blend away the harsh white glare.
- Because the sharp facet lines and micro-sparkles live on the High-Frequency layer, modifying the tones underneath will completely remove the distraction without destroying the realistic texture of the diamond.
Why Outsource Your Jewelry Retouching?
Mastering Camera Raw reflections control for jewelry takes time, patience, and a deep understanding of how light interacts with precious stones. If you are handling high-volume commercial shoots, spending 15 minutes per image tweaking Luminance Range masks and running frequency separation simply isn’t scalable.
Struggling to get that perfect diamond sparkle? Outsource your jewelry retouching to Image Work India or Cloud Retouch. Our team of expert retouchers specializes in high-end commercial jewelry editing. We know exactly how to eliminate distracting glare, correct color fringing, and enhance the natural fire of your diamonds for flawless, conversion-ready results.
Contact Image Work India and Cloud Retouch today to elevate your jewelry photography portfolio.


