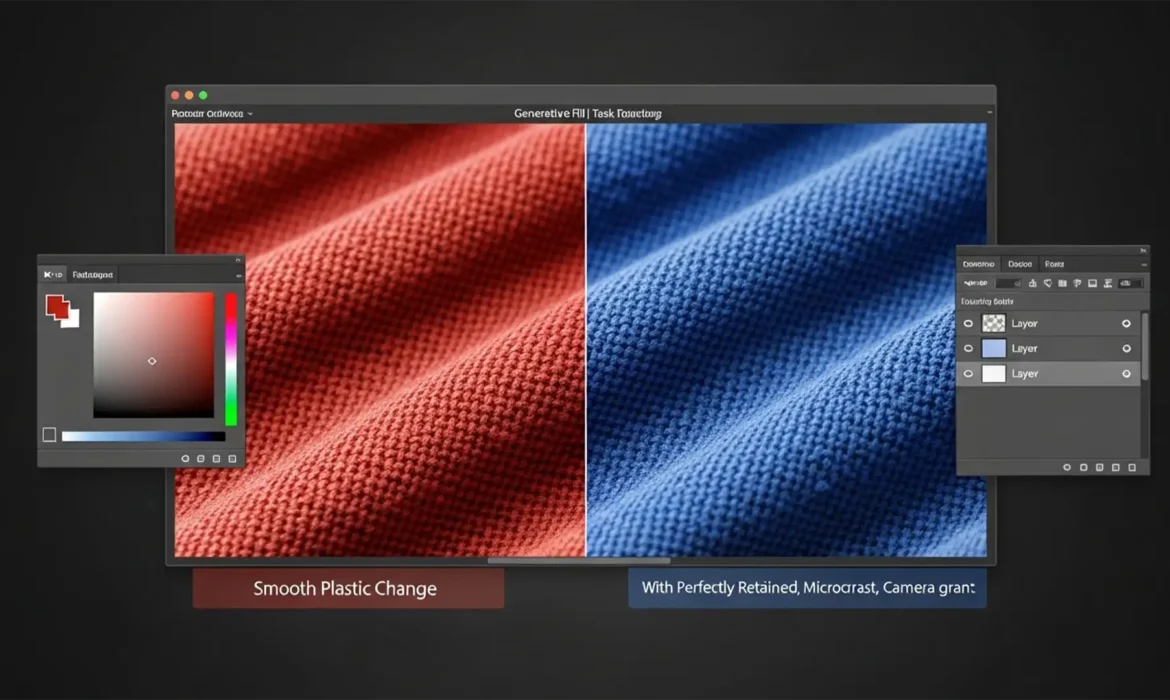
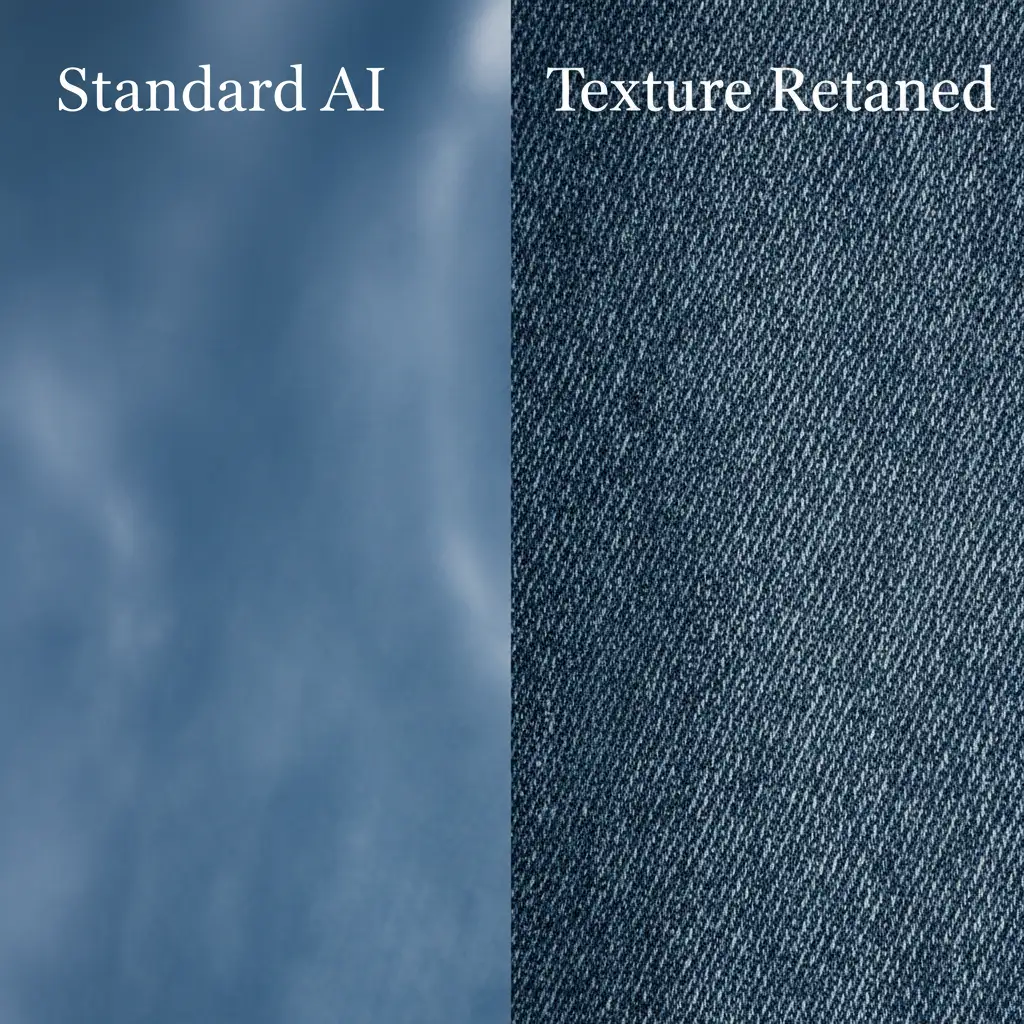
You tried to change the color of a product using Photoshop’s Generative Fill. It swapped the color perfectly, but now the object looks like smooth, plastic garbage. The beautiful fabric weave, the delicate micro-contrast, and the realistic grain are completely gone.
This happens because Generative Fill synthesizes entirely new pixels, overwriting your original photographic data. If you are struggling to fix generative fill texture loss color change, you aren’t alone. It is the number one complaint among commercial retouchers using Photoshop v25.0 and Beta v26.x.
In this guide, we will show you exactly how to combine AI speed with professional retouching workflows to change colors while preserving 100 percent of your original texture.
Why Does Generative Fill Destroy Original Texture?
Photoshop Generative Fill is powered by the Adobe Firefly model. When you lasso an object and prompt a color change, the AI doesn’t just tint the existing pixels. It generates a completely new image patch based on its training data.
Because it lacks the context of your camera’s specific sensor noise or the exact physical properties of your subject, it defaults to a generalized, smoothed-out interpretation. This results in a devastating loss of micro-contrast and realism, rendering the image unusable for high-end e-commerce or fashion photography.
Fortunately, you can bypass this limitation using non-destructive Photoshop techniques.
3 Methods to Fix Generative Fill Texture Loss Color Change
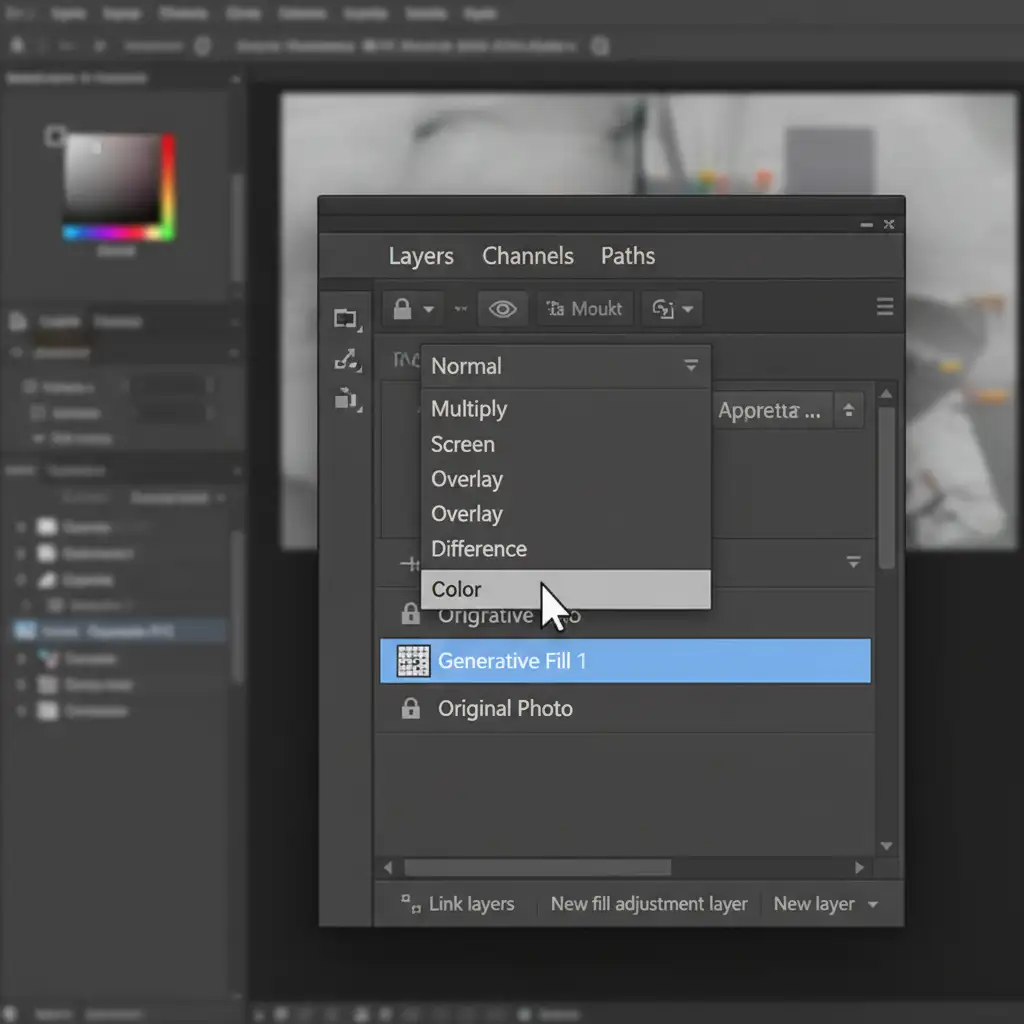
Method 1: The Quick Fix Using Blending Modes
The fastest way to retain your texture while keeping the AI-generated color is by utilizing Blending Modes. This technique separates the luminosity (light and texture) of your original image from the color values of the AI layer.
- Make your selection and run Generative Fill to change the object’s color.
- Once the generation is complete, select the Generative Layer in your Layers panel.
- Change the blending mode from Normal to Color (or Hue, depending on the vividness required).
By switching to the Color blend mode, Photoshop applies only the hue and saturation from the AI layer. The underlying luminosity, shadows, highlights, and physical textures from your original background layer show through perfectly.
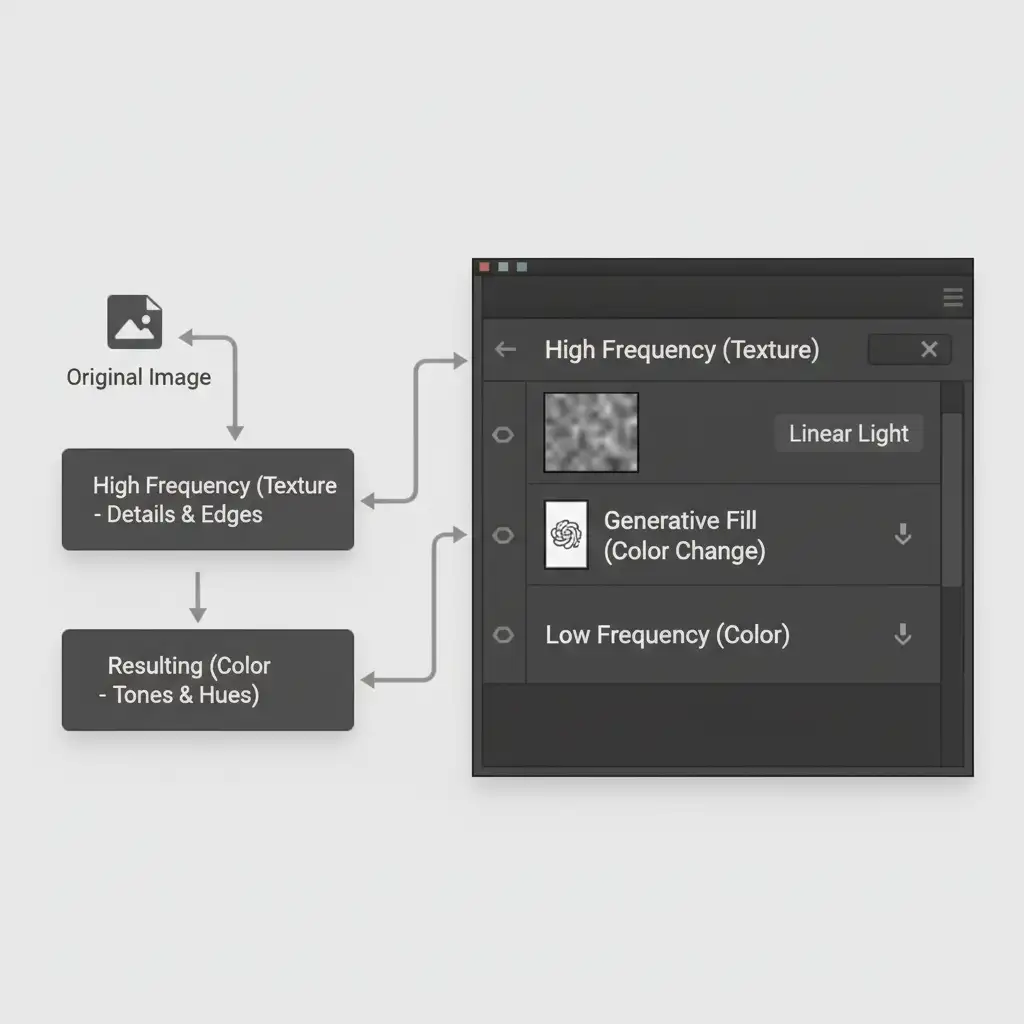
Method 2: The Pro Workaround with Frequency Separation
For complex images where blending modes introduce color bleeding or fail to mask properly, Frequency Separation is the industry-standard solution. This method physically separates your image into two layers: color (low-frequency) and texture (high-frequency).
- Run your standard Frequency Separation action to split the image.
- You will now have a Low-Frequency (Color/Tone) layer and a High-Frequency (Texture/Details) layer, usually created using the High Pass Filter.
- Make your selection on the Low-Frequency layer.
- Apply Generative Fill to change the color only on the low-frequency layer.
- Keep your High-Frequency texture layer at the very top of the layer stack, set to the Linear Light blend mode.
Because the AI is only altering the blurred color layer beneath, your original, pixel-perfect texture remains completely untouched on top.
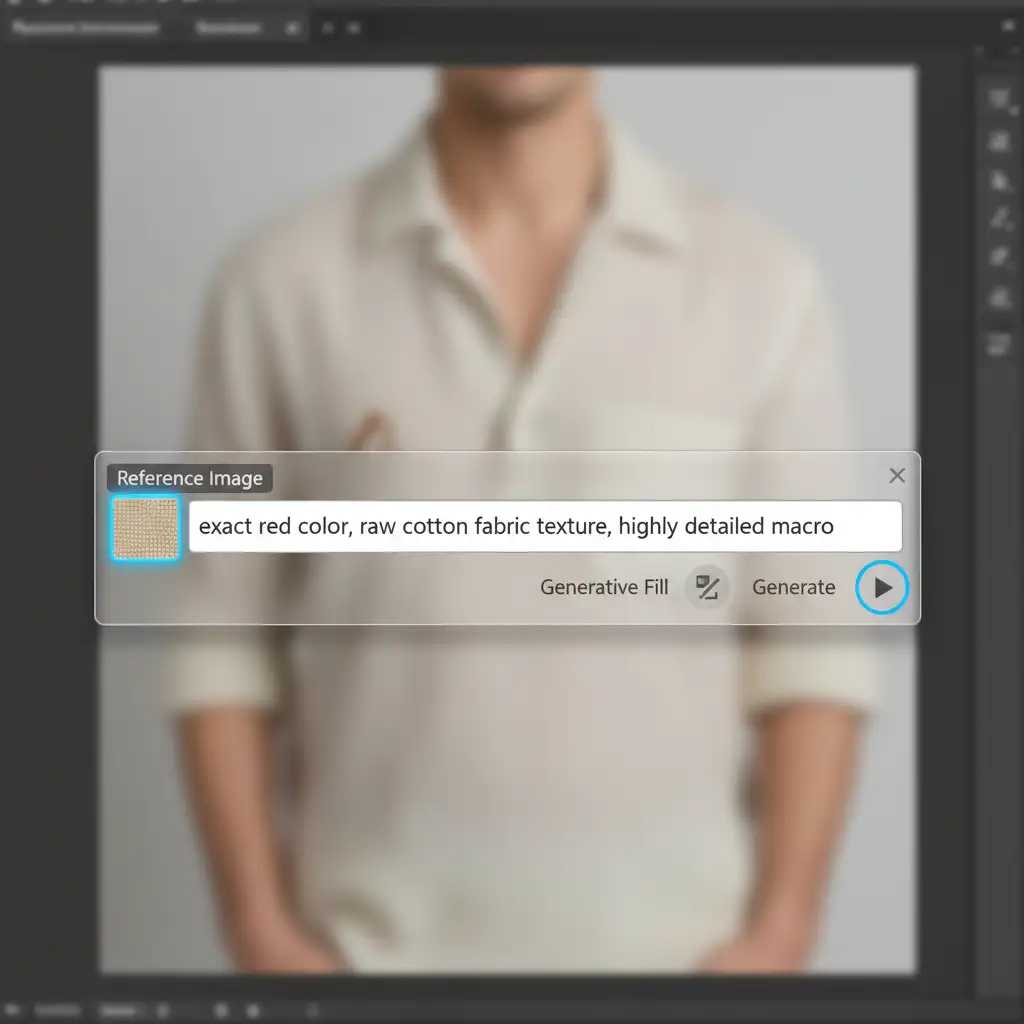
Method 3: Advanced Prompt Engineering & Noise Matching
If you must generate new textures—for instance, if the original texture was damaged—you need to utilize Prompt Engineering and the Reference Image feature introduced in Photoshop v25.5+.
- Select your target area and click Generative Fill.
- In the Contextual Task Bar, click the Reference Image icon and upload a clean crop of your original texture.
- Use highly specific prompts: “exact red color, raw cotton fabric texture, highly detailed macro.”
- Once generated, you must match the digital camera grain. Create a new layer above your Generative Fill layer.
- Fill it with 50 percent gray, change the blend mode to Overlay, and go to Filter > Noise > Add Noise.
- Adjust the Noise Overlay amount to perfectly match the surrounding original pixels.
When to Outsource Your Product Recoloring
Learning how to fix generative fill texture loss color change takes time, practice, and a deep understanding of concepts like Luminosity Masking and frequency separation. If you are processing a handful of images, these techniques are a lifesaver.
However, if you are an e-commerce brand, a fashion retailer, or a photography studio dealing with hundreds or thousands of SKUs, manually applying blending modes and noise overlays to every single variant is a massive drain on your resources.
Need Flawless, High-Volume Product Recoloring?
Don’t let AI ruin your product presentation. At Image Work India and Cloud Retouch, we specialize in commercial-grade, high-volume image editing.
Our team of expert retouchers understands exactly how to create pixel-perfect color variants without losing a single thread of your original fabric or a single pore of skin texture. We combine the speed of modern tools with meticulous, manual quality control to deliver flawless results at scale.
Stop fighting with AI artifacts. Let us handle the heavy lifting. Contact Image Work India and Cloud Retouch today for a free trial and see how we can streamline your e-commerce color variant creation.


