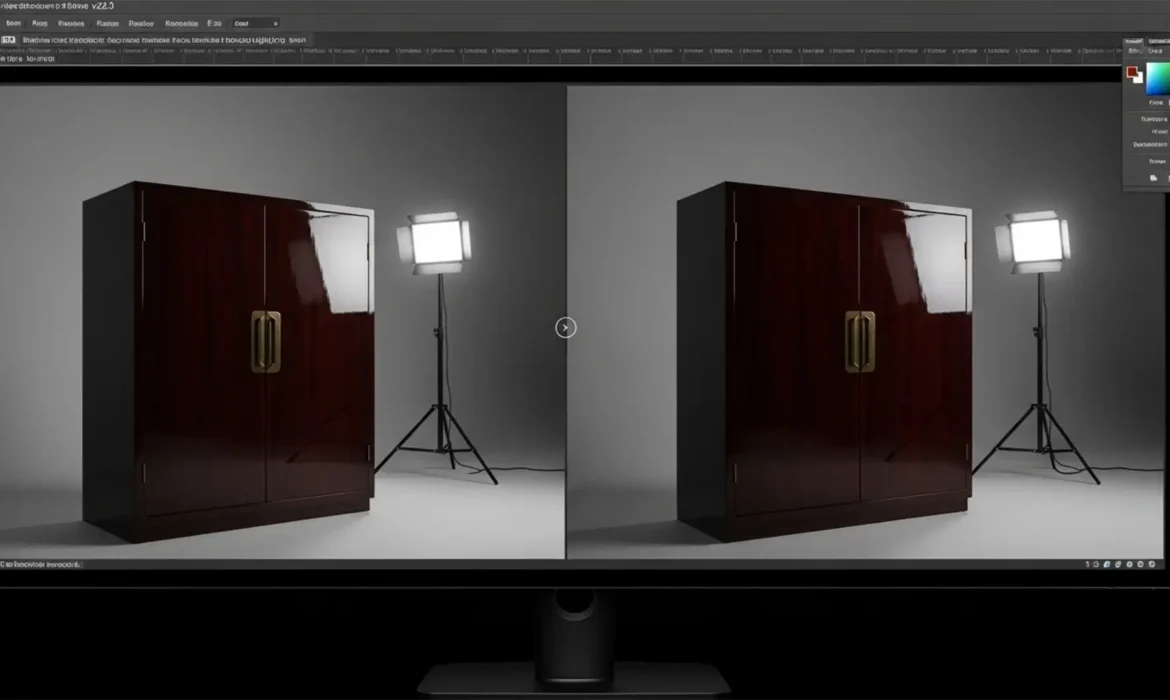
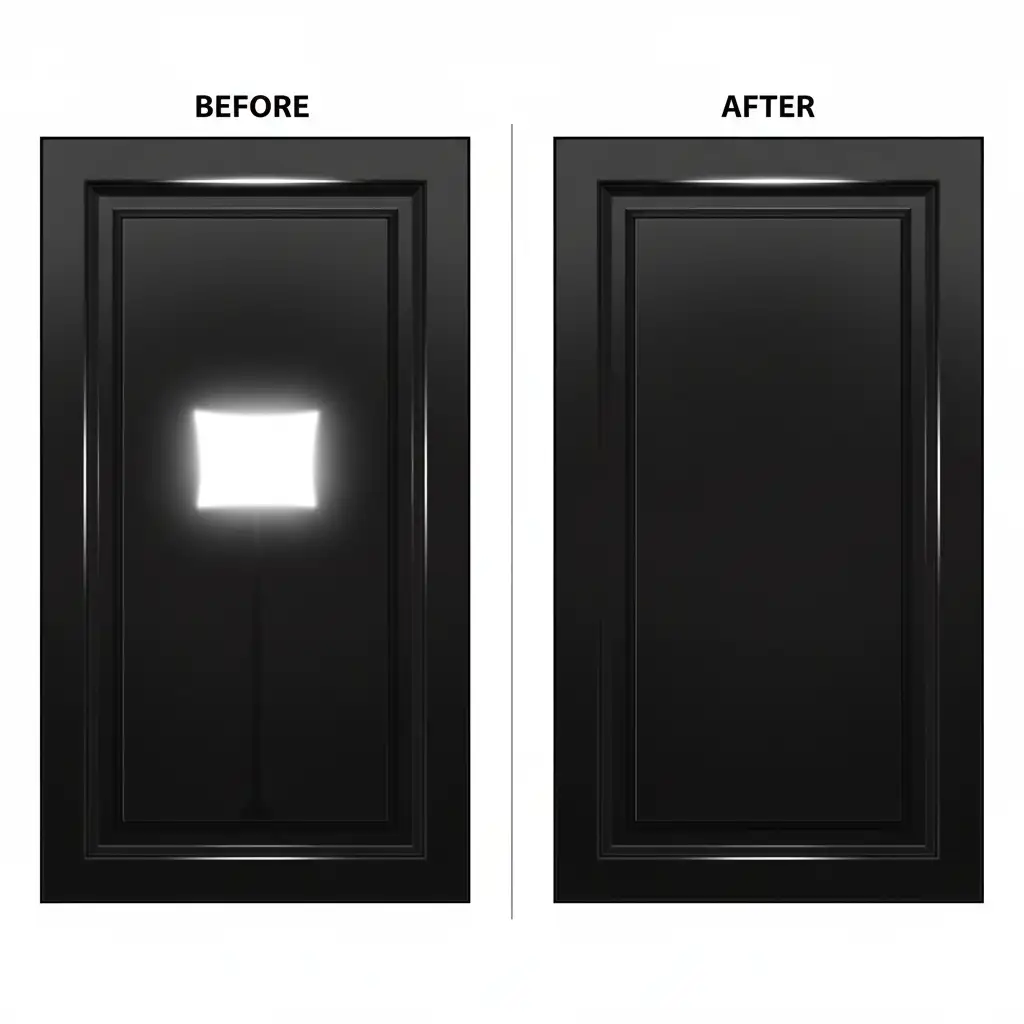
Shooting high-gloss, lacquered furniture is a technical nightmare. These dark, polished surfaces act exactly like mirrors, capturing every light stand, softbox, and even the photographer’s silhouette. When editors attempt removing reflections from high-gloss furniture in Photoshop, the result is often a muddy, matte disaster. Simple cloning destroys the luxurious specular highlights that define the object’s shape and premium glossy texture. If you are struggling to remove harsh studio reflections without ruining the realistic finish, you are not alone. This guide covers three professional methods—from AI-powered quick fixes to advanced gradient reconstruction—to help you achieve a flawless, high-end retail aesthetic.
The Challenge of High-Gloss Lacquer
High-gloss surfaces require a delicate balance. You must eliminate the sharp, distracting reflections of the studio environment while retaining the smooth light falloff and edge highlights that communicate “glossy” to the human eye. Flattening the lighting makes a $5,000 lacquered cabinet look like cheap matte plastic.
Here is how to tackle this in Photoshop v25.0+ using three distinct workflows, categorized by complexity.
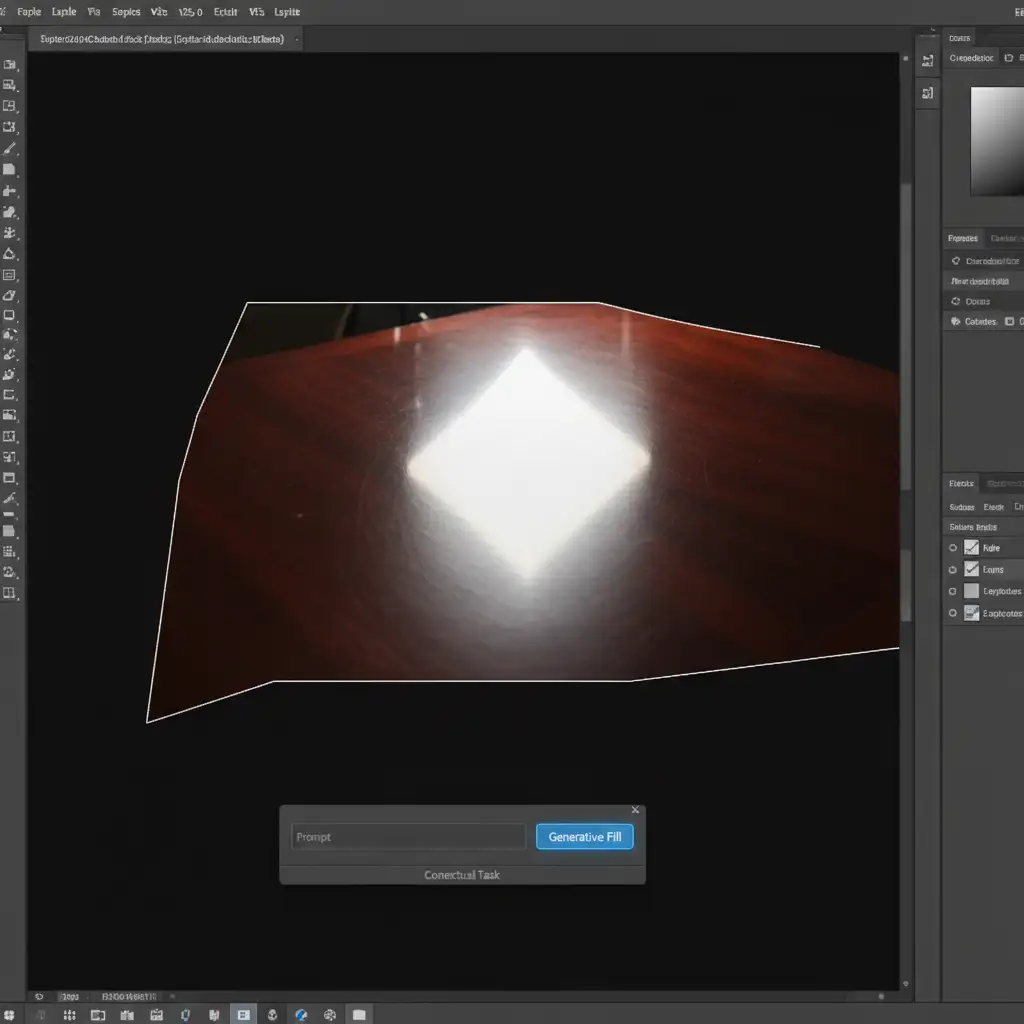
Method A: The Quick Fix Using Generative Fill
For minor reflections or isolated light stand legs, Adobe’s latest AI tools offer an incredibly fast starting point.
- Select the Lasso Tool (L) and draw a loose selection around the distracting reflection.
- Locate the Contextual Task Bar floating on your canvas.
- Click Generative Fill.
- Do not type a prompt. Leave the text box completely empty and hit Generate.
By leaving the prompt blank, Photoshop’s AI automatically samples the surrounding gradients, wood grain, and luminosity. It attempts to replace the reflection while maintaining the surface gloss.
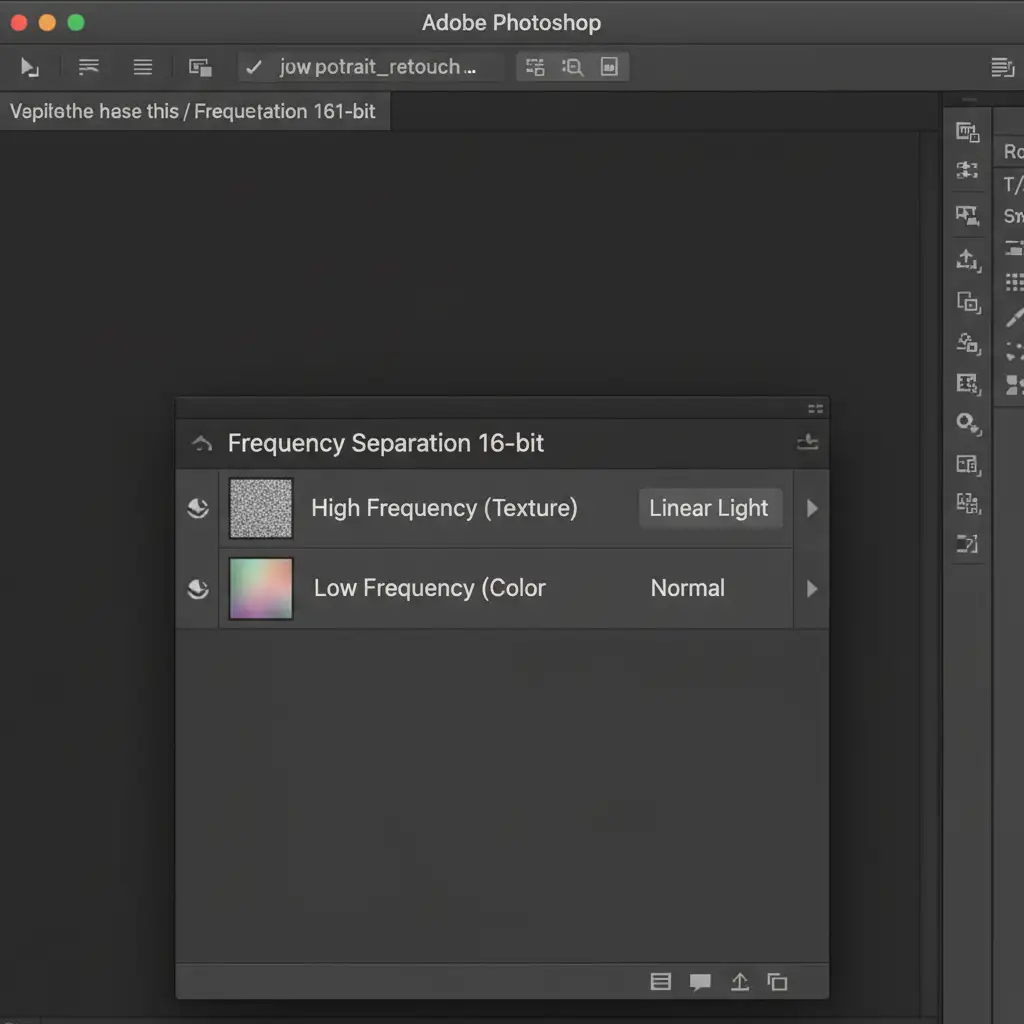
Method B: The Pro Workaround with Frequency Separation
When AI fails to understand the geometric plane of the furniture, frequency separation (working in 16-bit) is the industry standard for separating surface texture from underlying light and color.
Isolating the Plane and Separating Frequencies
- Use the Pen Tool (P) to draw precise vector paths around the specific furniture panel containing the reflection. Convert the path to a selection and duplicate the area.
- Run your 16-bit Frequency Separation action to split the layer into a High-Frequency (texture/grain) layer and a Low-Frequency (color/light) layer.
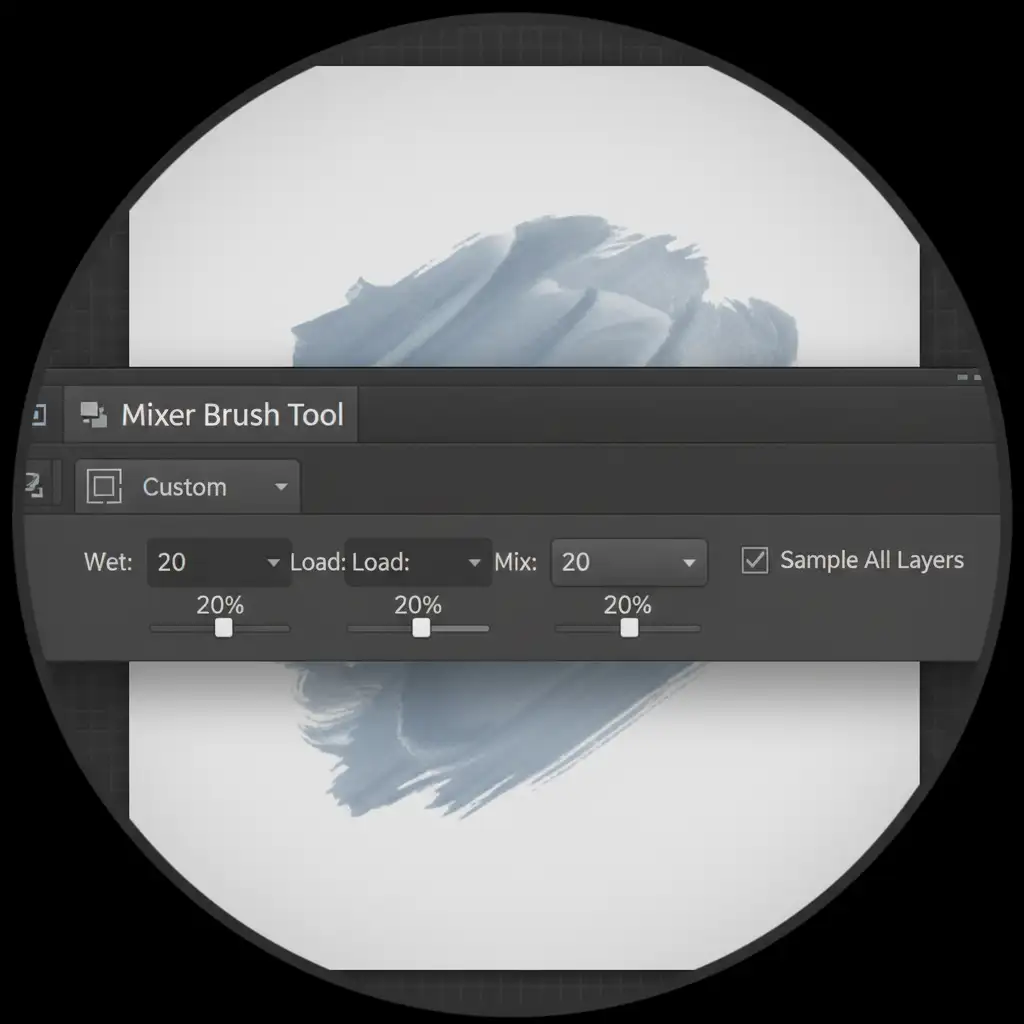
Smoothing the Light Falloff
Target the Low-Frequency layer. Select the Mixer Brush Tool. Set your brush to a soft round tip. Use settings similar to: Wet: 20%, Load: 20%, Mix: 20%, Flow: 20%. Carefully brush along the direction of the gradient to blend out the harsh lines of the reflection. Because you are only affecting color and light, the glossy texture on the High-Frequency layer remains perfectly intact.
Finally, select the High-Frequency layer and use the Clone Stamp Tool (S) to remove any sharp, residual edges of the light stands that were captured as texture.
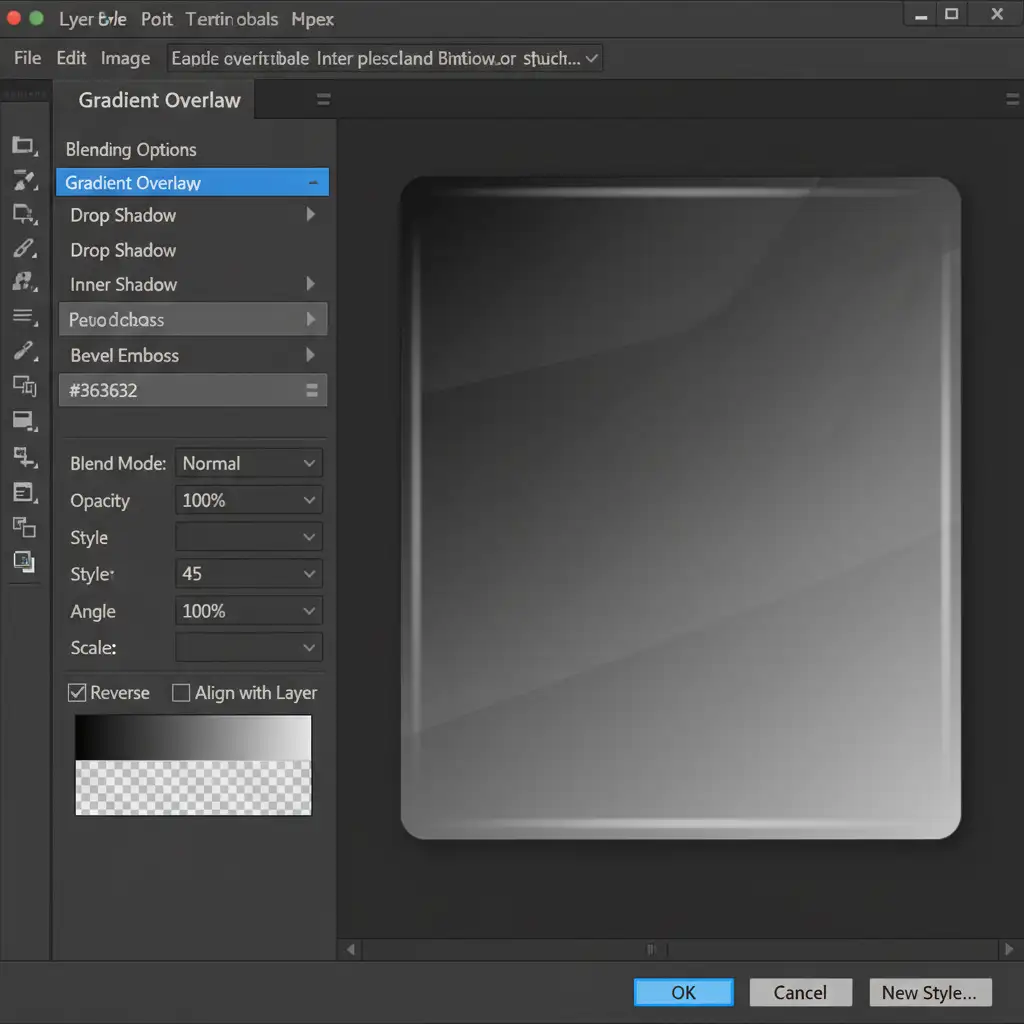
Method C: The Technical Deep-Dive (Gradient Reconstruction)
For the most severe cases where a reflection covers an entire surface, the only solution is to completely rebuild the reflective plane using gradient overlay techniques and clipping masks.
Rebuilding the Reflective Plane from Scratch
- Use the Pen Tool to create a perfect vector shape that matches the exact dimensions of the compromised furniture panel.
- Use the Eyedropper Tool (I) to sample the darkest natural tone of the lacquer, and the lightest natural tone (excluding the harsh glare).
- Open the Layer Style dialog box for your vector shape and apply a Gradient Overlay.
- Adjust the angle and scale of the gradient to perfectly match the natural light falloff of the room.
Restoring Realism and Specular Highlights
A perfect computer-generated gradient looks fake. To make it photorealistic:
- Go to Filter > Noise > Add Noise. Apply a 0.5% Gaussian Monochromatic noise. This prevents color banding in the gradient and mimics subtle photographic grain.
- The most critical step: Apply a layer masking technique to the vector shape. Use a soft black brush (or advanced luminosity masks) to gently mask out the edges of your new gradient shape.
- By masking the edges, you reveal the original specular highlights on the corners and bevels of the furniture underneath. These bright, sharp edge highlights are what trick the eye into perceiving the surface as high-gloss lacquer rather than matte paint.
Why Outsource Your Luxury Furniture Retouching?
Removing reflections from high-gloss furniture in Photoshop is incredibly tedious. While these techniques yield flawless results, executing them across a catalog of 500 luxury furniture pieces requires massive amounts of time, precision, and technical expertise.
If you are struggling to get that flawless high-gloss finish at scale, let the experts handle it. Image Work India and Cloud Retouch specialize in high-end, complex furniture retouching. Our dedicated teams master advanced frequency separation, gradient reconstruction, and pathing to deliver pixel-perfect, scalable results that elevate your luxury products.
Stop fighting studio reflections and start publishing pristine product imagery. Contact Image Work India and Cloud Retouch today to streamline your post-production workflow.


