Are you tired of ruining your base image data or dealing with frustrating color shifts during high-end portrait retouching? You are not alone. In Photoshop v25.x (the 2024 release), traditional frequency separation is a trap if you aren’t using the latest non-destructive frequency separation workflows. Once you bake in those texture or tone changes using outdated methods, there is no going back-your original pixel data is permanently altered.
To achieve flawless, magazine-quality skin, you must separate texture and color without destroying the foundation of your image. This guide breaks down the ultimate non-destructive frequency separation 2024 workflow, utilizing advanced Smart Objects, precise blending modes, and dynamic layers to future-proof your retouching process.
Why Traditional Frequency Separation Fails in 2024
The core problem with legacy frequency separation is its rigidity. By duplicating rasterized layers and applying a static Gaussian Blur, you commit to a specific blur radius. If you realize later that the radius was too low (leaving blotchy colors on your texture layer) or too high (destroying fine skin details), you have to delete the entire group and start over.
Furthermore, applying the Apply Image command incorrectly-especially when moving between 16-bit vs 8-bit files-results in devastating color shifts and banding. The modern 2024 workflow solves this by utilizing Smart Filters and protective layer groups.
The Ultimate Non-Destructive Frequency Separation 2024 Workflow
To maintain complete control over your base image data, we recommend a three-tiered approach that protects your original file while giving you infinite flexibility.
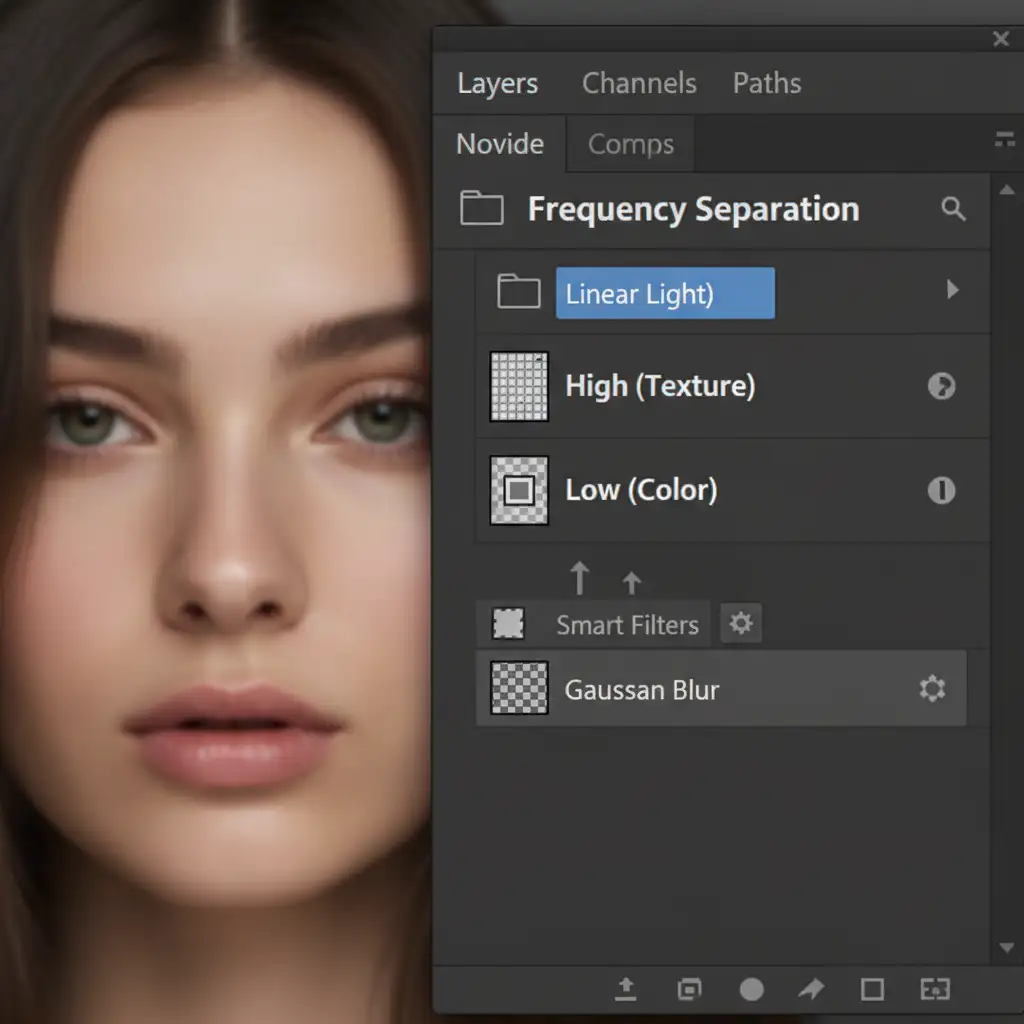
Method 1: The Smart Object “Pro” Workaround
The secret to a truly non-destructive workflow lies in Smart Objects. Instead of rasterizing your background duplicates, you will convert them.
- Duplicate your base image twice. Name the top layer High Frequency Layer (Texture) and the bottom layer Low Frequency Layer (Color).
- Right-click the Low Frequency Layer and select Convert to Smart Object.
- Apply your Gaussian Blur as a Smart Filter.
Because the blur is now a Smart Filter, you can double-click it at any point in your retouching process to dynamically adjust the blur radius without starting over.
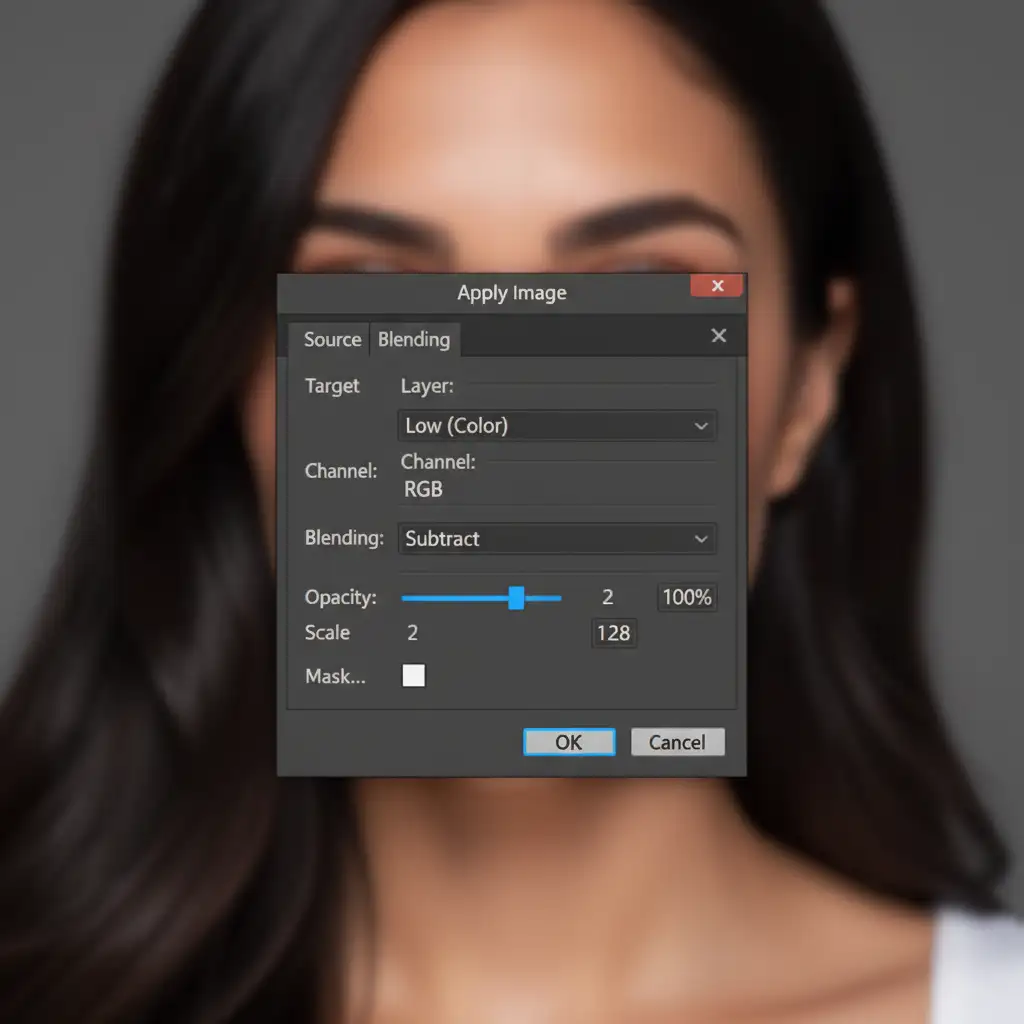
Method 2: Mastering the Technical Math (16-bit vs 8-bit)
The most critical step in frequency separation is the Apply Image command. This is where Photoshop subtracts the blurred color data from the original image to isolate the texture. The math changes entirely depending on your document’s bit depth.
For 8-Bit Images:
Select your High Frequency Layer, go to Image > Apply Image, and use the following exact settings:
- Layer: Low Frequency Layer
- Blending: Subtract
- Scale: 2
- Offset: 128
For 16-Bit Images:
High-end portrait retouching should always be done in 16-bit to prevent color banding. For 16-bit files, the settings are completely different:
- Layer: Low Frequency Layer
- Check the “Invert” box next to the channel selection.
- Blending: Add
- Scale: 2
- Offset: 0
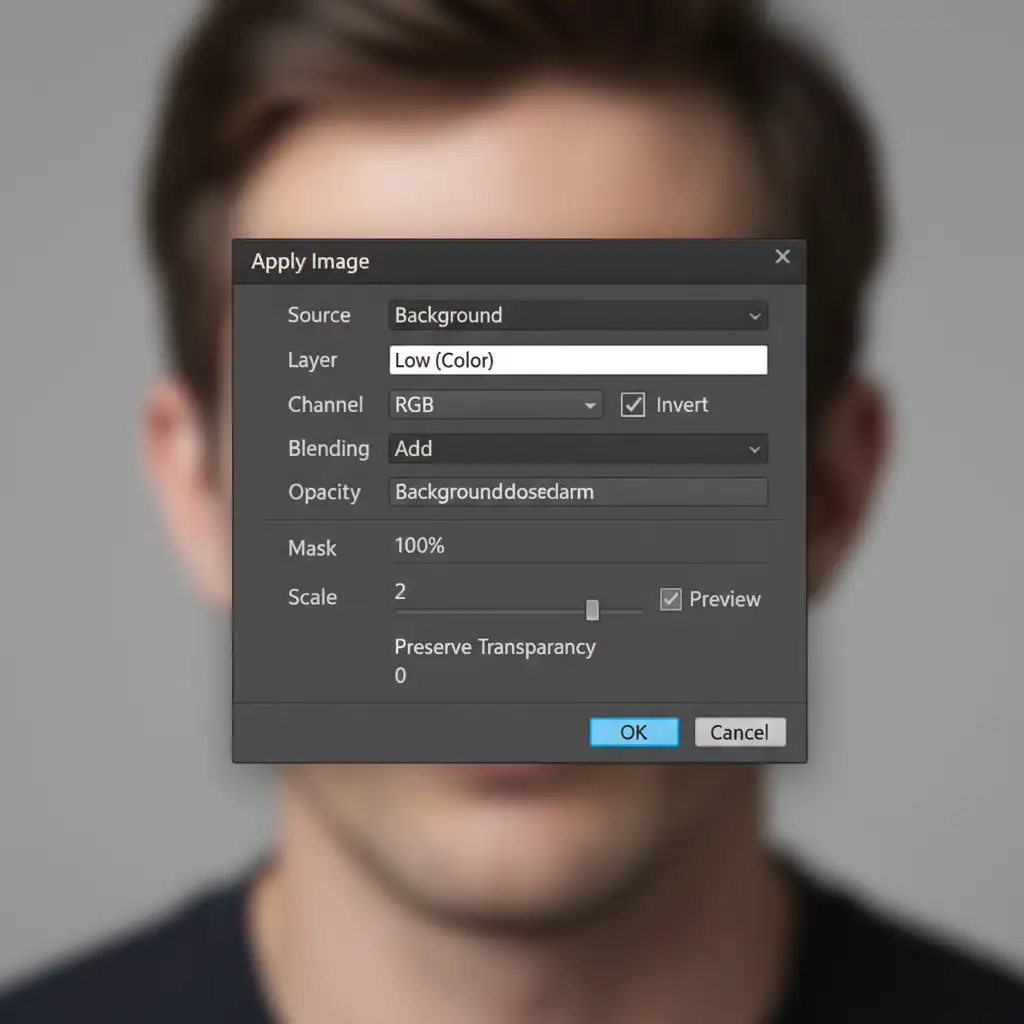
Once applied, change the blending mode of your High Frequency Layer to Linear Light. Your image should look exactly like the original unedited photo, but the texture and color are now mathematically separated.
Method 3: The Blank Layer Technique for Tone Correction
To ensure you never ruin your Low Frequency Layer, do not paint directly on it.
Instead, create a blank layer between your High and Low layers. Right-click this blank layer and create a Clipping Mask pointing down to the Low layer. You can now use a soft brush to sample and paint skin tones non-destructively. If you make a mistake, simply lower the opacity of this blank layer or erase the strokes.
When fixing blemishes on the High Frequency Layer, always use the Healing Brush tool with the sample drop-down set to Current Layer. This ensures you are only moving texture data, leaving the underlying color data perfectly intact.
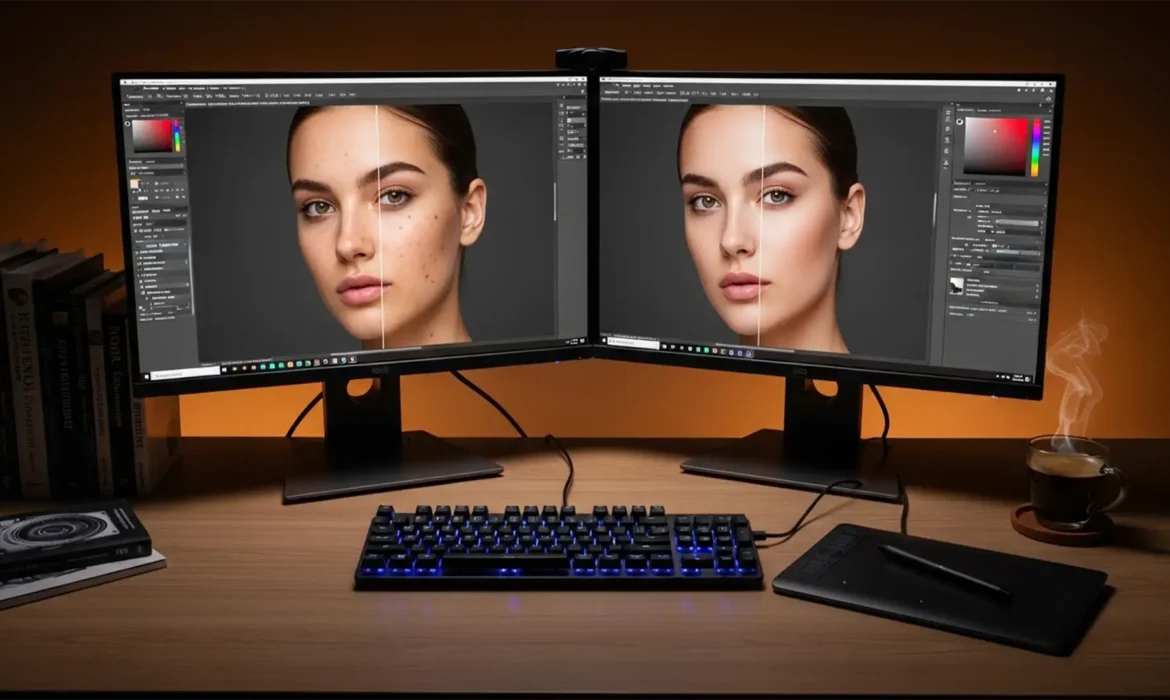
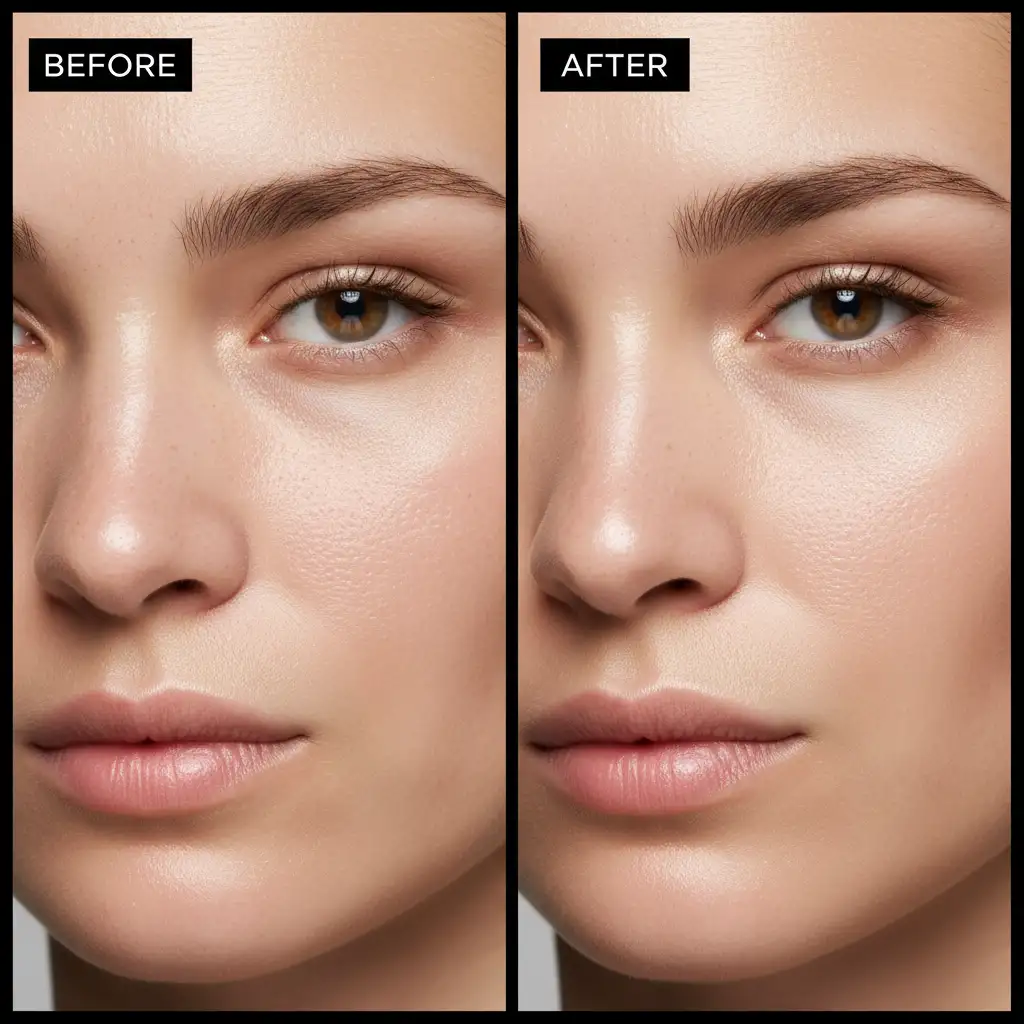
Before and After: The Power of Preserved Texture
When executed correctly, this non-destructive frequency separation 2024 workflow allows you to completely even out blotchy skin tones, remove harsh shadows, and fix blemishes-all while retaining 100% of the subject’s natural skin pores and micro-contrast.
Stop Struggling with High-End Portrait Retouching
Mastering the math, Smart Objects, and layer structures required for professional, non-destructive frequency separation takes years of practice. One wrong blending mode or a slight miscalculation in your Apply Image settings can result in muddy textures and ruined portraits.
Struggling to perfect your portrait retouching workflow? You don’t have to do it alone. Hire the experts at Image Work India and Cloud Retouch for flawless, high-end skin retouching that preserves every detail. Our team of professional retouchers utilizes industry-leading, non-destructive techniques to deliver magazine-ready images tailored to your exact specifications.
Focus on capturing the perfect shot, and let Cloud Retouch handle the pixel-perfect polishing. Contact us today to elevate your portfolio!


