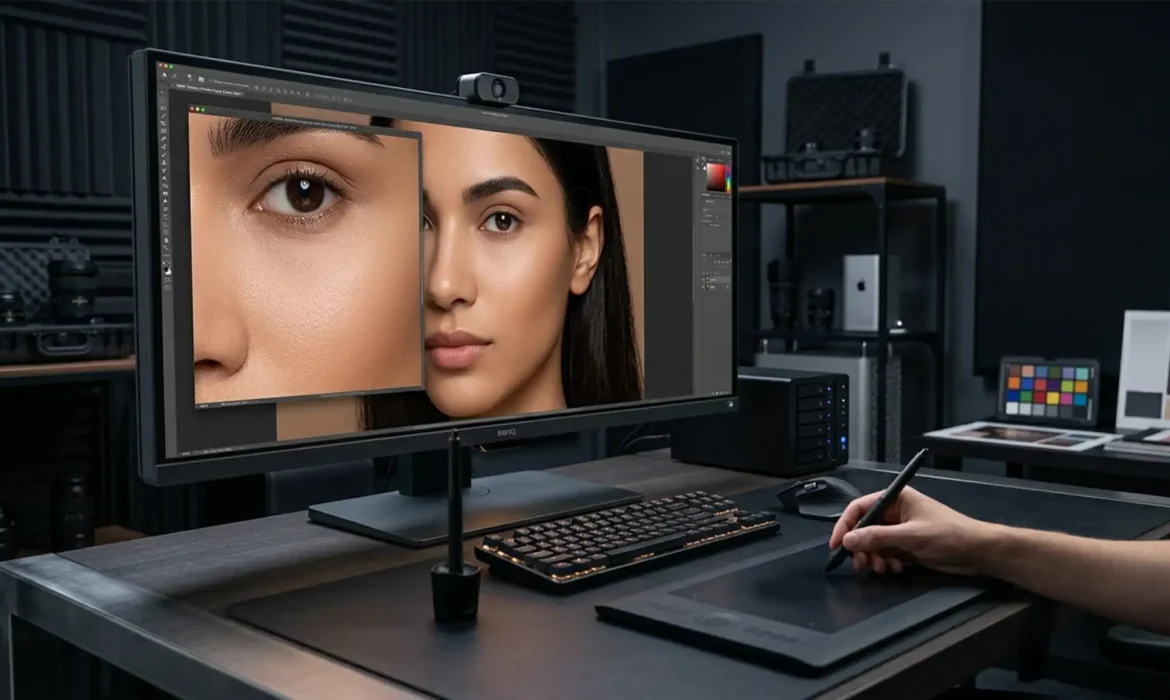
You are staring at a 100-megapixel medium-format beauty portrait destined for a global dodge & burn vs frequency separation luxury print campaign. The lighting is flawless, the makeup is impeccable, but the moment you apply standard skin retouching techniques, the image falls apart. The skin pores look smudged, the natural dimension is flattened, and the subject suddenly looks like a plastic mannequin.
If this sounds familiar, your workflow is likely destroying the file’s native pixel structure. For years, retouchers relied on standard spatial splitting techniques to clean up skin, but as camera resolutions soar, these old habits are ruining high-end editorials.
Here is exactly why the industry’s top professionals are abandoning standard methods and adopting Micro Dodge and Burn vs Frequency Separation for Luxury Print, and how you can implement this pixel-perfect workflow in Photoshop v25.x and v26.x.
The Core Problem: Why Frequency Separation Fails in High-Res Print
Frequency Separation (FS) works by splitting an image into two distinct layers: spatial frequencies for color/tone (low-frequency) and texture (high-frequency). While this is a fast way to smooth out uneven skin tones, it is catastrophic for medium-format files (50MP-100MP) destined for luxury print.
When you blur the low-frequency layer, you inevitably cause texture smudging. When you aggressively clone or heal the high-frequency layer, you create an overly sharp, artificial pixel structure. The result? A dreaded “plastic look” that strips the subject of their humanity. Luxury brands demand the retention of natural micro-texture, which FS simply cannot preserve under the scrutiny of high-resolution macro lenses and massive print formats.
The Solution: Luminosity Shifting via Micro Dodge and Burn
The gold standard for high-end beauty and fashion retouching is Micro Dodge and Burn. Instead of destroying and rebuilding the image’s pixel structure, this technique relies entirely on luminosity shifting.
By manipulating the brightness of individual pixels—lightening dark blemishes (dodging) and darkening overly bright spots (burning)—you leave the original 16-bit skin texture completely intact. It is the ultimate form of non-destructive retouching, ensuring that the natural pore structure remains untouched while the overall skin tone appears flawlessly even.
Step-by-Step High-End Retouching Workflow (Photoshop v25.x & v26.x)
Transitioning to this method requires precision. Here is the technical breakdown of how to set up your file for success.
Method A: The Core Curves Setup
The foundation of this technique is a dual-curve system that allows for microscopic adjustments.
- Create a new Curves Adjustment Layer and pull the midtones up slightly. Name this layer “Dodge”.
- Create a second Curves Adjustment Layer and pull the midtones down slightly. Name this layer “Burn”.
- Invert both layer masks to black (Ctrl/Cmd + I).
- Select a soft round brush, set your foreground color to white, and drop your Flow setting to exactly 1 percent.
- Gently paint over microscopic dark spots on the Dodge layer, and light spots on the Burn layer.
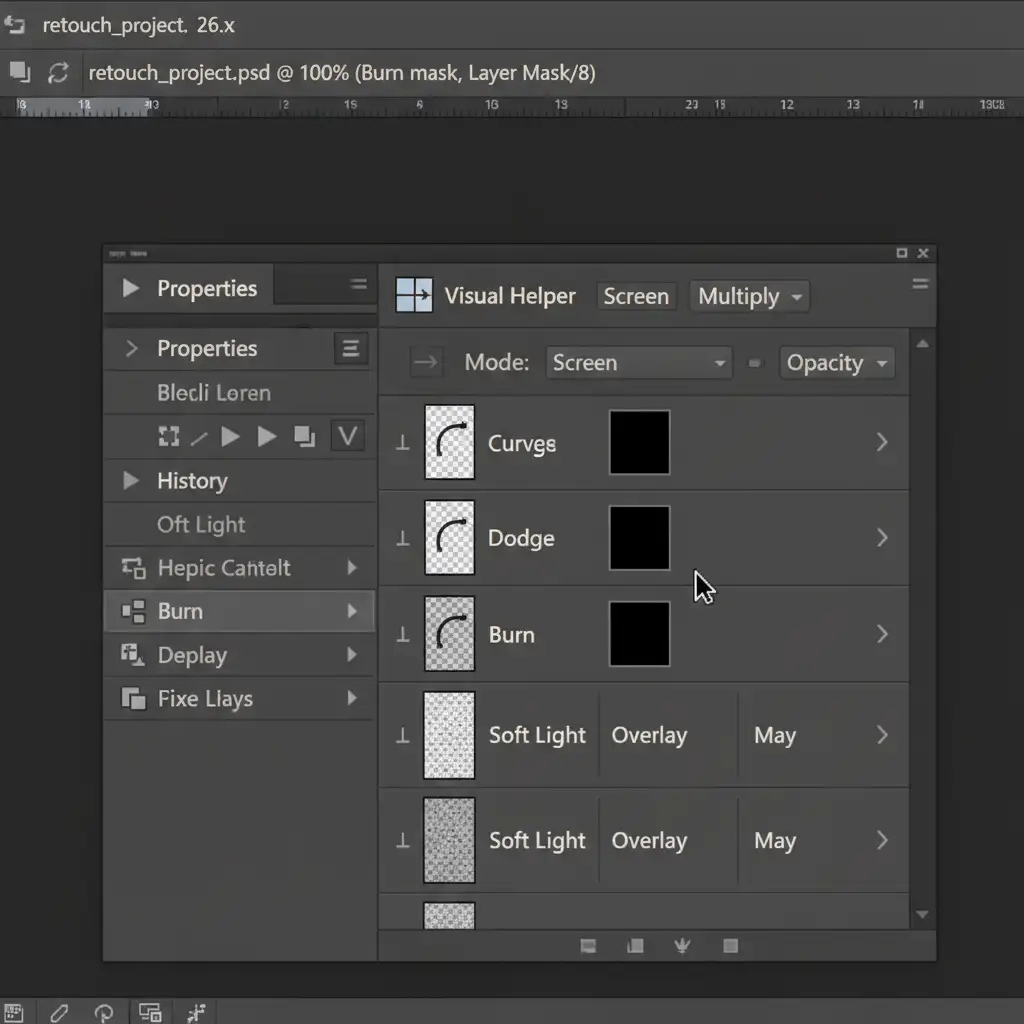
Method B: Creating the Visual Helper Group
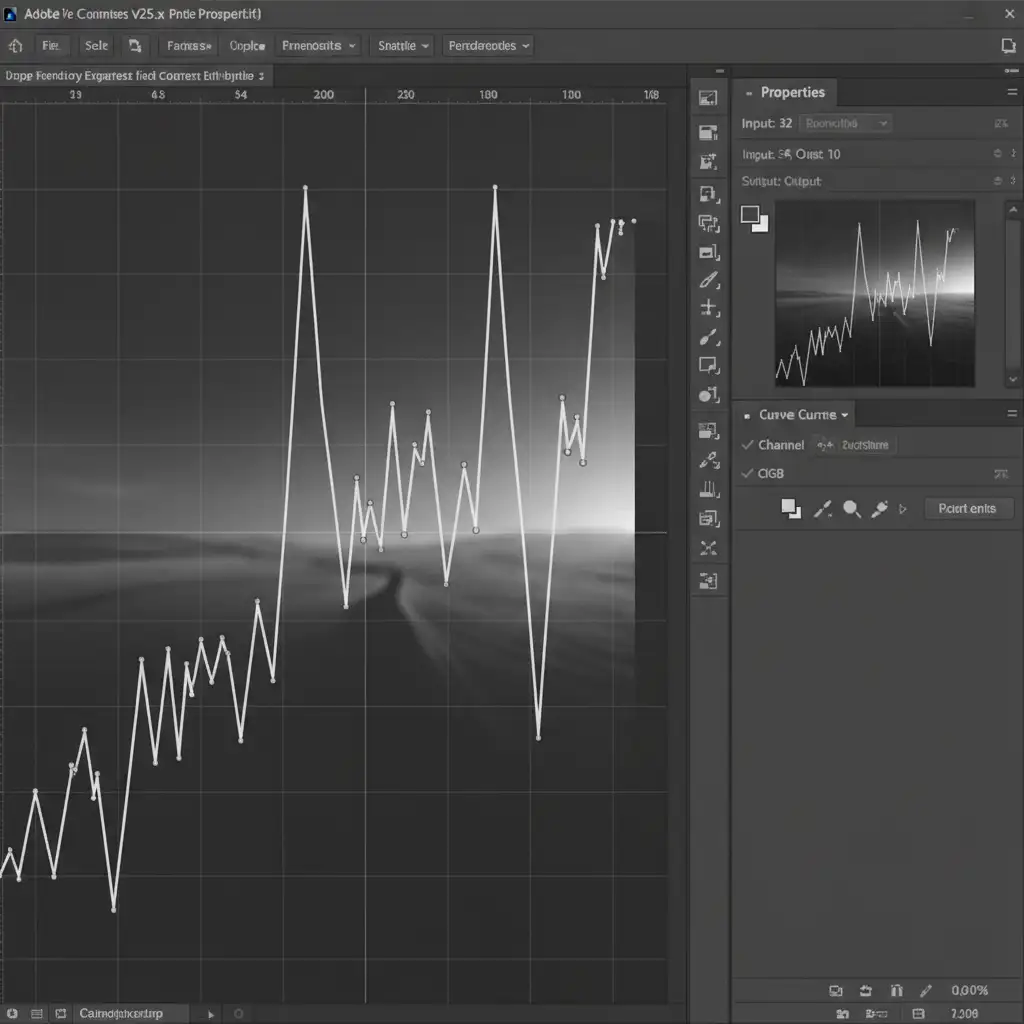
Because you are performing macro retouching at the pixel level, the human eye struggles to see the minute tonal inconsistencies that need fixing. You need a visual helper curve to exaggerate the micro-contrast.
- Group a new set of adjustment layers at the top of your layer stack.
- Add a Black and White adjustment layer to strip away distracting color data.
- Add a Curves adjustment layer above it and create a severe “Solar Curve” (a jagged, up-and-down zig-zag pattern).
- This extreme contrast curve will make microscopic blemishes, blotchiness, and uneven transitions glow brightly, guiding your Dodge and Burn strokes.
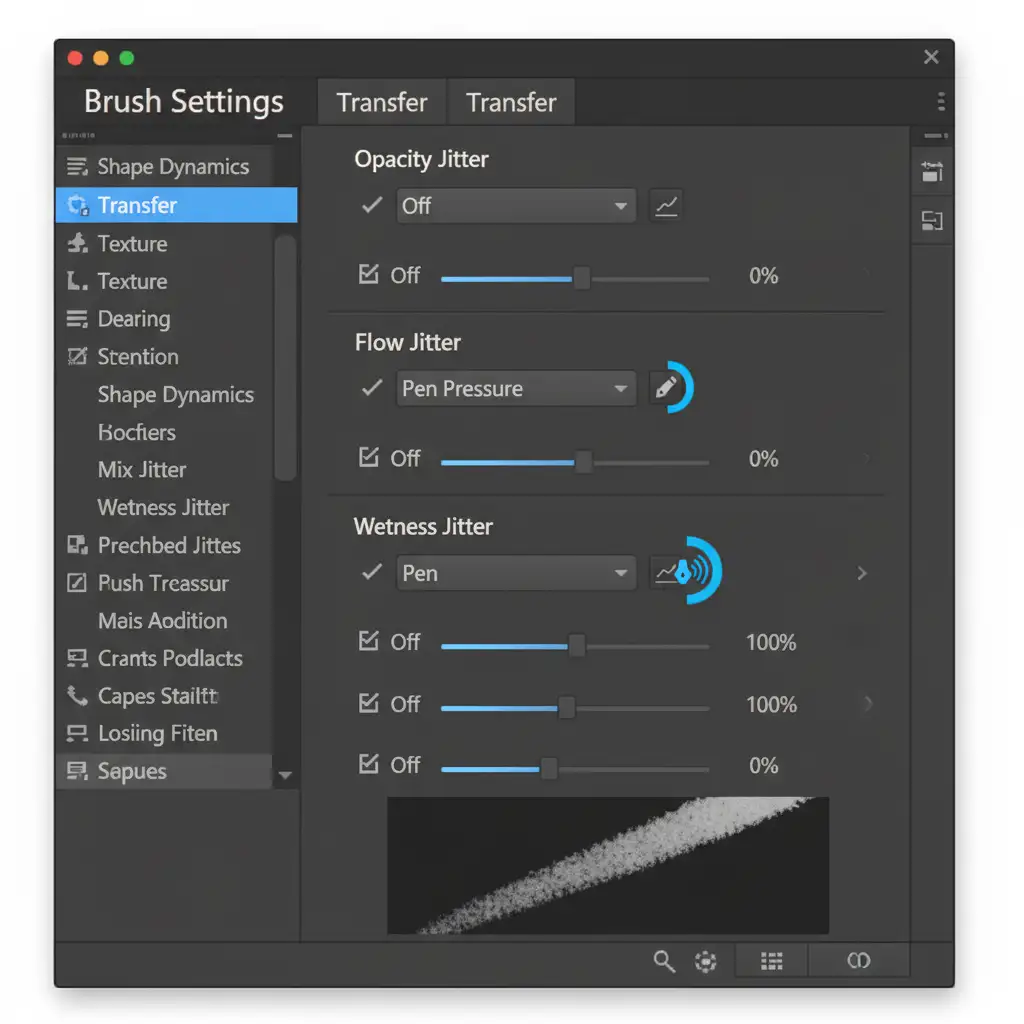
Method C: Optimizing the 16-Bit Workflow and Tablet Settings
Technical execution requires optimized hardware and software settings to ensure banding prevention and smooth application.
- Color Space: Ensure your document is set to a 16-bit workflow and the ProPhoto RGB color space. 8-bit files will break apart and band under heavy Dodge and Burn adjustments.
- Tablet Pen Pressure: Your Wacom tablet settings are critical. You must set your tablet pen pressure to control Flow, not Opacity. This allows you to build up luminosity shifts gradually without lifting your pen.
- Performance: Go to Photoshop Preferences > Performance. Allocate at least 70% of your RAM to Photoshop and ensure “Use Graphics Processor” is checked to reduce brush lag during intensive macro work.
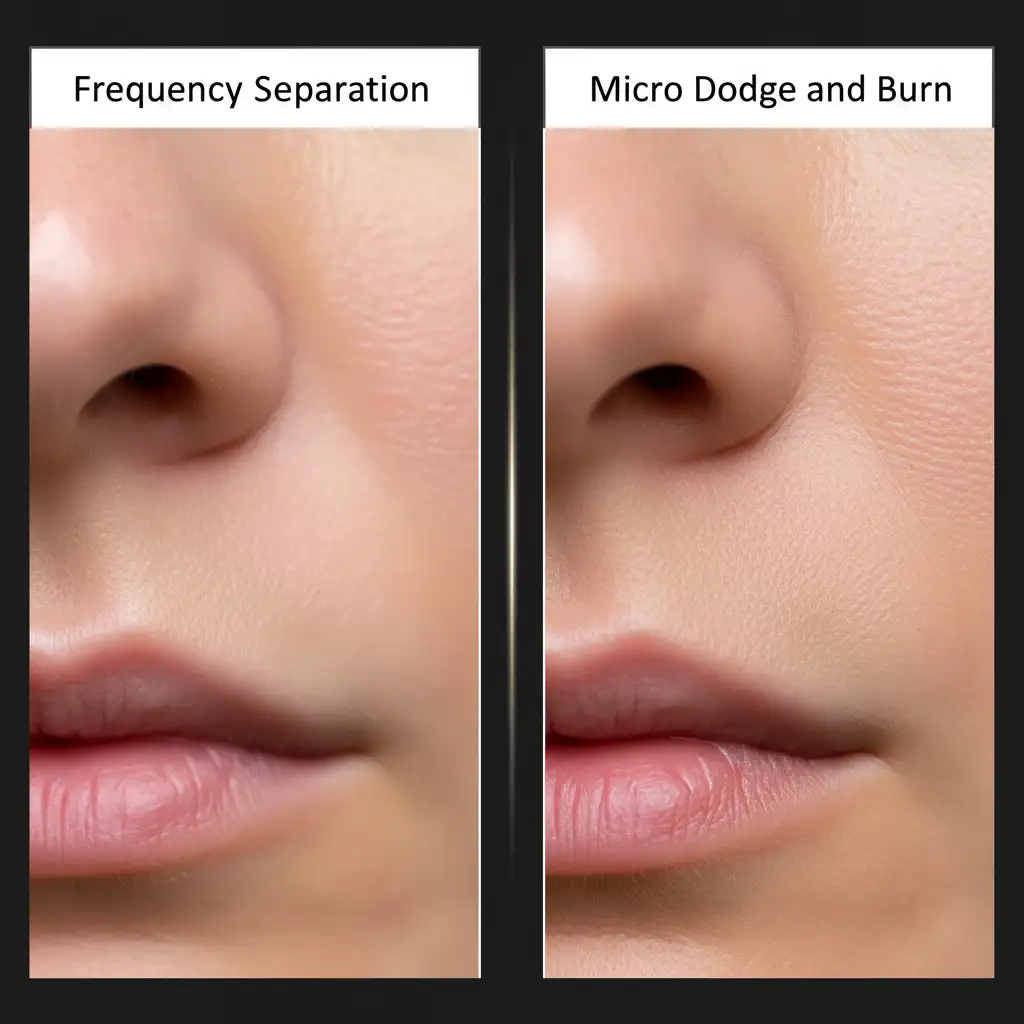
The Results: 400% Zoom Comparison
When you compare the two methods side-by-side at a 400 percent magnification, the difference is undeniable. The spatial frequency method leaves the pores looking smeared and artificial, while the luminosity shifting method retains the crisp, three-dimensional reality of the subject’s skin.
Elevate Your Luxury Print Campaigns Today
Mastering the intricacies of Micro Dodge and Burn vs Frequency Separation for Luxury Print requires years of practice, an eagle eye for detail, and hours of painstaking manual labor per image. If your agency or studio is handling high volumes of medium-format files, spending four hours dodging and burning a single portrait is rarely scalable.
You don’t have to compromise on quality to meet your deadlines. Outsource your luxury editorial retouching to Image Work India and Cloud Retouch. Our team of high-end retouchers specializes in strict 16-bit workflows, pixel-perfect luminosity shifting, and flawless micro-texture retention.
Whether you are preparing a global cosmetics campaign or a high-fashion editorial spread, we deliver magazine-ready, non-destructive results that look impossibly perfect, yet entirely real. Contact Image Work India and Cloud Retouch today to elevate your visual standards.


