
You’ve just applied Photoshop’s Skin Smoothing Neural Filter to a stunning high-resolution raw portrait. It removes the blemishes instantly, but there’s a massive problem: your subject now looks like a plastic mannequin. The Adobe Sensei AI algorithm has completely obliterated the vital micro-contrast and pore detail, leaving behind a waxy, unnatural finish that clashes heavily with the sharp details of their eyes, lips, and hair.
If you’re tired of AI skin smoothing ruining your high-end retouching workflow, you aren’t alone. Here is the definitive guide to non-destructive editing techniques that fix waxy skin photoshop neural filters output and restore natural, human texture in Photoshop 2024 and 2025.
Why Photoshop’s Neural Filters Cause the “Plastic” Look
In Photoshop versions 24.x through 26.x, the Skin Smoothing Neural Filter relies on Adobe Sensei to automatically identify faces and blur out imperfections. While the technology is fast, it lacks the nuanced eye of a human retoucher.
The core technical failure of this tool is its inability to distinguish between unwanted blemishes (like acne or scars) and necessary human skin texture (like pores and fine lines). When processing high-resolution raw files, this aggressive blurring destroys micro-contrast. The result is a flat, two-dimensional surface that looks distinctly artificial when placed next to razor-sharp eyelashes or textured clothing.
To combat this, we must borrow concepts from traditional frequency separation—separating the color/tone smoothing (handled by the AI) from the texture (handled by manual injection).
3 Ways to Fix Waxy Skin from Photoshop Neural Filters
Depending on your turnaround time and quality requirements, there are three distinct ways to bring life back to AI-smoothed skin.
Method 1: The Quick Fix (Opacity & Noise Injection)
If you are batch-processing images and need a rapid solution, the easiest method is to blend the AI output with your original image and simulate lost texture.
- Open the Neural Filters panel (Filter > Neural Filters).
- Apply your Skin Smoothing.
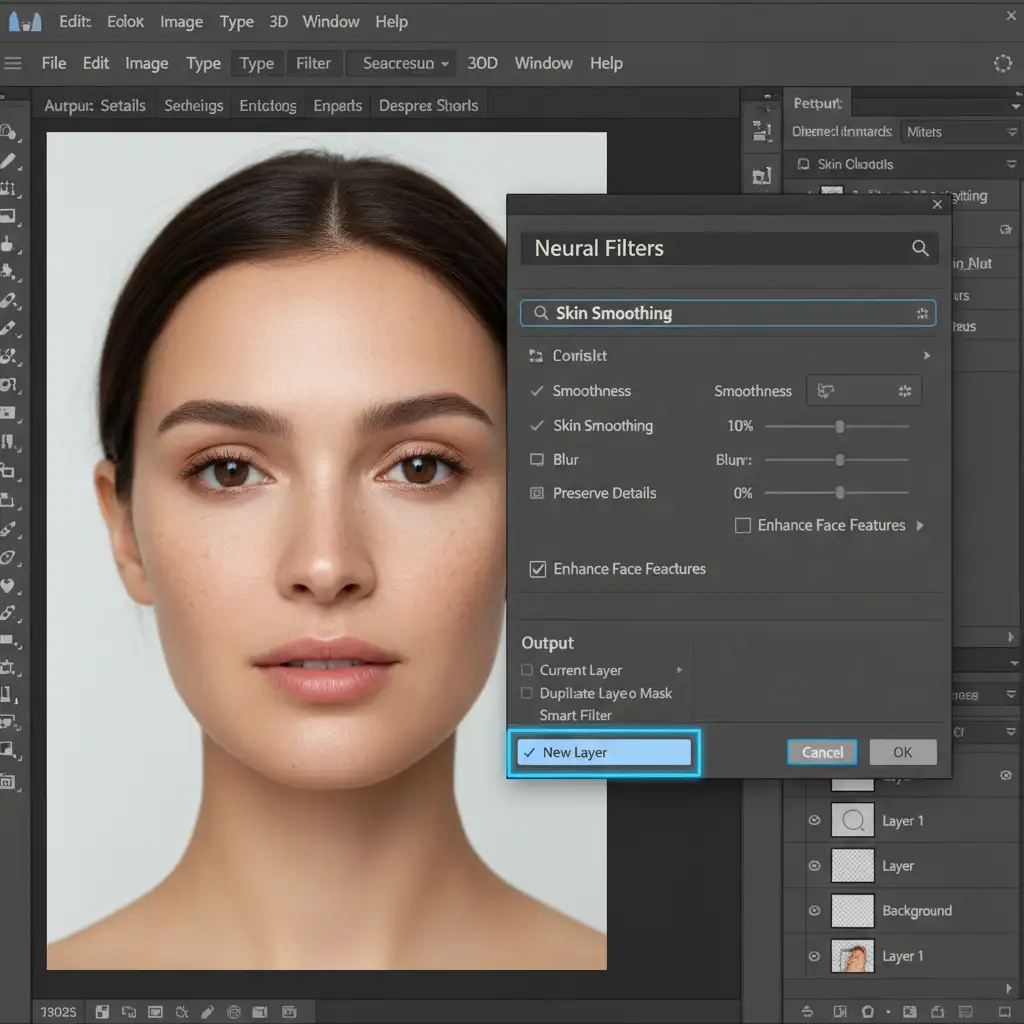
- Crucial Step: Before clicking OK, navigate to the bottom right of the panel and change the Output dropdown from “Current Layer” to “New Layer”.
- Once generated, lower the opacity of this new layer to 50–60%. This allows the original pore texture to bleed through the blur.
- Optional: To further combat the plastic look, go to Filter > Noise > Add Noise. Add 1–2% Monochromatic noise to the smoothed layer to simulate natural skin grain.
Method 2: The Pro Workaround (High Pass Texture Injection)
For high-end beauty and fashion retouching, simulating noise isn’t enough. You need the subject’s actual pore texture back. This method utilizes a High Pass filter to extract the original texture and map it precisely over the AI-smoothed skin.
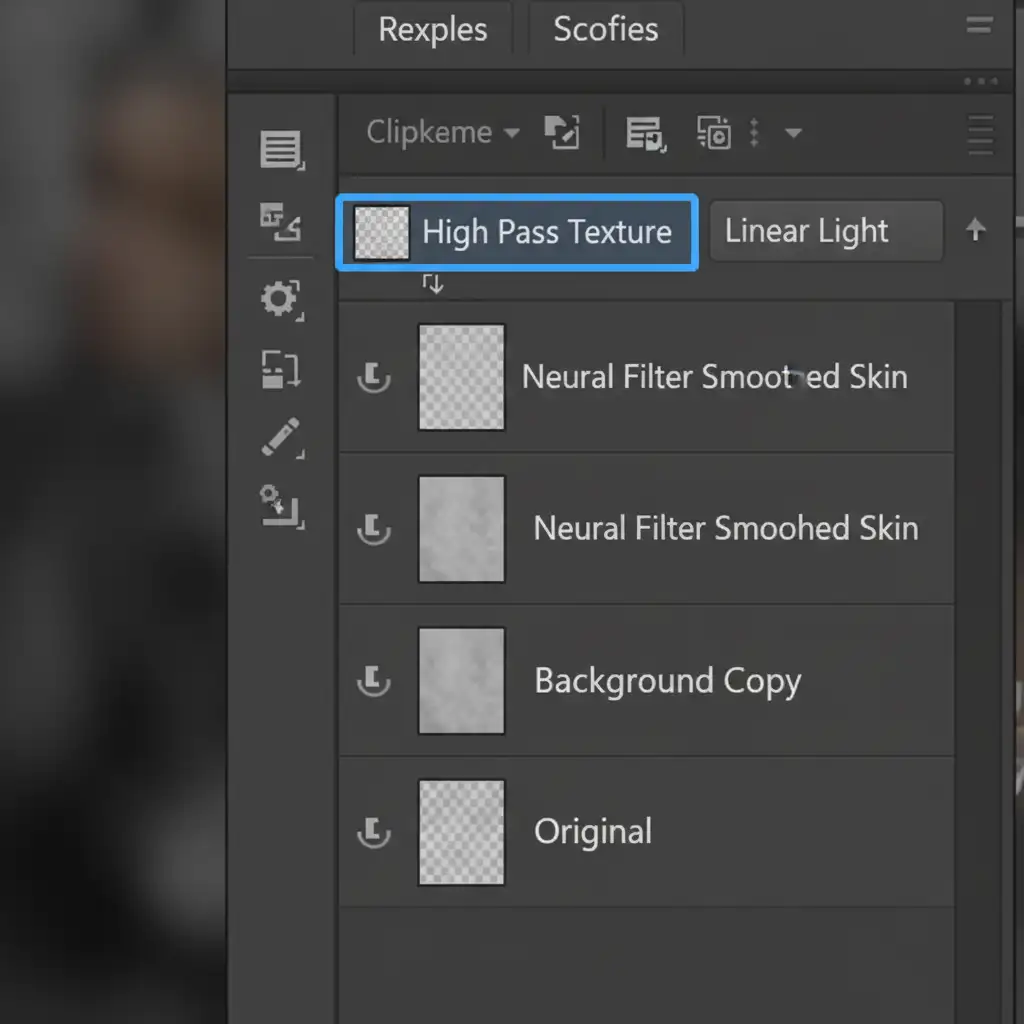
- Apply the Neural Filter to a New Layer as described above.
- Duplicate your original, untouched Background layer.
- Drag this duplicate layer above your Neural Filter smoothed layer.
- Convert this layer to a Smart Object (Right-click > Convert to Smart Object) for non-destructive editing.
- Go to Filter > Other > High Pass. Set the Radius between 2.0 and 4.0 pixels (just enough to see the pores, but no color).
- Change the blending mode of this High Pass layer to Linear Light.
- Right-click the High Pass layer and select Create Clipping Mask.
This technique injects the exact original pore texture directly onto the smoothed pixels, giving you the flawless tone of AI skin smoothing with the realistic texture of the original photograph.
Method 3: The Technical Deep-Dive (Tonal Protection via Blend If)
Even with texture restored, AI smoothing can make the deep shadows and bright highlights of a face look muddy, destroying the 3D volume of your portrait. To fix this, we use the Blend If sliders to protect these critical tonal areas.
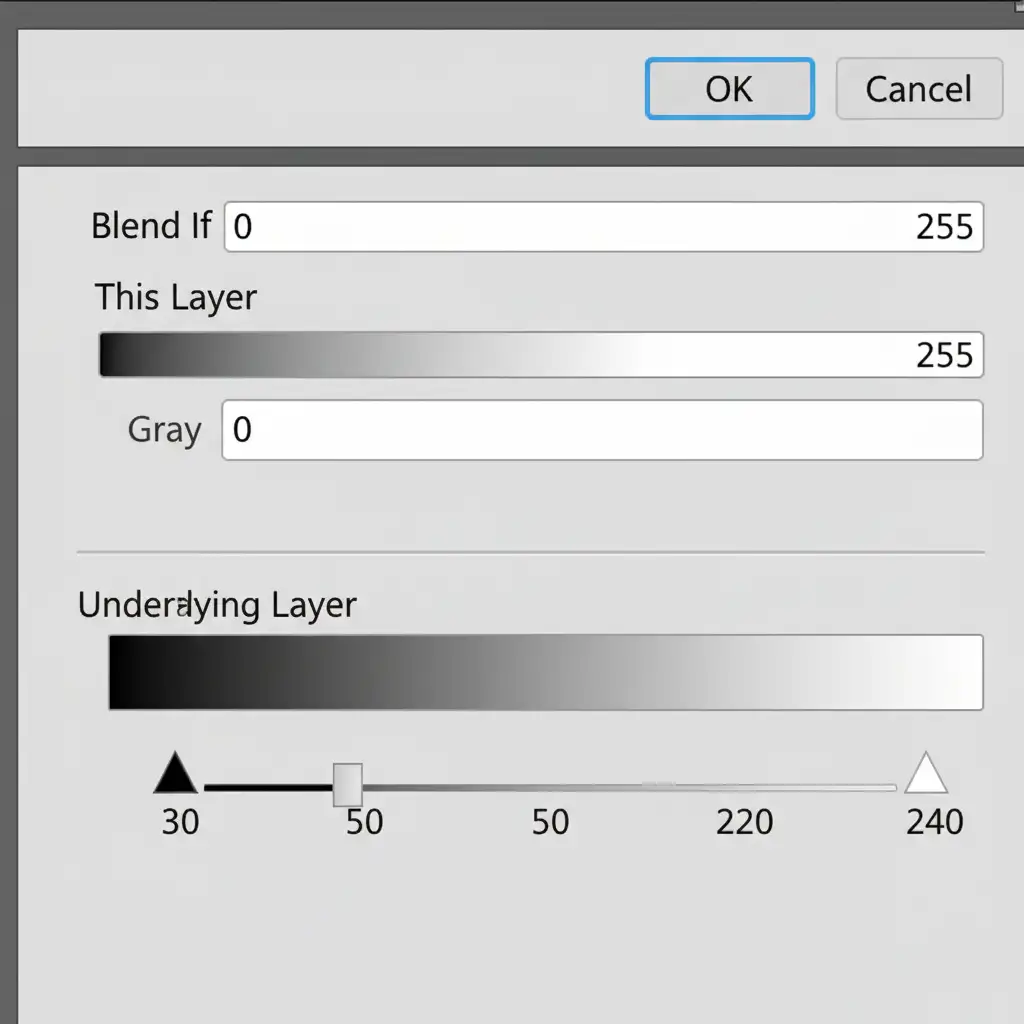
- Double-click the empty space next to your Neural Filter smoothed layer’s name to open the Layer Style dialog box.
- Look at the bottom section labeled Blend If, specifically the Underlying Layer gradient bar.
- Hold Alt (Windows) or Option (Mac) and click the black triangle slider on the left to split it. Drag the right half to 30/50. This pulls the waxy smoothing out of the deep pores and shadows.
- Hold Alt/Option again and split the white triangle slider on the right. Drag the left half to 220/240. This removes the AI blur from bright specular highlights (like the tip of the nose or lips).
By forcing the smoothing out of the extreme shadows and highlights, you instantly restore three-dimensional volume and micro-contrast to the face.
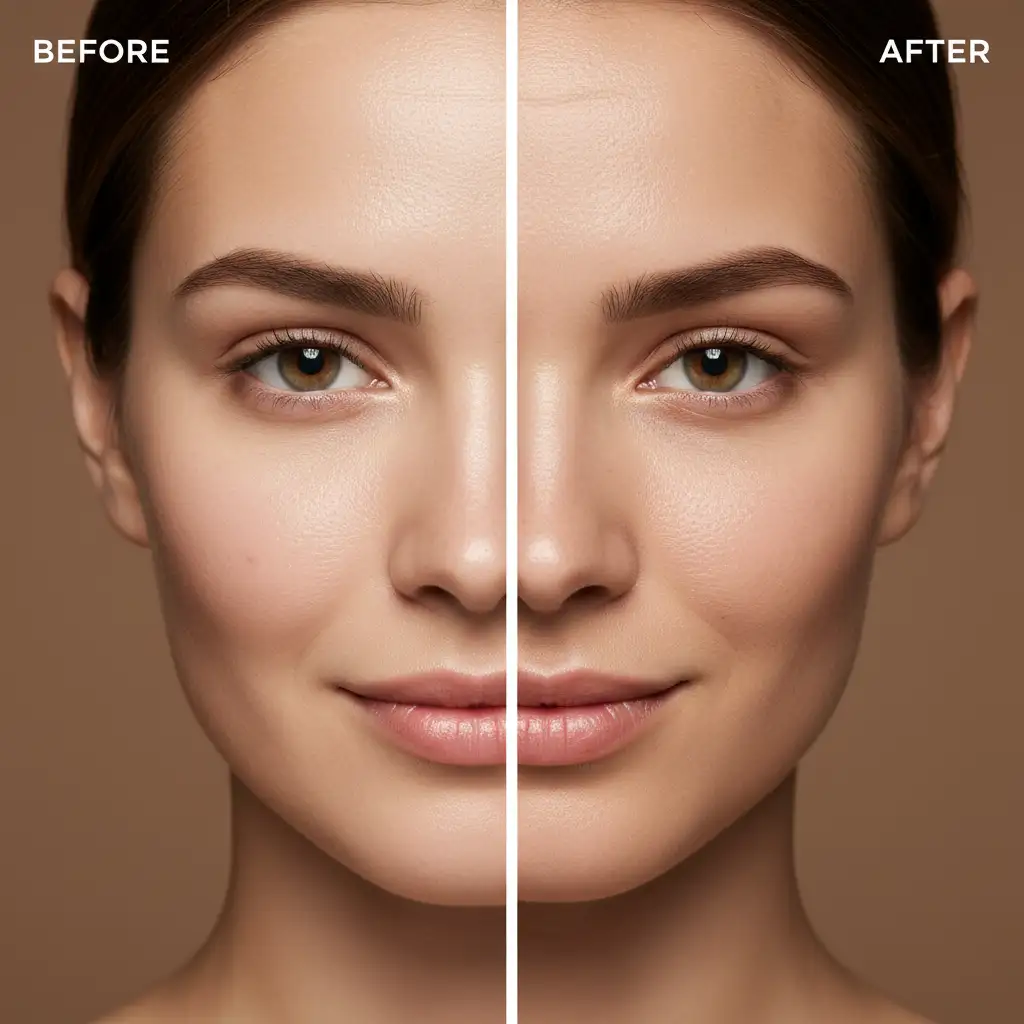
The Ultimate Before & After: Restoring Micro-Contrast
When you combine the High Pass texture injection with Blend If tonal masking, the results are night and day. You successfully bypass the limitations of Adobe Sensei, achieving a commercial-grade finish without sacrificing the humanity of your subject.
Video Tutorial: Mastering Non-Destructive Skin Retouching
Want to see these techniques in action? Watch our quick workflow demonstration below to see exactly how to apply High Pass layers and Blend If masking to your AI-smoothed portraits.
Stop Fighting AI: Let the Experts Handle Your High-End Retouching
Learning how to fix waxy skin from Photoshop Neural Filters is a great skill, but executing these multi-step frequency separation and clipping mask techniques on hundreds of images per day is exhausting. It drains your time and limits your ability to take on new clients.
Struggling to balance flawless skin with natural texture in high-volume batches? Let the master retouchers at Image Work India and Cloud Retouch handle your high-end portrait editing. Our team specializes in meticulous, non-destructive retouching that preserves vital micro-contrast while delivering flawless, commercial-ready results.
Stop wrestling with AI sliders. Contact Image Work India and Cloud Retouch today for pixel-perfect, natural retouching services that elevate your photography portfolio.


