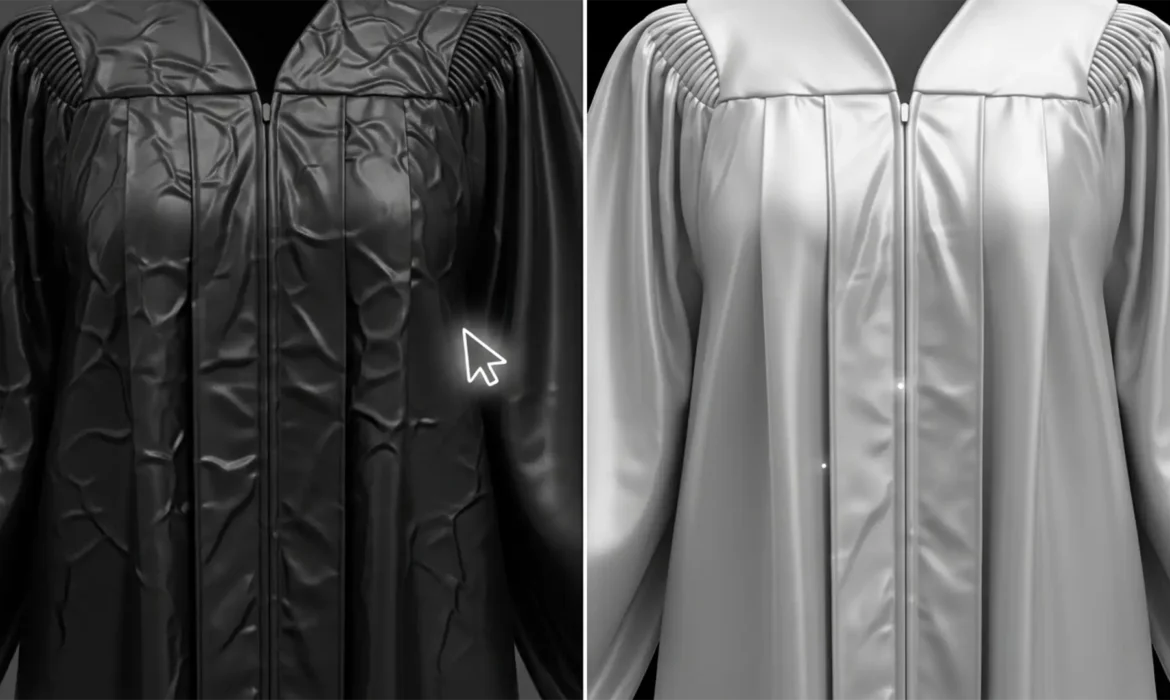
You’ve captured the perfect graduation portrait, but there’s a glaring issue: the gown looks like it was pulled straight out of a cramped duffel bag. Removing graduation gown wrinkles in Photoshop is notoriously tricky because most academic regalia is made of shiny polyester. When amateur editors try to fix these creases using standard cloning tools, they often create muddy, blurred patches that destroy the fabric’s natural sheen and drape.
If you want to eliminate harsh shadow creases without flattening the dimensional lighting of the garment, you need advanced, non-destructive workflows. In this guide, we will break down three professional methods to flawlessly smooth graduation gowns using Adobe Photoshop v24.x and v25.x.
Why Standard Tools Fail on Shiny Polyester Gowns
Graduation gowns are reflective. When fabric folds, it creates a high-contrast ridge: a bright, sharp highlight immediately followed by a deep shadow. Standard tools like the Spot Healing Brush or Clone Stamp try to blend these pixels together. The result? A smudged mess that ruins the fabric sheen and makes the garment look like flat matte plastic.
To fix this, we need to separate the texture of the fabric from the underlying color and shadow data, or leverage Photoshop’s newest AI models to understand the geometry of the drape.
Method 1: The Quick Fix Using the AI Remove Tool (Photoshop v24.5+)
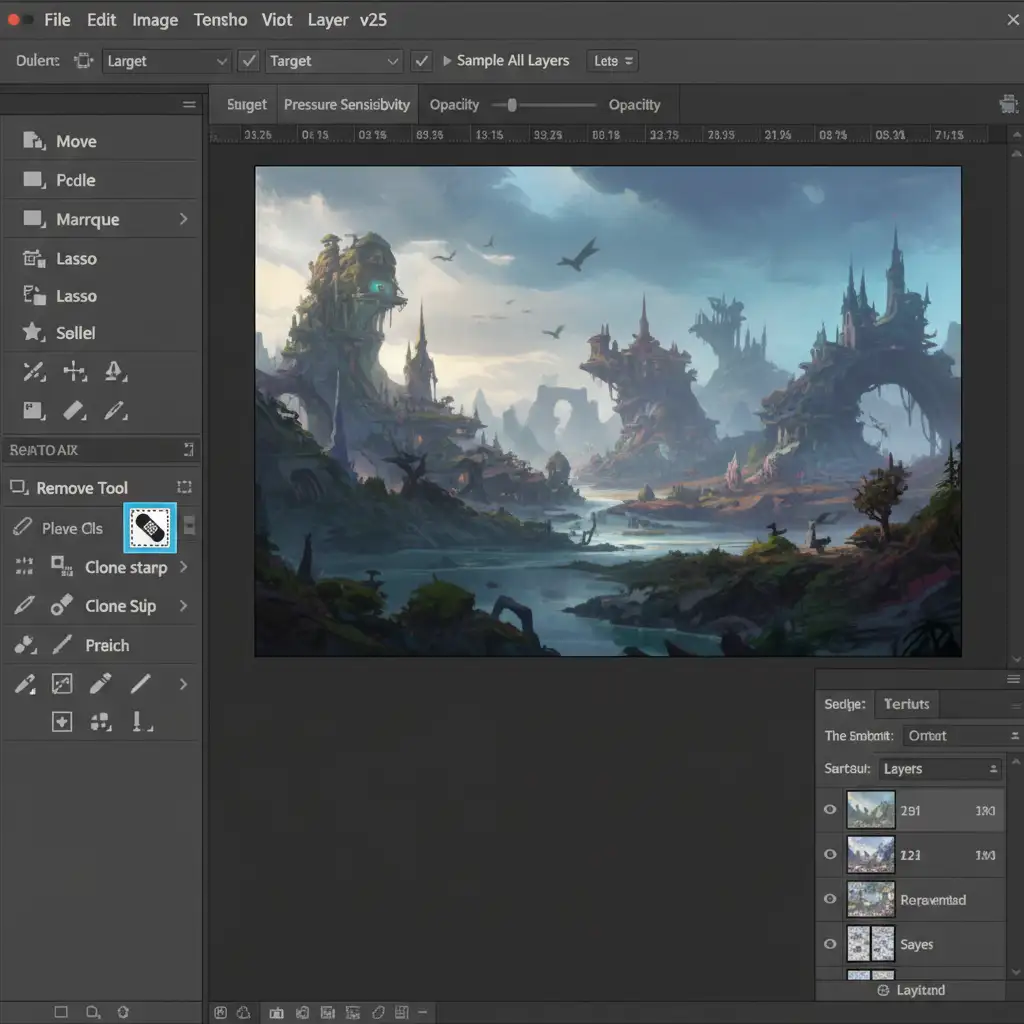
For minor to moderate wrinkles, Adobe’s AI-powered Remove Tool is a game-changer. Unlike older healing tools, it intelligently analyzes fabric texture to blend edges seamlessly.
- Open your image in Photoshop.
- Create a new, blank layer above your background layer.
- Select the Remove Tool (found under the Spot Healing Brush group).
- In the top options bar, ensure Sample All Layers is checked.
- Brush carefully over the minor wrinkles.
Because you are working on a blank layer, this method is entirely non-destructive. The AI will reconstruct the shiny polyester texture while eliminating the crease.
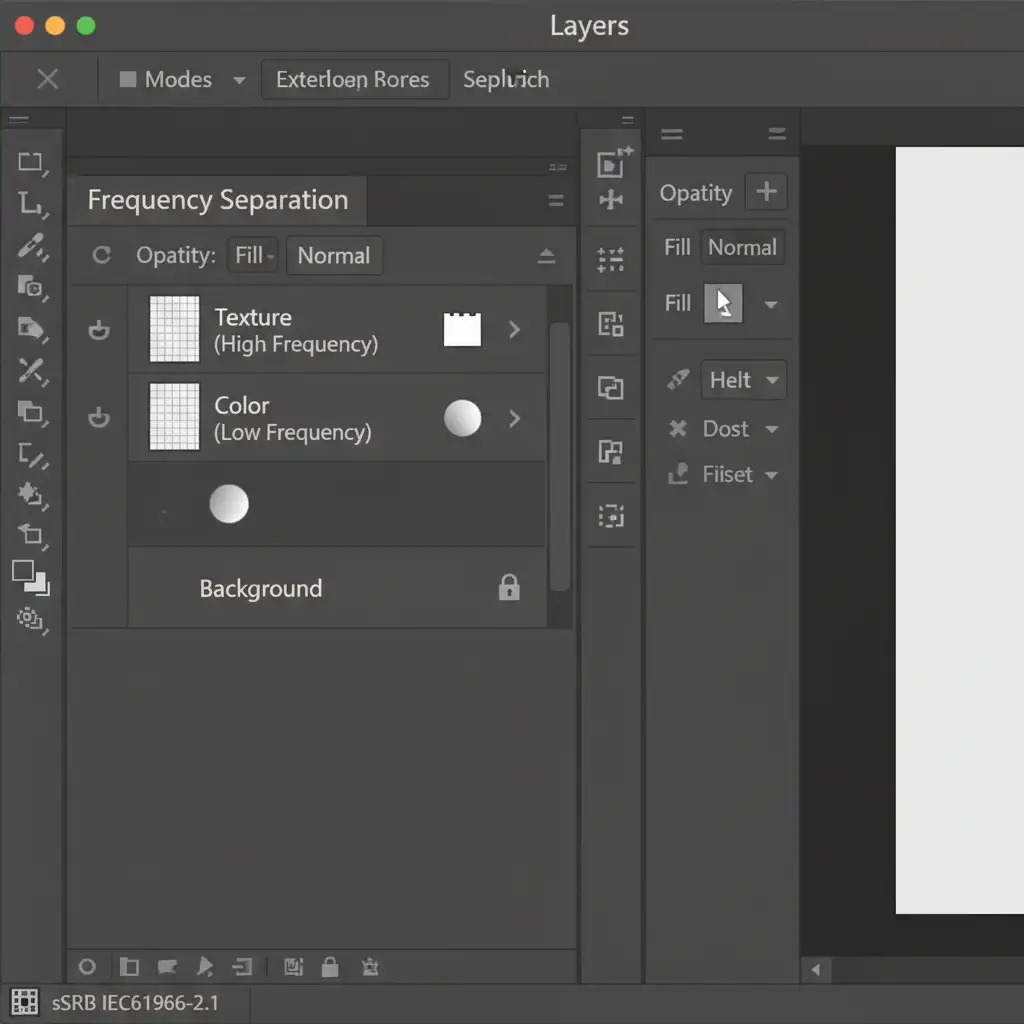
Method 2: The Pro Workaround with Frequency Separation
When dealing with complex, overlapping folds, the Remove Tool might still struggle. This is where Frequency Separation becomes essential. This technique splits your image into two layers: one for the color/shadows (Low Frequency) and one for the crisp fabric details (High Frequency).
Setting Up Your Frequency Separation Layers
- Duplicate your background layer twice (Ctrl/Cmd + J).
- Name the bottom duplicate “Color” and the top duplicate “Texture”.
- Hide the Texture layer and select the Color layer.
- Go to Filter > Blur > Gaussian Blur. Apply just enough Gaussian Blur to soften the wrinkles (usually between 4-8 pixels depending on resolution).
- Unhide and select the Texture layer.
- Go to Image > Apply Image.
- For 8-bit images: Layer: Color, Blending: Subtract, Scale: 2, Offset: 128.
- For 16-bit images: Layer: Color, Check “Invert”, Blending: Add, Scale: 2, Offset: 0.
- Change the Texture layer’s blending mode to Linear Light.
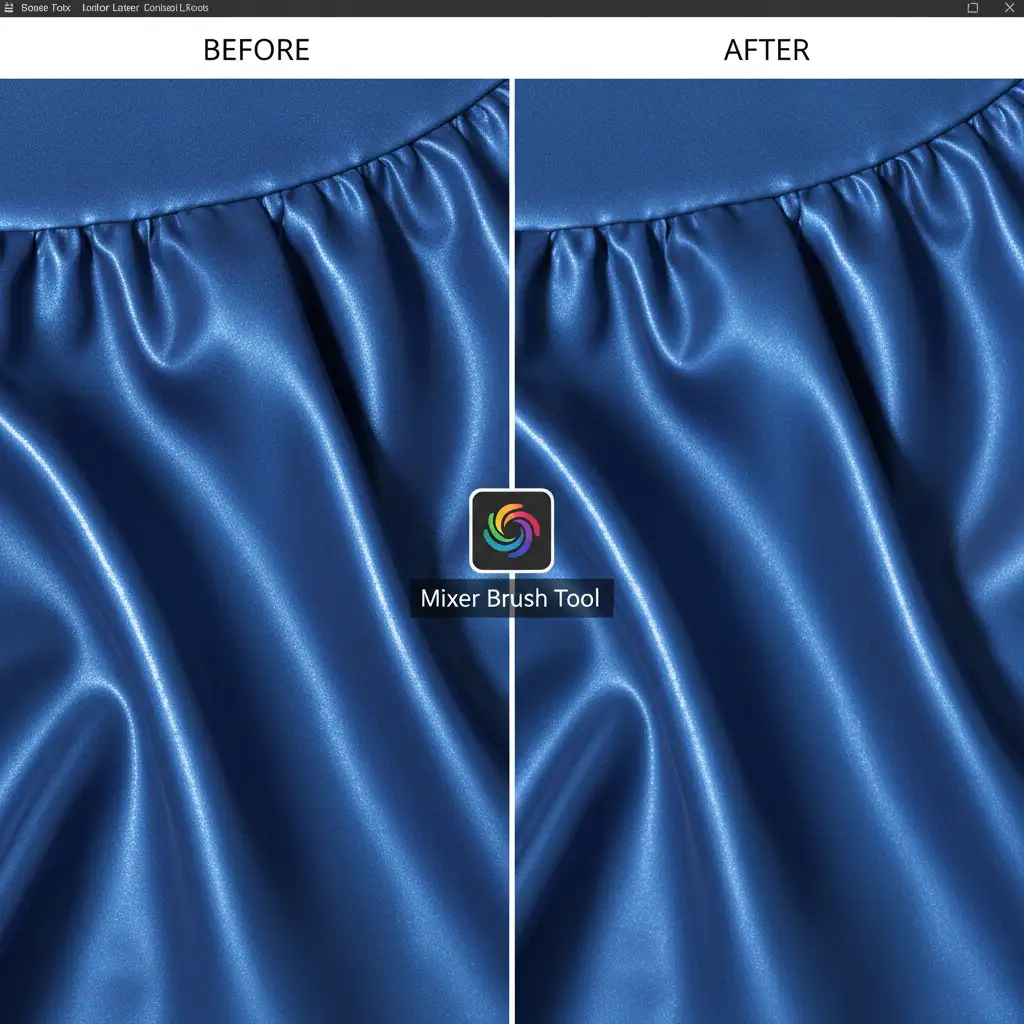
Smoothing with the Mixer Brush Tool
Now that your texture is safe on a separate layer, you can manipulate the shadows causing the wrinkles.
- Select your “Color” layer.
- Choose the Mixer Brush Tool.
- Set your brush to a clean, soft round brush. Use settings around Wet: 20%, Load: 20%, Mix: 20%, Flow: 20%.
- Gently brush along the shadow creases of the gown.
You will see the dark shadows melt away into the surrounding fabric color, but because the “Texture” layer remains untouched, the shiny weave of the polyester stays perfectly sharp.
Method 3: The Technical Deep-Dive (Generative Fill & Dodge and Burn)
For massive, structural creases that distort the entire shape of the academic gown, you need a hybrid approach.
Leveraging Generative Fill for Massive Creases
If a wrinkle completely ruins the silhouette of the gown, you can rebuild it using Photoshop’s AI.
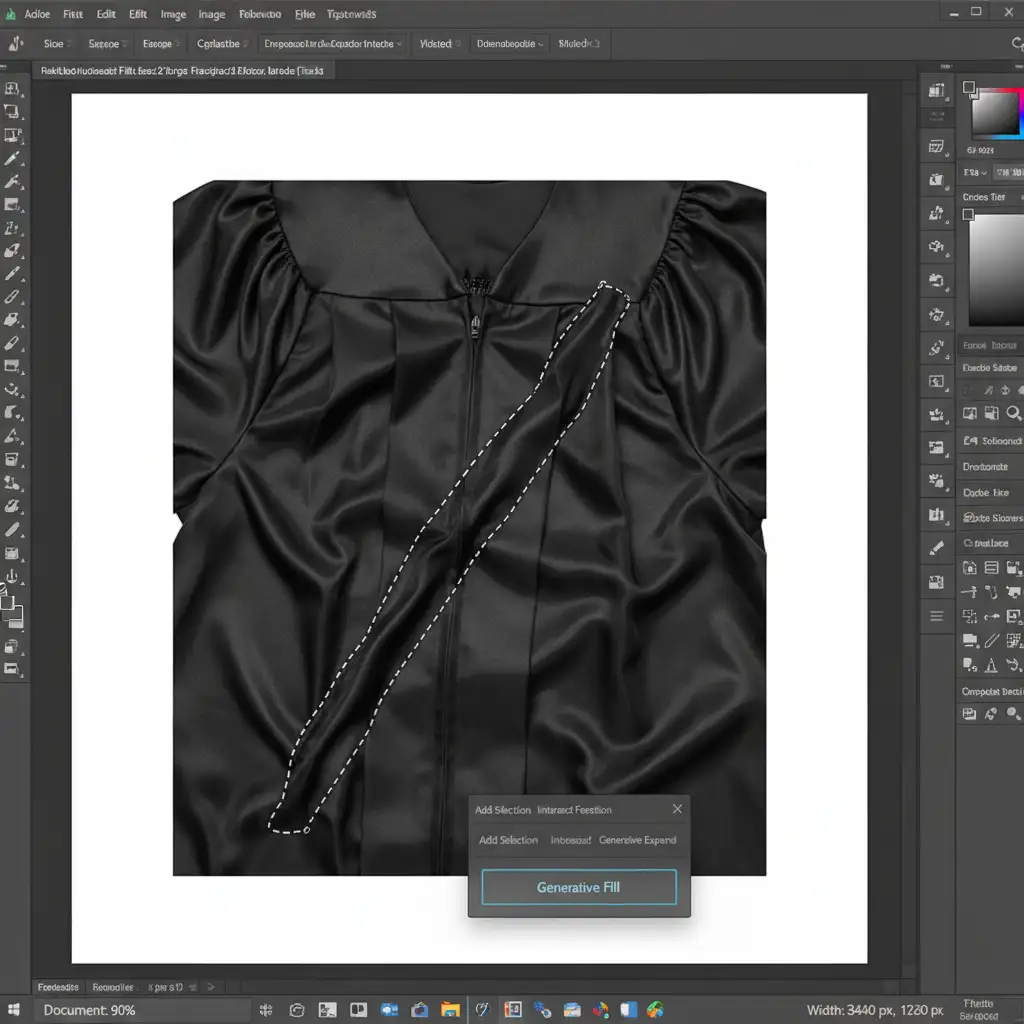
- Use the Lasso tool to make a loose selection around the massive crease.
- The Contextual Taskbar will appear. Click Generative Fill.
- You can leave the prompt blank, or type: “smooth graduation gown fabric”.
- Click Generate and choose the variation that best matches the natural drape.
Micro-Retouching with Dodge and Burn
Generative Fill might leave slight lighting inconsistencies. To perfect the edit, use Dodge and Burn on a 50% gray layer (set to Overlay or Soft Light blending mode).
- Use the Dodge tool to gently lighten the dark valleys of the crease.
- Use the Burn tool to slightly darken the harsh, bright highlights on the ridges of the folds.
This neutralizes the 3D appearance of the wrinkle, flattening it out visually while maintaining absolute control over the pixels. Combine this with precise Layer Masking to ensure your edits only affect the gown and not the graduate’s hands or diploma.
Outsource Your Bulk Graduation Edits to the Pros
Removing graduation gown wrinkles in Photoshop is a rewarding skill, but it is incredibly time-consuming. If you are a commencement photographer dealing with hundreds—or thousands—of graduate portraits, spending 10 minutes per photo smoothing out polyester gowns simply isn’t viable.
Struggling with bulk graduation edits? Outsource your commencement galleries to Image Work India and Cloud Retouch. Our expert retouching teams specialize in high-volume batch editing. We utilize advanced frequency separation and AI workflows to deliver flawless, natural-looking graduation gowns that preserve every detail of the fabric. Focus on shooting the next big event, and let us handle the pixels. Contact us today for a custom quote on your bulk retouching needs!


