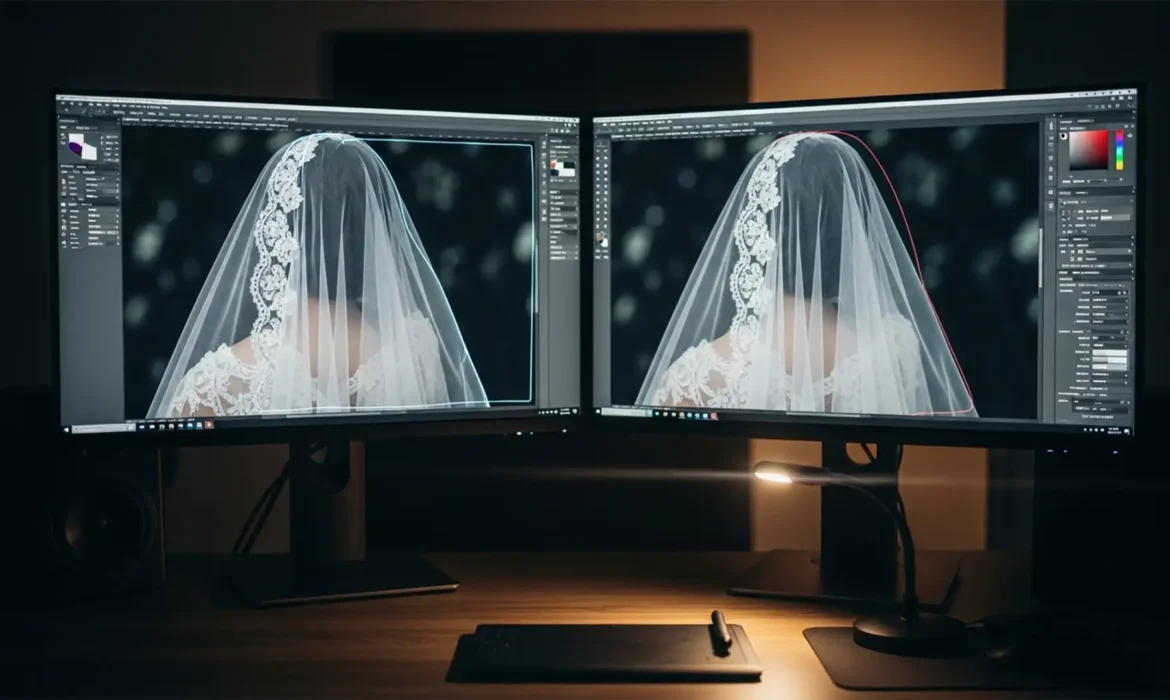
E-commerce editors know the nightmare: you click “Remove Background” on a wedding dress, and the AI instantly destroys the veil. Standard automated tools rely on hard edge-contrast detection. When faced with the alpha transparency of chiffon or intricate lace, they fail critically-leaving behind jagged geometric edges, completely deleted fabric, and severe color fringing from the original studio backdrop.
If you need to know how to remove background from lace and semi-transparent fabric 2024 standard workflows demand that you bypass the one-click buttons. True high-end retouching requires overriding AI pathing to utilize pixel-luminosity data, manual edge refinement, and conditional blending. Here is the exact professional workflow to achieve flawless transparency.
Why Automated Clipping Paths Fail on Fabric
Standard clipping paths and AI selection tools are designed for solid objects. They cannot accurately process semi-transparent pixels (alpha transparency). When a subject wears a veil or sheer lace, the original background color bleeds through the fabric. If you simply cut out the shape, you carry that background color contamination into your new composite, ruining the photorealism.
To extract lace properly, you must separate the luminosity (lightness and darkness) of the fabric from the color data of the background.
How to Remove Background From Lace and Semi-Transparent Fabric (2024 Workflows)
Depending on the contrast of your original image, Photoshop 2024 (v25.x) offers three distinct methods for flawless extraction.
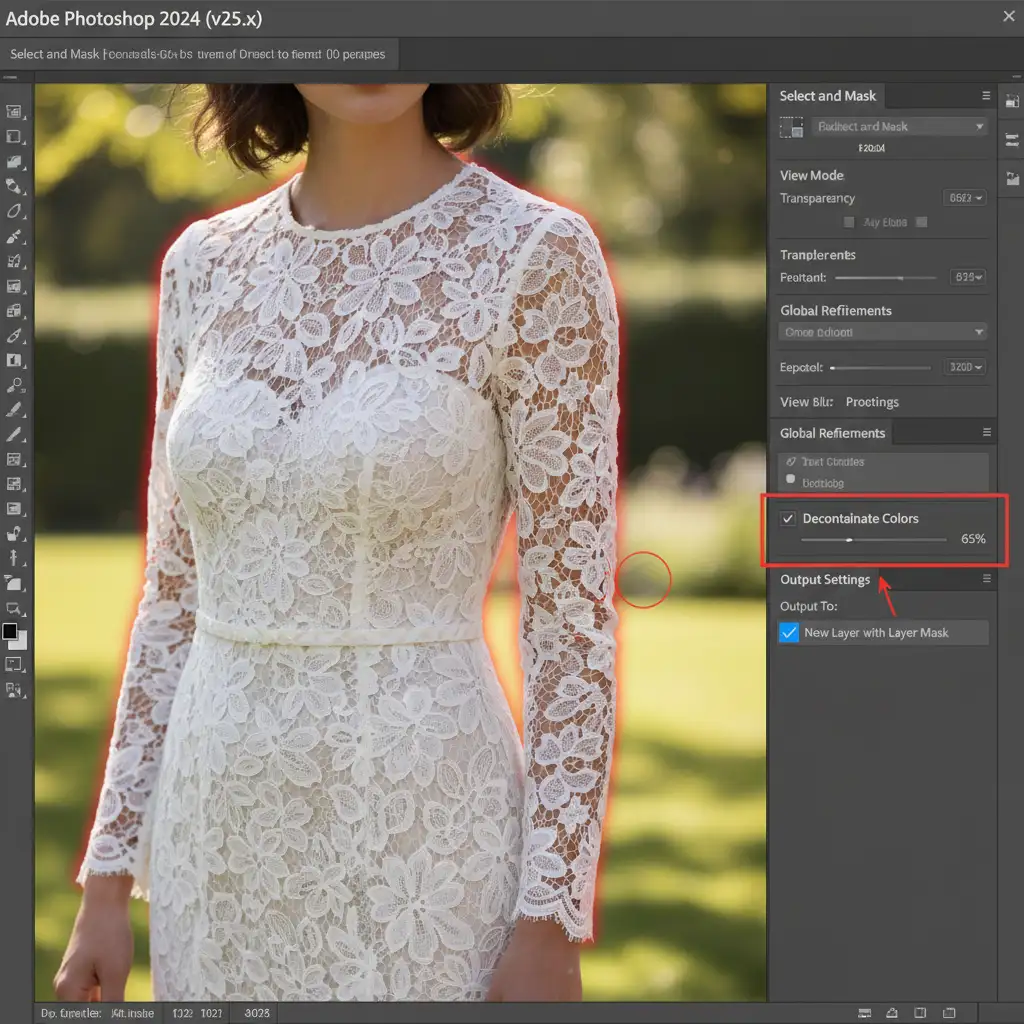
Method 1: The “Select and Mask” Quick Fix
This method works best when there is decent contrast between the lace and the background, but standard tools are leaving behind a halo.
- Initial Selection: Use the Object Selection tool to isolate the solid parts of your subject (the model’s body and face).
- Open Select and Mask: Click the ‘Select and Mask’ button in the top toolbar to enter the dedicated workspace.
- Refine Edge Brush: Select the Refine Edge Brush tool from the left panel. Carefully paint over the edges of the lace or veil. This forces Photoshop to recalculate the edge detection specifically for transparency.
- Decontaminate Colors: Scroll down to the Output Settings on the right panel. Check the Decontaminate Colors box and set the slider between 50% and 70%. This mathematically removes the background color bleed from the semi-transparent pixels.
- Output: Set the output to “New Layer with Layer Mask” and click OK.
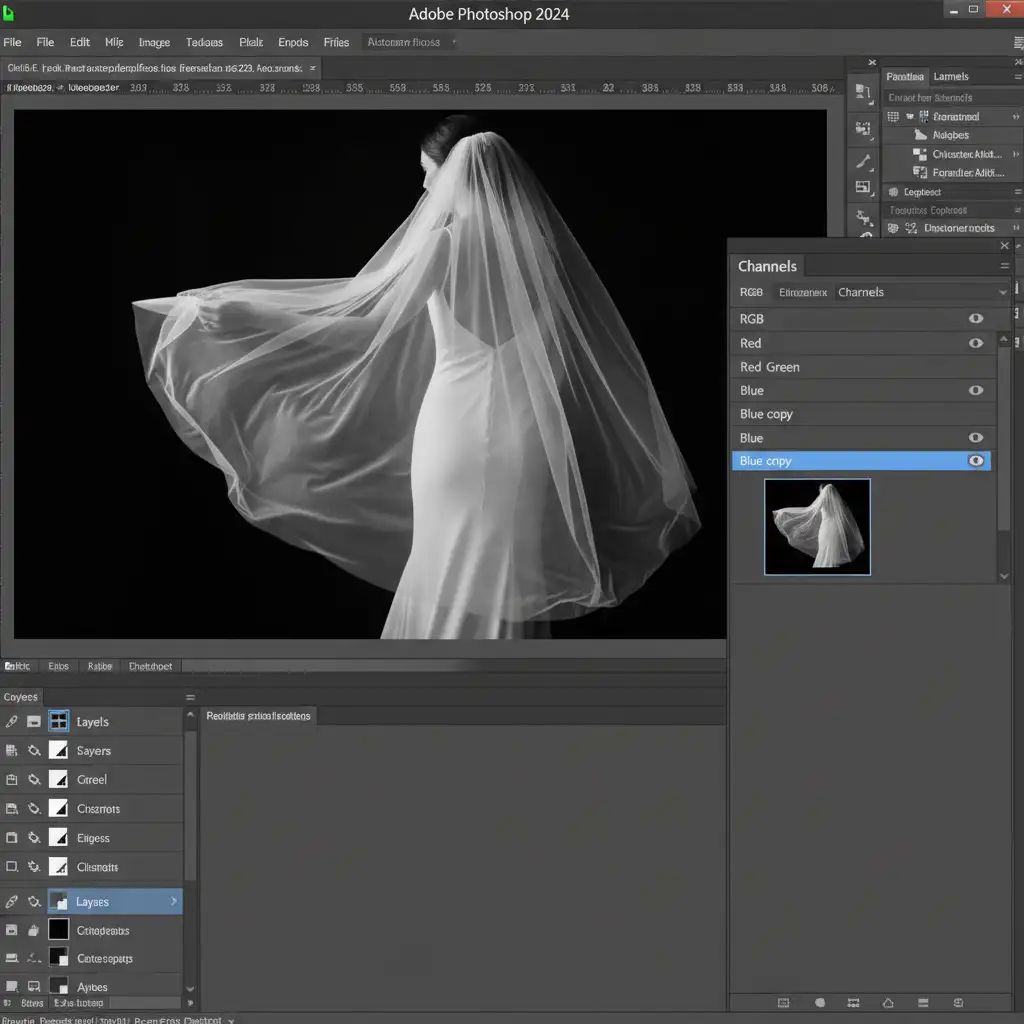
Method 2: Channel Masking for High-End Precision
When the Refine Edge tool fails, professional retouchers rely on Channel Masking. This technique uses luminosity selection to create a mathematically perfect alpha channel mask based on the actual light values of the fabric.
- Find the High-Contrast Channel: Navigate to the Channels panel. Click through the Red, Green, and Blue channels. Identify the channel that shows the highest contrast between the lace (usually white/light) and the background (dark).
- Duplicate the Channel: Drag that specific channel down to the ‘+’ icon to duplicate it. Never work on the original RGB channels.
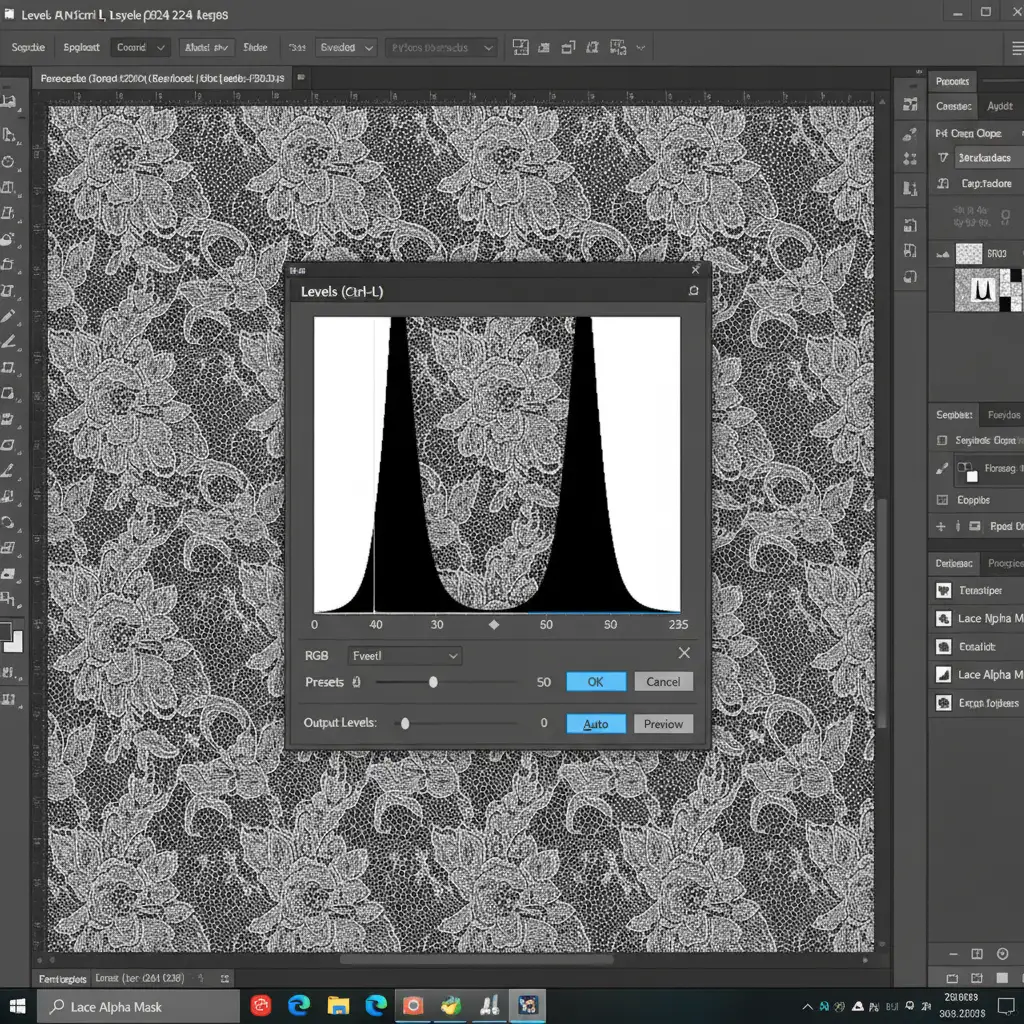
- Crush the Levels: With the duplicated channel selected, press Ctrl+L (Windows) or Cmd+L (Mac) to open the Levels dialog. Push the black point slider to the right to crush the shadows (making the background pure black), and push the white point slider to the left to blow out the highlights (making the lace pure white). You are creating a stark black-and-white silhouette.
- Load the Selection: Hold Ctrl (or Cmd) and click the thumbnail of your duplicated channel. This loads the luminosity data as a selection, indicated by the marching ants on your canvas.
- Apply Layer Masking: Click back to the composite RGB channel, return to the Layers panel, and click the “Add Layer Mask” icon. Your lace is now perfectly extracted based on its exact pixel transparency.
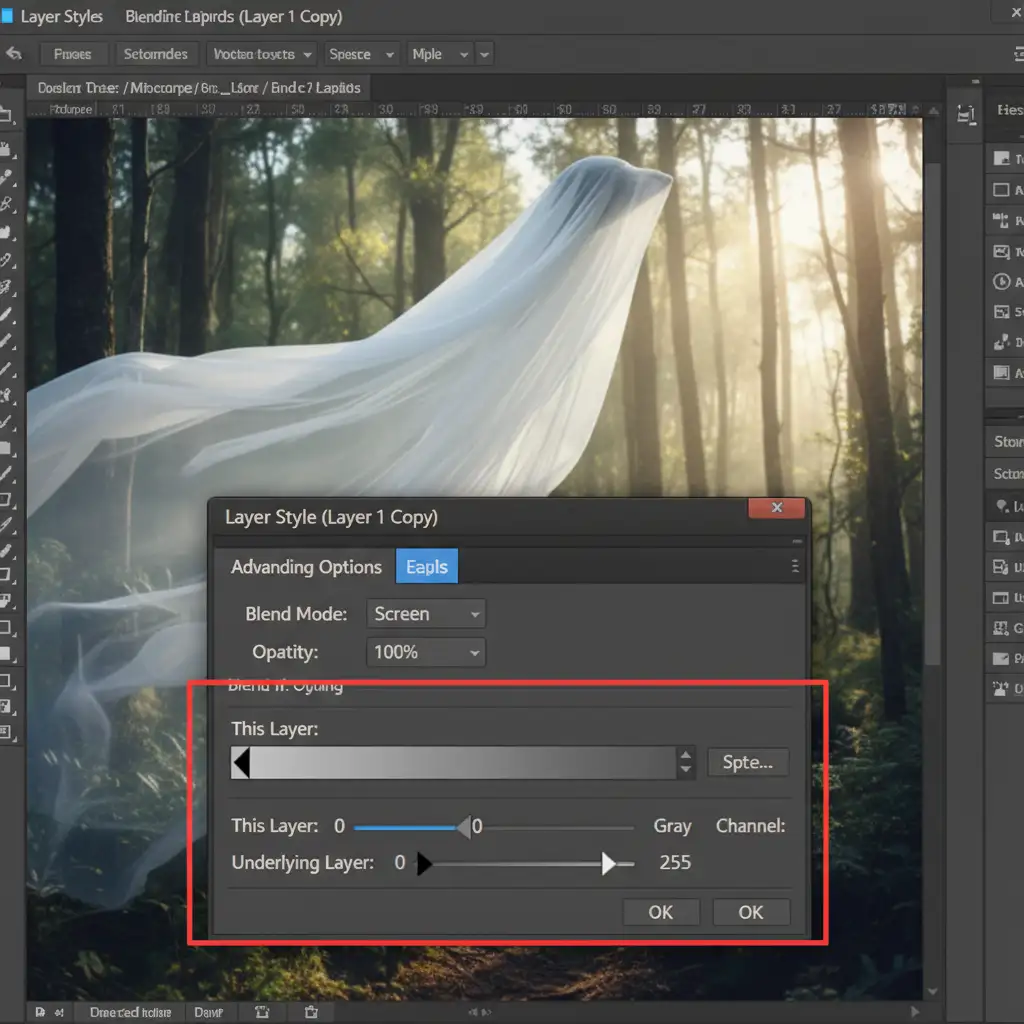
Method 3: Advanced “Blend If” Compositing
For the most complex extractions-like a white chiffon veil shot against a textured gray background-layer masking alone isn’t enough. You need advanced Blend If compositing.
- Separate the Subject: Duplicate your image. Mask the solid body of the subject on the top layer, leaving the transparent fabric unmasked on the layer below.
- Open Layer Styles: Double-click the transparent fabric layer to open the Layer Style dialog box.
- Adjust Blend If: Look at the “Blend If: Underlying Layer” or “This Layer” sliders at the bottom.
- Split the Sliders: Hold Alt (Windows) or Option (Mac) and click the triangle sliders to split them in half. Drag the split slider to create a smooth, feathered transition. This drops out the original background’s tonal values without rigidly masking the lace, preserving all micro-details.
- Apply Blend Modes: Finally, change the fabric layer’s blend mode. Use Screen for white lace/veils, or Multiply for black lace. This forces the fabric to react naturally to whatever new background you place behind it.
Scale Your High-End Retouching
Learning how to remove background from lace and semi-transparent fabric 2024 techniques takes time, patience, and deep technical knowledge of Photoshop’s luminosity engines. While these methods guarantee perfect results, they are incredibly time-consuming to execute on high-volume e-commerce or editorial shoots.
If you are struggling with complex fabric masking at scale, outsource your high-end retouching to Image Work India and Cloud Retouch. Our expert team doesn’t rely on automated shortcuts. We manually mask every intricate detail of lace, chiffon, and semi-transparent fabrics using advanced channel masking and clipping paths, delivering pixel-perfect, ready-to-publish results for your fashion and e-commerce catalogs.
Contact us today to streamline your post-production workflow and ensure your fabrics look flawless in every single shot.


