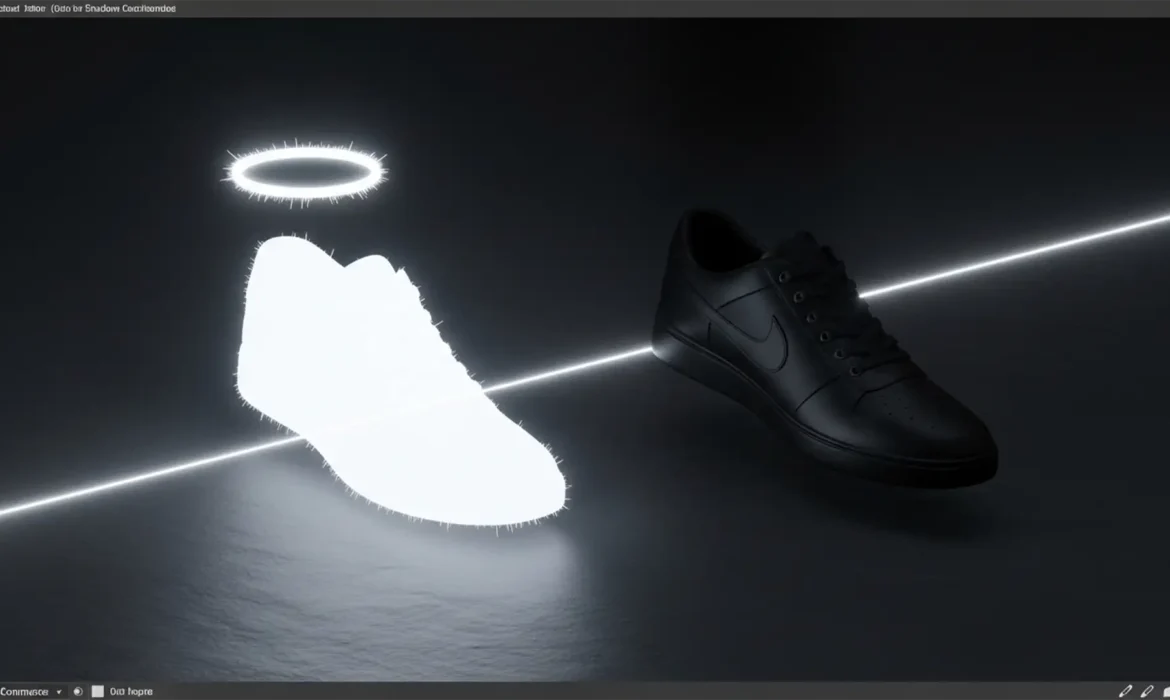
You spent hours meticulously extracting a product and its natural shadow in Photoshop. Over a white background, it looks flawless. But the moment you export it as a transparent PNG and place it over a dark-themed webpage or a colored HTML background, disaster strikes: a stark, ugly white glow surrounds your shadow.
If you are desperately searching for an original shadow PNG export white halo fix, you are not alone. This frustrating white fringe ruins the realism of e-commerce imagery. Fortunately, the issue isn’t your photography; it is how Photoshop calculates transparency.
In this guide, we will break down exactly why this happens and show you three methods—ranging from a quick fix to a professional luminosity mask technique—to achieve pixel-perfect, truly transparent shadows.
Why Does the White Halo Effect Happen in Photoshop?
When you export drop shadows or original photographed shadows to PNG-24 in Photoshop (especially noticeable in v24.x through v27.x), the software has to render semi-transparent pixels.
The white halo occurs because of anti-aliasing. If your shadow was originally photographed on a white backdrop, or if you extracted it using the Multiply blend mode over a white layer, Photoshop blends those semi-transparent shadow pixels with the underlying white data before calculating the final transparency. Essentially, the white pixels are permanently baked into the shadow. When you use the ‘Export As’ or ‘Save for Web’ dialogue, those baked-in white pixels appear as a glowing fringe against any non-white background.
To fix this, we need to extract the shadow’s pure opacity data without bringing the white pixels along for the ride.
Method 1: The Quick Fix (Remove White Matte)
If you are in a rush and need a rapid solution, Photoshop has a built-in defringing tool that targets white edge pixels.
- Duplicate your isolated shadow layer to preserve the original.
- Change the layer’s Blending Mode to Multiply.
- Navigate to the top menu and select Layer > Matting > Remove White Matte.
Note: While fast, this method can sometimes leave a slight dark artifact or reduce the overall softness of the shadow edge. For high-end e-commerce, proceed to Method 2.
Method 2: The Pro Workaround (Solid Color Fill Mask)
This is the industry standard original shadow PNG export white halo fix. By using a Luminosity Mask tied to a Solid Color Fill layer, you completely bypass the white pixel data, relying purely on the image’s light values to dictate transparency.
Step 1: Load Luminosity as a Selection
Go to your Channels panel. Hold Ctrl (Windows) or Cmd (Mac) and click directly on the thumbnail of the RGB channel. This creates a selection based on the brightness (luminosity) of the image.
Step 2: Invert the Selection
Currently, you have the white areas selected. Press Ctrl+Shift+I (Windows) or Cmd+Shift+I (Mac) to invert the selection so that the dark shadow areas are now selected.
Step 3: Apply a Solid Color Fill
With the selection active, go to the bottom of the Layers panel and click the ‘Create new fill or adjustment layer’ icon. Choose Solid Color. Set the color picker to pure black (or the specific color of your shadow).
Step 4: Hide and Export
Hide your original shadow layer. The layer masking on your new Solid Color Fill layer perfectly replicates the shadow’s opacity without a single white pixel attached.
Method 3: Technical Deep-Dive (Advanced Alpha Channel Extraction)
For complex product shots where you need absolute control over the shadow density, extracting the shadow into a dedicated Alpha Channel is the ultimate solution.
- Use the Marquee tool to select the area containing your original shadow and copy it (Ctrl/Cmd + C).
- Navigate to the Channels panel and click the ‘+’ icon to create a new Alpha Channel (usually named Alpha 1).
- Paste (Ctrl/Cmd + V) your shadow into the Alpha Channel.
- Press Ctrl/Cmd + I to invert the channel (shadows should appear white on a black background).
- Ctrl/Cmd-click the Alpha 1 thumbnail to load the exact transparency data as a selection.
- Return to the Layers panel, create a new blank layer, and fill the selection with black. Delete your original background.
Exporting Your Flawless Shadow
Once you have applied your preferred fix, it is time to export.
Go to File > Export > Export As…. Ensure your format is set to PNG, check the Transparency box, and ensure any “Matte” setting (if using Save for Web legacy) is set to None.
When you upload this file to your website, the shadow will blend beautifully with any HTML/CSS background, completely free of the dreaded white halo.
Scale Your E-Commerce Imagery with Image Work India
Fixing the original shadow PNG export white halo on a single image takes a few minutes. But what if you have a catalog of 5,000 e-commerce SKUs that all require natural, pixel-perfect transparent shadows for your new website redesign?
You don’t have to spend hundreds of hours manually extracting alpha channels. Image Work India and Cloud Retouch specialize in high-volume, professional image editing. From complex clipping paths and natural shadow extraction to advanced ghost mannequin effects, our expert retouchers ensure your product images are flawless, web-ready, and perfectly transparent against any background.
Stop fighting with Photoshop artifacts. Contact Image Work India today and let our team handle your shadow extraction and product retouching at scale, delivering perfect results on time, every time.


