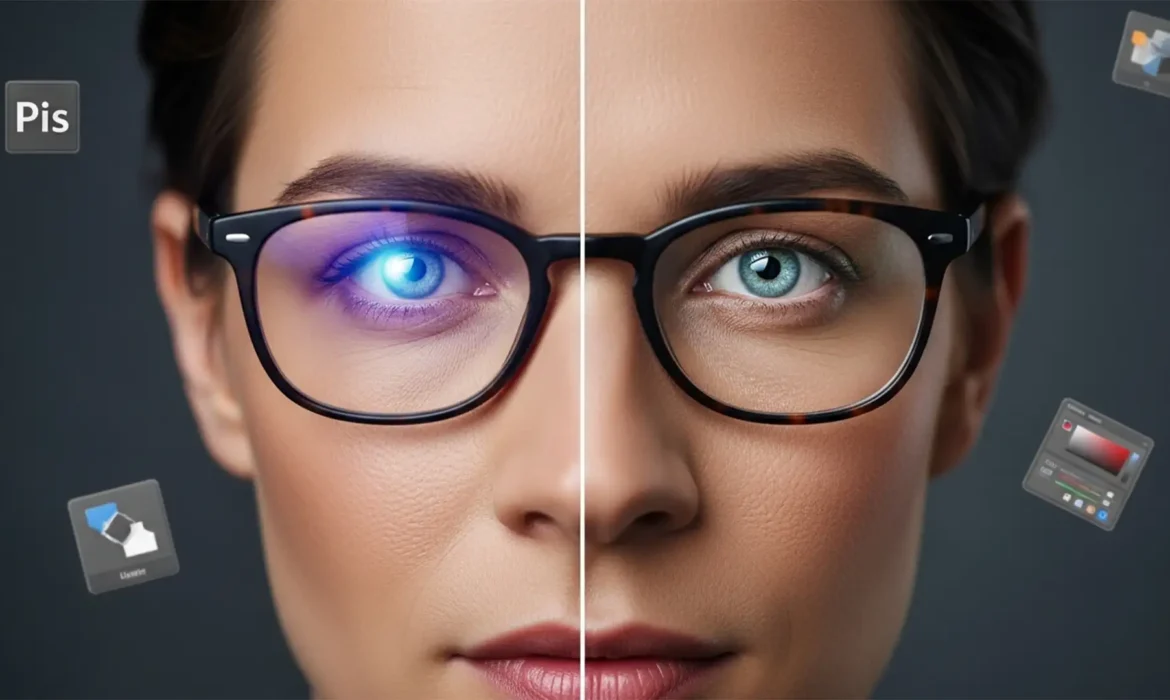
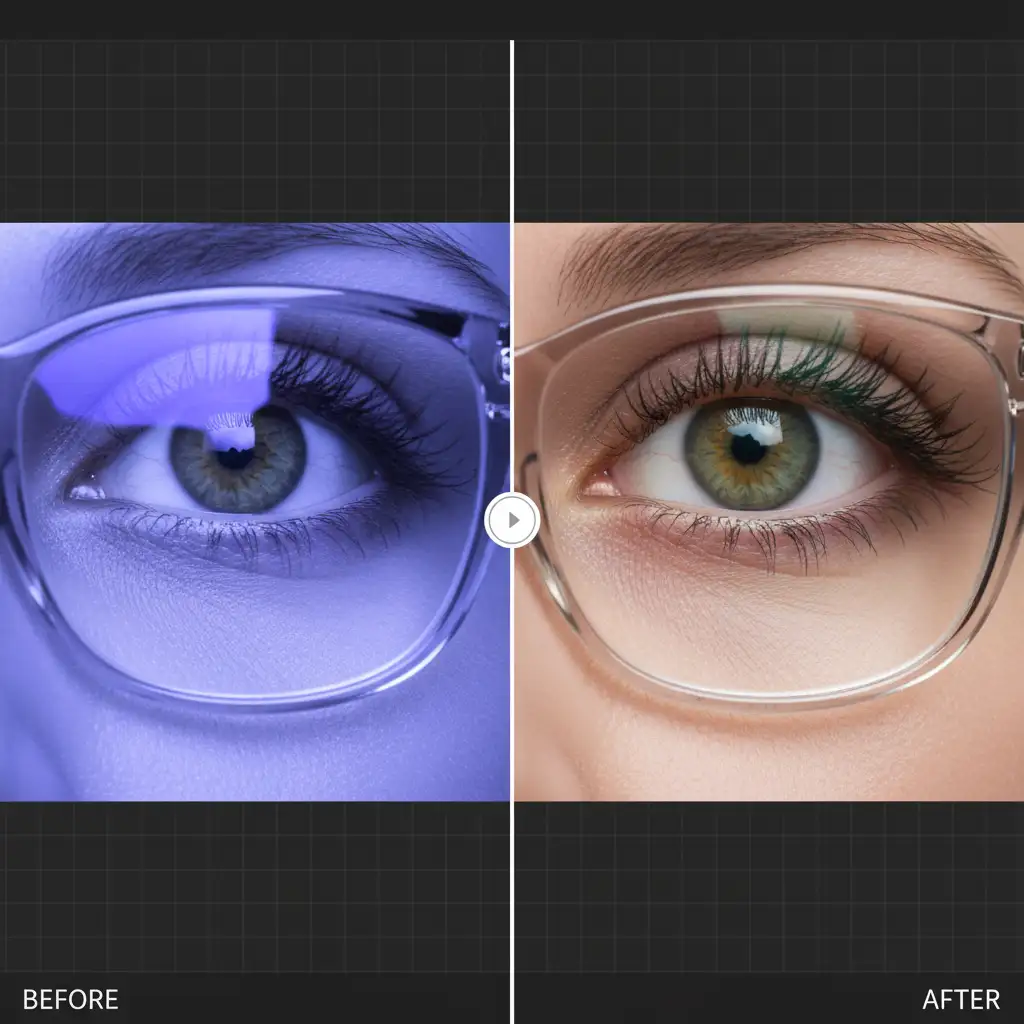
You just finished a flawless corporate headshot session, only to open Photoshop and find a glaring issue: stubborn purple and blue reflections completely hiding your subject’s eyes. Retouching blue light lens flare in headshots is the bane of modern portrait photography. Because these glasses use specialized dielectric coatings, the resulting glare isn’t just a bright spot-it’s a localized color shift that ruins contrast and masks the eye’s natural beauty.
If you try basic cloning or healing tools, you will instantly destroy the delicate iris texture and natural catchlights, leaving the eyes looking flat and lifeless. Simple desaturation isn’t much better, as it leaves behind muddy, gray patches. To rescue your portraits, you need a multi-frequency approach that separates color from texture. Let’s dive into the exact Photoshop techniques required to neutralize chromatic glare flawlessly.
Why Blue Light Glasses Ruin Headshots
Blue light blocking glasses feature a specific dielectric coating designed to reflect light in the blue and purple spectrum (typically around 380-500nm). When studio strobes or bright window light hit these lenses, the camera captures a dense, opaque chromatic reflection.
In Photoshop v24.0 and newer, tackling this requires understanding that the glare exists on two planes:
- Color: The intrusive purple/blue hue.
- Luminosity/Texture: The bright, hazy wash that destroys the contrast of the eyelashes, pupil, and iris underneath.
Here are the three most effective methods to fix it, ranging from a quick adjustment to a professional, high-end retouching workflow.
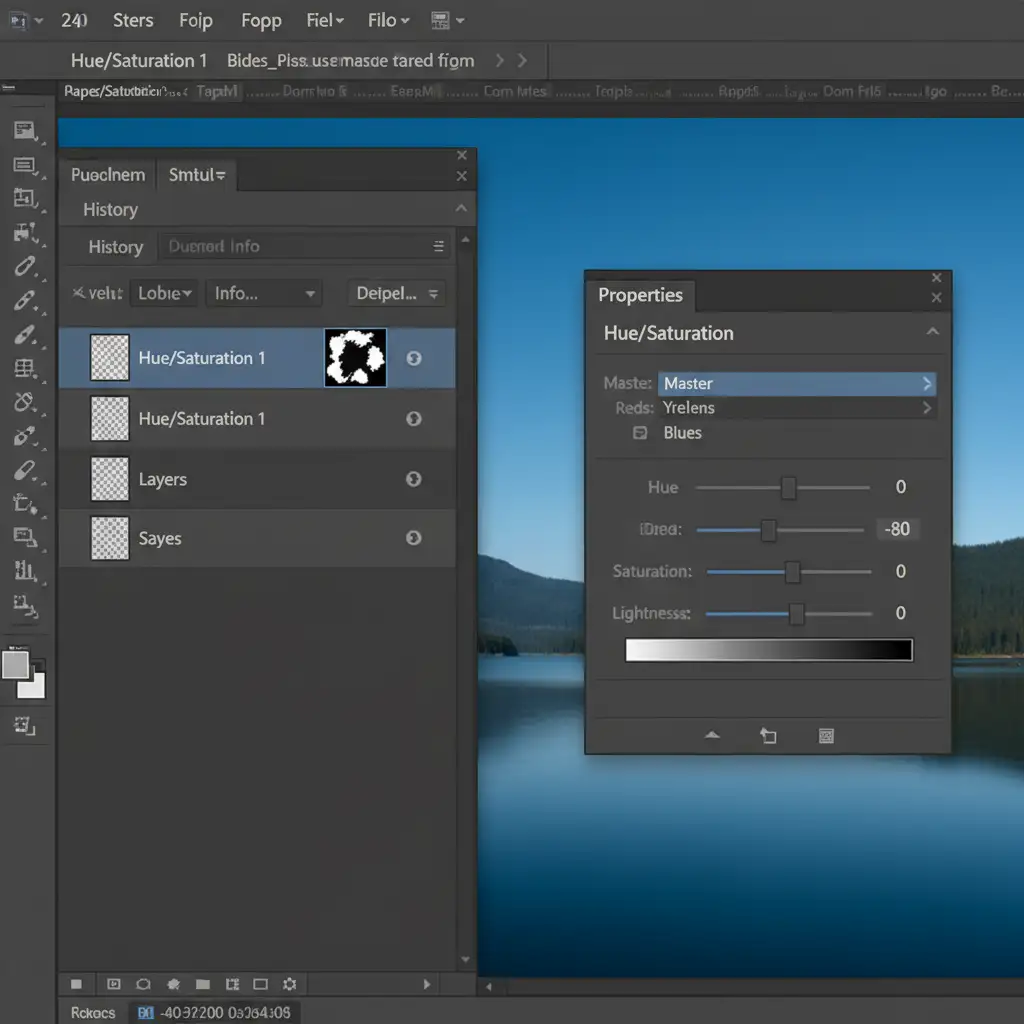
Method 1: The Quick Fix (Targeted Desaturation)
If the glare is mild and hasn’t completely blown out the details of the eye, you can isolate and remove the color cast.
- Create a Hue/Saturation adjustment layer.
- Click the master dropdown and select Blues (or Magentas, depending on the exact tint of the coating).
- Drop the Saturation slider down to -80, and slightly tweak the Lightness slider to match the surrounding skin or eye tone.
- Because you don’t want to desaturate other blue elements in the photo (like clothing or blue eyes), invert the layer mask (Ctrl/Cmd + I).
- Use a soft black brush with careful layer masking to paint white exclusively over the glare.
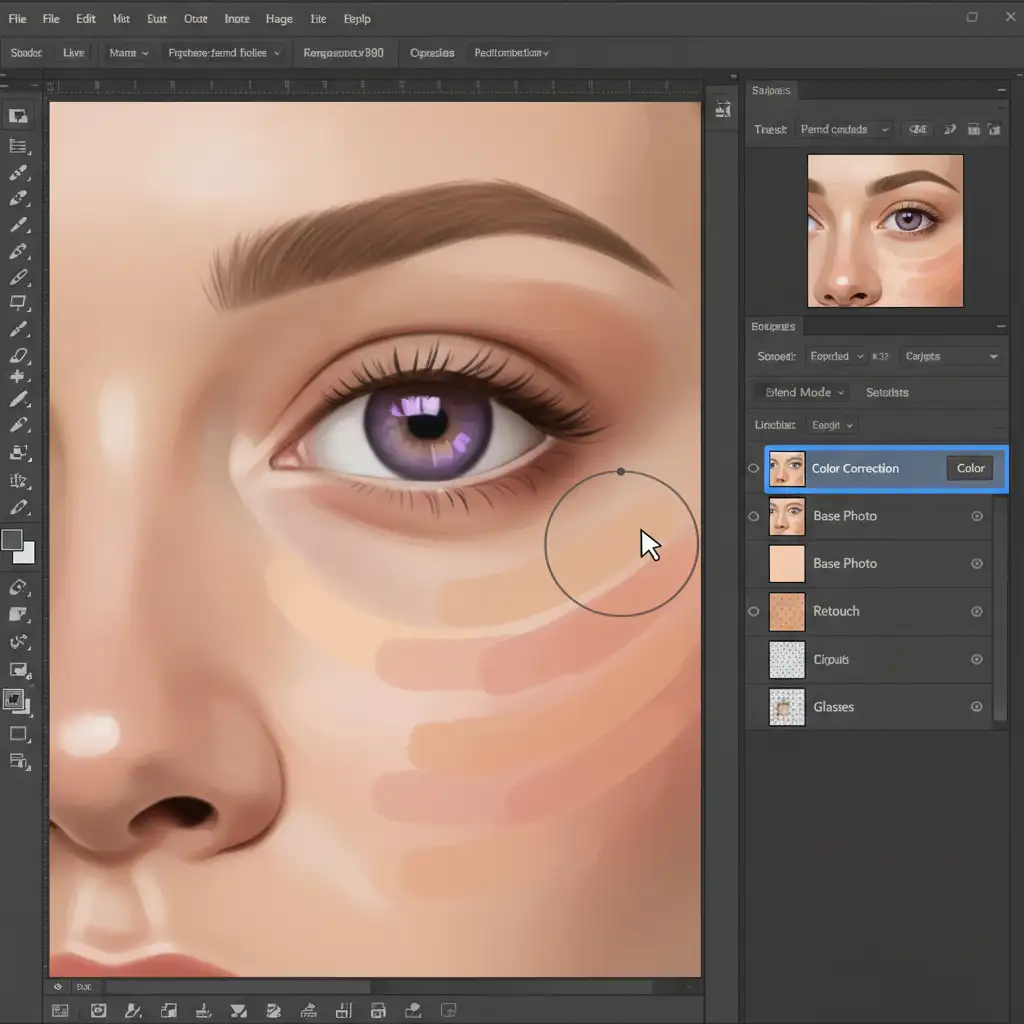
Method 2: The Pro Workaround (Blend Mode Magic)
When desaturation leaves a muddy gray patch, you need to introduce new, correct color back into the affected area without destroying the underlying details.
- Create a new blank layer above your background.
- Change the Blend Mode of this new layer from Normal to Color.
- Select the Eyedropper tool and sample a healthy, natural skin tone (or the correct eye white/iris color) directly adjacent to the purple glare.
- Select a soft brush at 20-30% opacity and gently paint over the blue/purple reflection. The Color blend mode replaces the unwanted purple hue with the natural skin tone, leaving the underlying luminosity intact.
- Add a Curves adjustment layer clipped to your color layer to restore any lost contrast.
Method 3: The Technical Deep-Dive (Frequency Separation)
For severe glare where the eye’s contrast is heavily compromised, Frequency Separation is the only way to achieve a flawless, commercial-grade result. This technique separates your image into two layers: one for color/tones (Low Frequency) and one for texture (High Frequency).
Step 1: Setting Up the Layers
- Duplicate your background layer twice. Name the bottom duplicate “Color” and the top duplicate “Texture”.
- Turn off the Texture layer for now and select the Color layer.
- Go to Filter > Blur > Gaussian Blur. Increase the radius just until the texture of the skin and eyelashes disappears (usually between 5px and 8px for high-resolution headshots).
- Turn the Texture layer back on and select it.
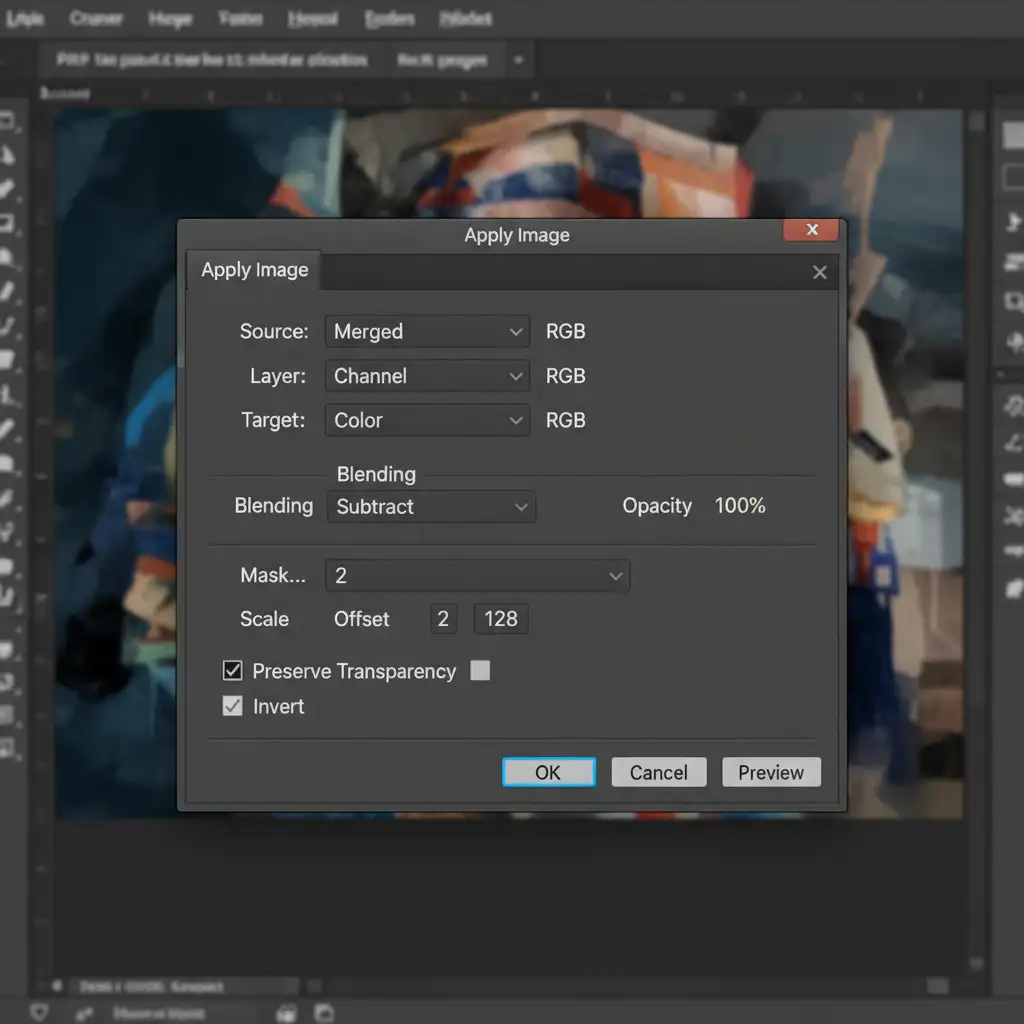
- Go to Image > Apply Image.
Step 2: The Apply Image Settings
Configure the dialog box exactly as follows for an 8-bit image:
- Layer: Select your “Color” layer.
- Blending: Subtract
- Scale: 2
- Offset: 128
Click OK. Finally, change the Blend Mode of the Texture layer to Linear Light. Your image should now look exactly like the original photograph, but the data is split.
Step 3: Retouching the Glare
Now, you can fix the color shift without ruining the eye details.
- Select the “Color” layer.
- Use the Mixer Brush tool (with a clean, moist brush setting) or the Clone Stamp tool at a low opacity.
- Gently blend the natural skin and eye colors over the purple glare. Because you are only working on the low-frequency layer, the delicate catchlights, eyelash hairs, and iris lines remain perfectly preserved on the untouched high-frequency Texture layer above it.
Stop Fighting Glare: Outsource Your Headshot Retouching
Retouching blue light lens flare in headshots requires patience, technical skill, and a deep understanding of Photoshop’s advanced tools. If you are processing a gallery of 50 or 100 corporate team headshots, spending 15 minutes per image fixing glasses glare will completely destroy your profit margins and turnaround times.
You don’t have to do this yourself.
Image Work India and Cloud Retouch specialize in high-end, bulk commercial retouching. Our team of expert retouchers handles complex frequency separation, glare removal, and stray hair cleanup daily. We guarantee flawless, naturally perfect results that preserve vital facial details and catchlights-delivered on time and on budget.
Struggling with stubborn glasses glare in your corporate team headshots? Let us handle the heavy lifting. Contact Image Work India and Cloud Retouch today to streamline your post-production workflow and deliver stunning, glare-free galleries to your clients.


