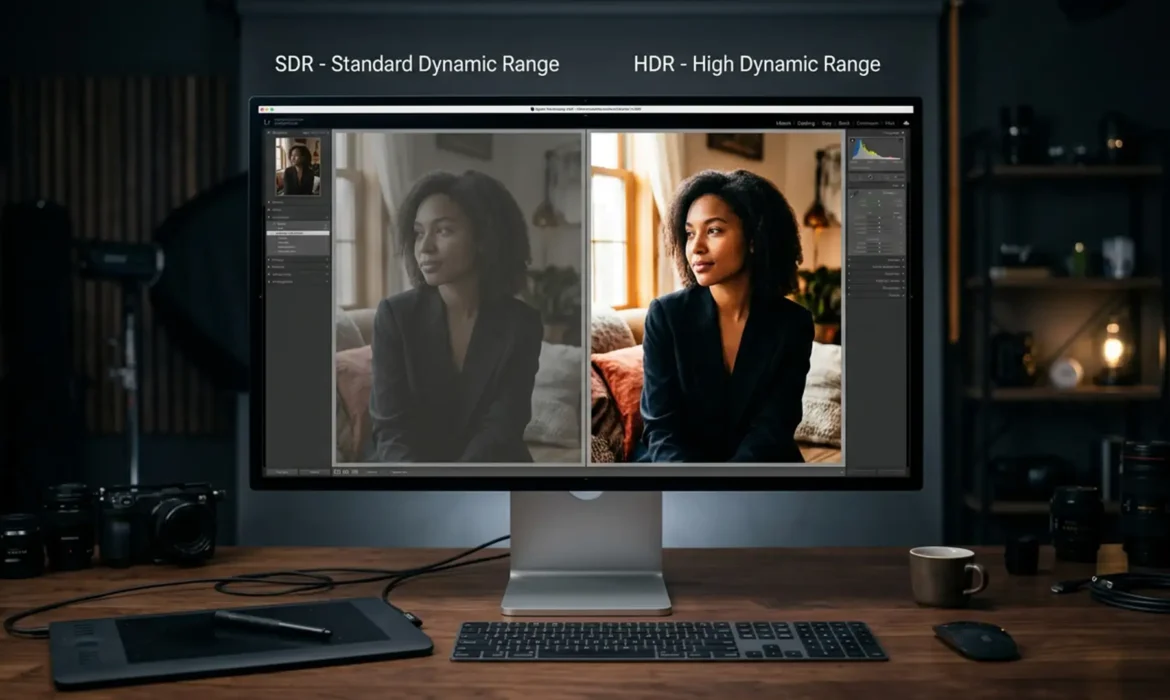
You’ve spent hours perfecting a high-end portrait. It looks flawless on your studio monitor. But when your client views it on their new Apple XDR display, the highlights are blown out, and the colors look completely washed out. Sound familiar?
The rapid transition to high dynamic range screens has created a massive headache for commercial retouchers. If you don’t master retouching for HDR displays vs SDR, your portfolio will suffer from inconsistent quality. Let’s explore why HDR clipping happens in modern Photoshop and how to future-proof your workflow to ensure your color grading translates perfectly across every screen.
The Core Problem: Why Your Portraits Look Different on HDR vs SDR
In Photoshop v25.0 and newer (2024+), users frequently experience a critical disconnect when editing on HDR-capable monitors. The core technical issue stems from mismatched color depth. Standard monitors utilize 8-bit or 16-bit color depth mapped to Rec.709/sRGB standards. However, modern high-end displays push massive amounts of Nits (luminance) to achieve high Peak Brightness, requiring a wider Color Gamut and advanced transfer functions like the Perceptual Quantizer (PQ).
When you edit an SDR image and view it on an HDR screen without proper color management, the display attempts to stretch the SDR values into the HDR space. The result? Severe HDR clipping. Conversely, an image edited natively in HDR will look incredibly dull on an SDR device due to a lack of proper Tone Mapping.
To solve this, retouchers must adopt a 32-bit Float workflow, utilizing standards like Display P3 or Rec. 2020 to bridge the gap between legacy screens and modern HDR10 devices.
How to Set Up Your Photoshop Workflow for HDR
To guarantee your portraits look pristine on both standard and high-end screens, you need to configure your operating system and Photoshop workspace correctly.
Step 1: Configure Your OS and Monitor Settings
Before touching Photoshop, your hardware needs to communicate properly with your operating system. Ensure that your monitor’s hardware HDR mode is active, and then enable it within your OS.
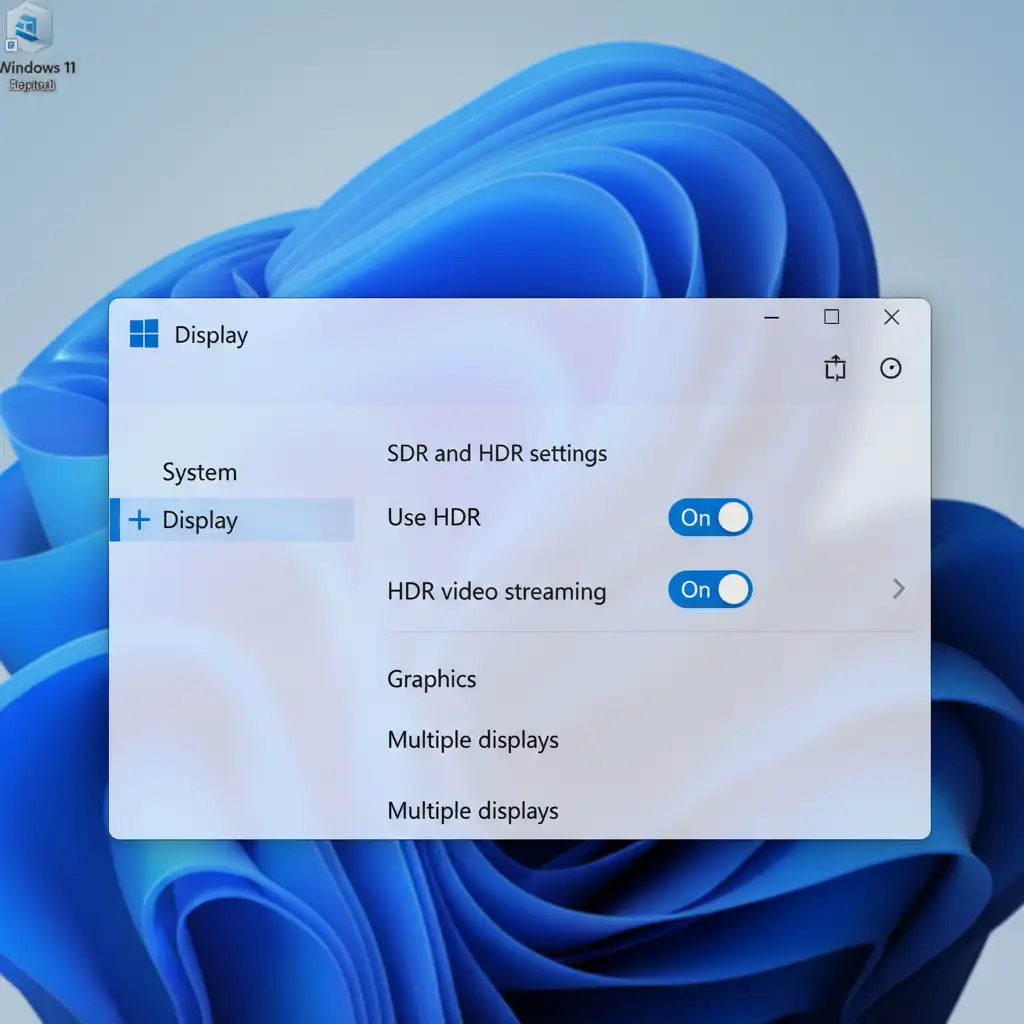
- Windows Users: Navigate to Display Settings and toggle “Use HDR” to the ON position.
- Mac Users: Go to System Settings > Displays and check the “High Dynamic Range” box (available on compatible Apple XDR or Liquid Retina displays).
Step 2: Enable HDR Technology Previews in Photoshop
Photoshop requires explicit permission to utilize your display’s full dynamic range. This is currently housed under the Technology Previews section.
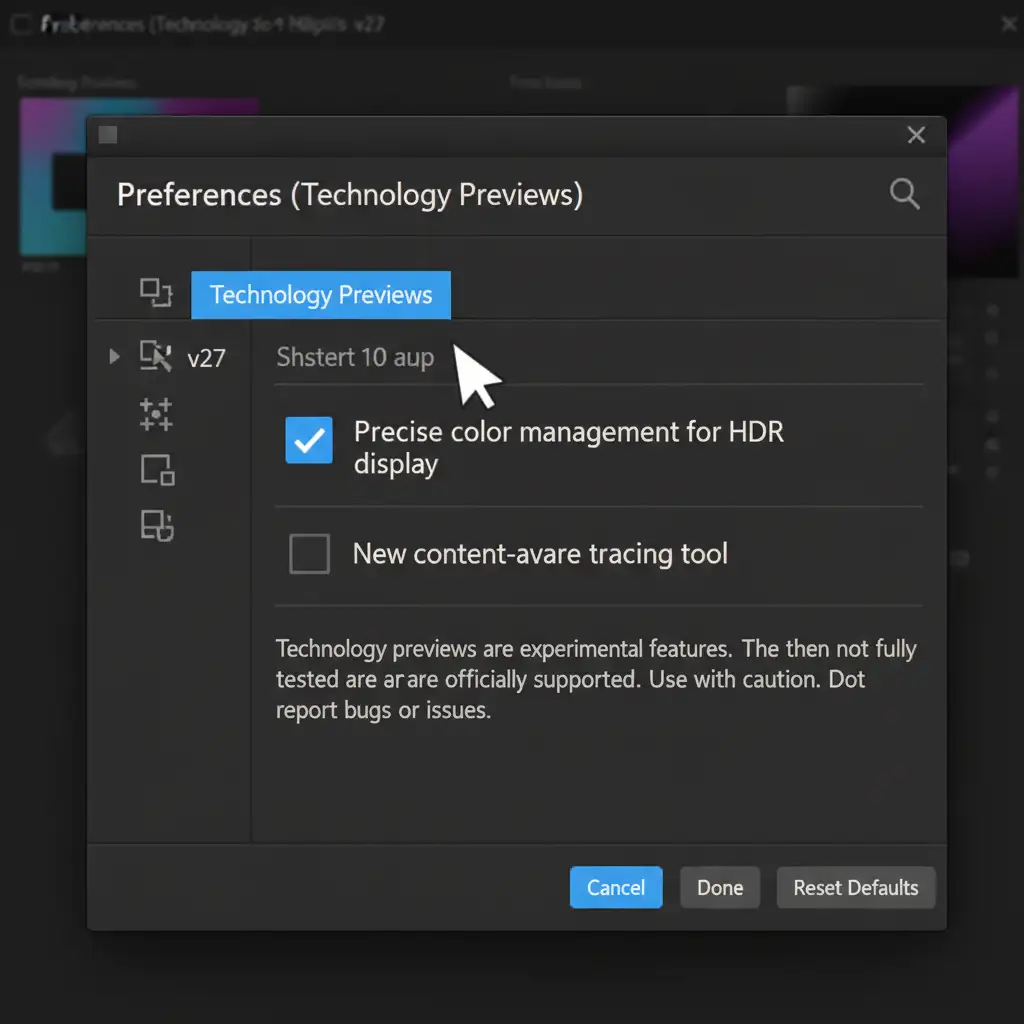
- Open Photoshop and go to Edit > Preferences > Technology Previews (Windows) or Photoshop > Settings > Technology Previews (Mac).
- Check the box labeled Precise color management for HDR display.
- Restart Photoshop to apply the changes.
Step 3: Switch to a 32-Bit Float Color Depth
To capture the vast amount of data required for high dynamic range, you must move away from standard 8-bit or 16-bit limitations.
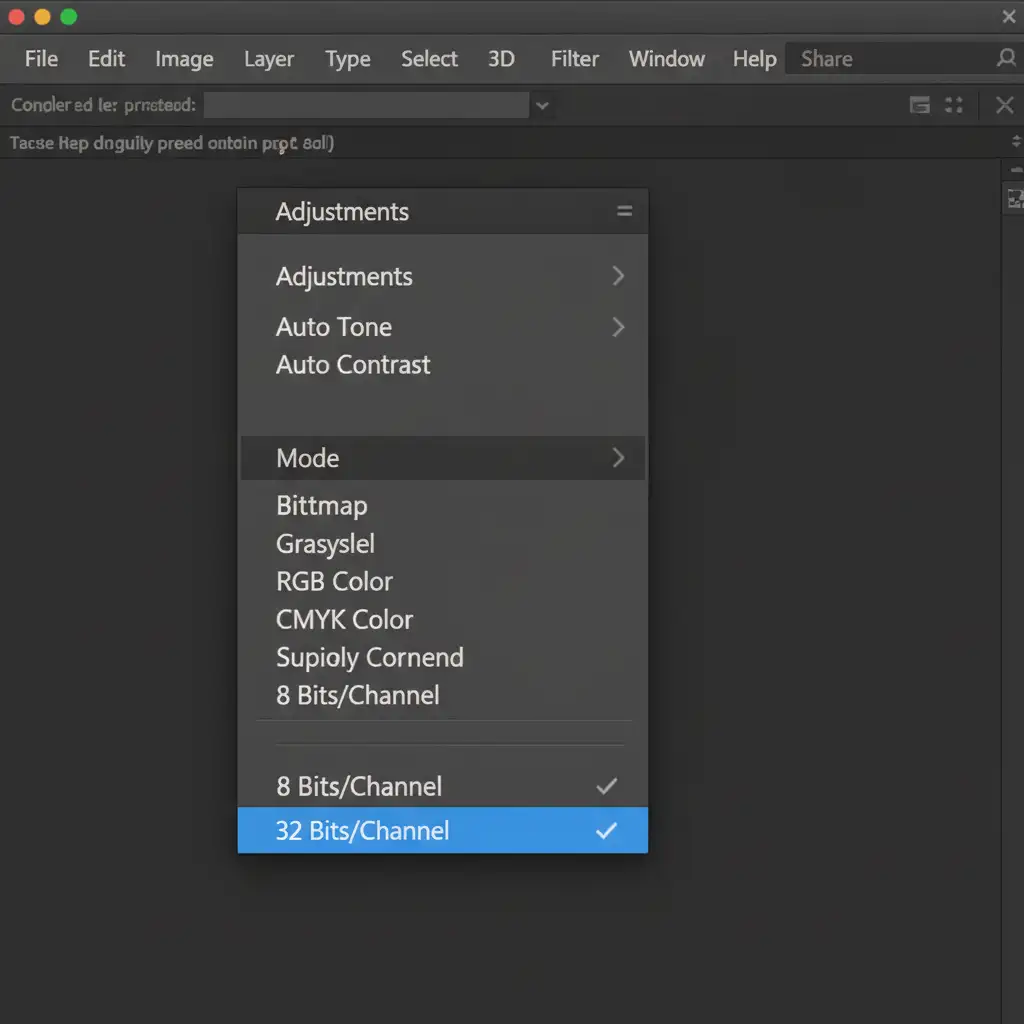
Navigate to Image > Mode > 32 Bits/Channel. Working in 32-bit floating-point allows Photoshop to store luminance values far beyond standard white, preventing highlight clipping when adjusting exposure on skin tones and metallic jewelry. Set your working space to a wide gamut profile like Adobe RGB or ProPhoto RGB for maximum color retention.
The Pro Workaround: Mastering Camera Raw’s SDR Rendition
The most significant challenge in retouching for HDR displays vs SDR is ensuring backward compatibility. You want the glowing highlights for clients with Apple XDR displays, but you cannot abandon users viewing your work on standard office monitors.
This is where the Camera Raw Filter becomes your best tool.
Safely Tone Mapping for Standard Screens
Instead of guessing how your HDR image will look on an older screen, you can manually control the tone mapping.
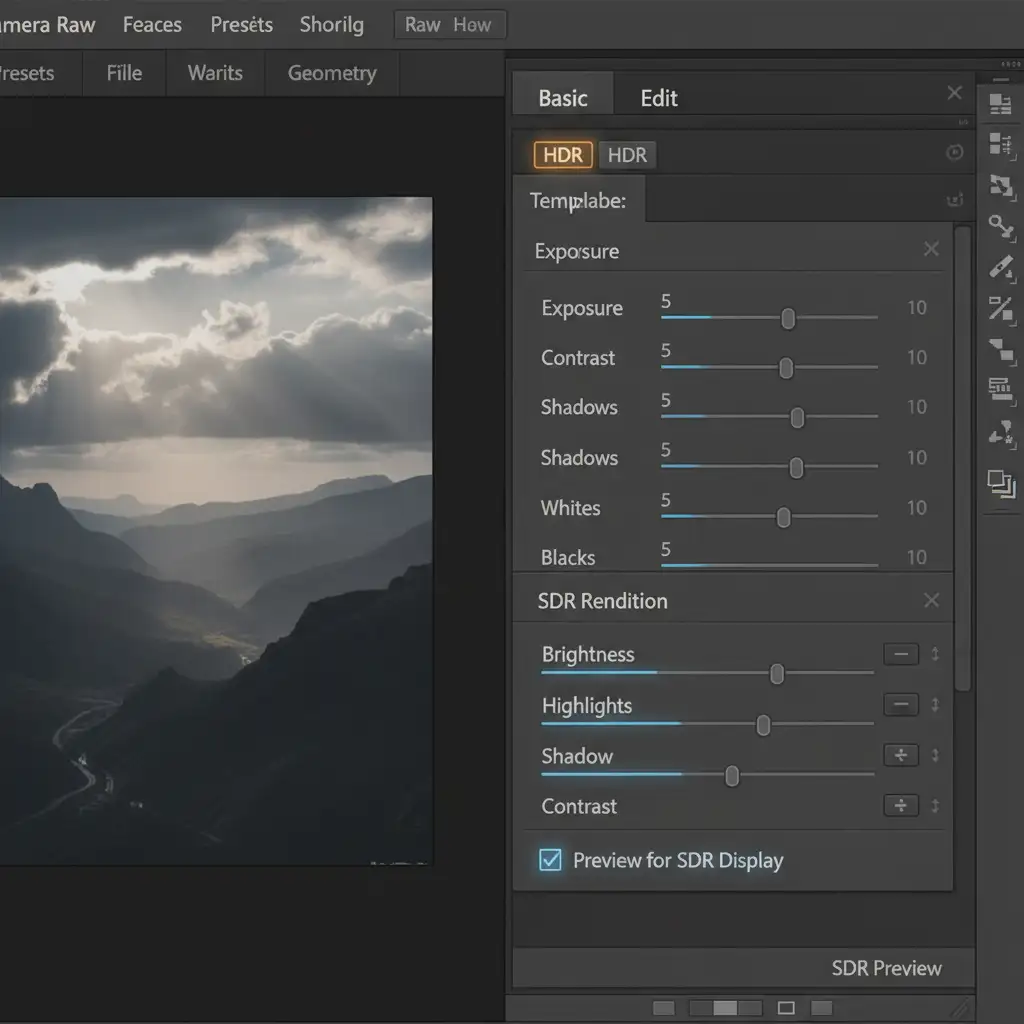
- Convert your retouched portrait layer to a Smart Object.
- Open Filter > Camera Raw Filter.
- In the Edit panel, click the HDR button to enable High Dynamic Range editing.
- Scroll down to the SDR Rendition section.
- Check the “Preview for SDR Display” box. Here, you can adjust the sliders to manually tone-map how the HDR highlights will compress when viewed on standard screens. This ensures your subject’s skin retains its natural luminosity without looking dull or flat on older devices.
Exporting Your HDR Portraits
When your retouching is complete, standard “Save for Web” won’t cut it. You must utilize the Export As feature to explicitly define the metadata for PQ or HLG transfer functions. Ensure you embed your color profile (like Display P3) so web browsers and social media platforms know exactly how to render the file’s dynamic range.
Future-Proof Your Commercial Retouching with Image Work India
Transitioning your studio’s workflow to accommodate the complexities of retouching for HDR displays vs SDR requires technical precision, high-end hardware, and extensive training. A single mistake in color depth or tone mapping can ruin a campaign across thousands of devices.
You don’t have to navigate this technical minefield alone.
At Image Work India and Cloud Retouch, our expert team is fully equipped with the latest HDR-capable hardware and advanced 32-bit workflow protocols. Whether you need high-end commercial portraits, fashion editorials, or product photography that looks flawless on every screen—from basic smartphones to top-tier Apple XDR displays—we deliver future-proof, pixel-perfect results.
Stop worrying about color clipping and washed-out highlights. Contact Image Work India and Cloud Retouch today, and let us elevate your imagery for the next generation of digital displays.


