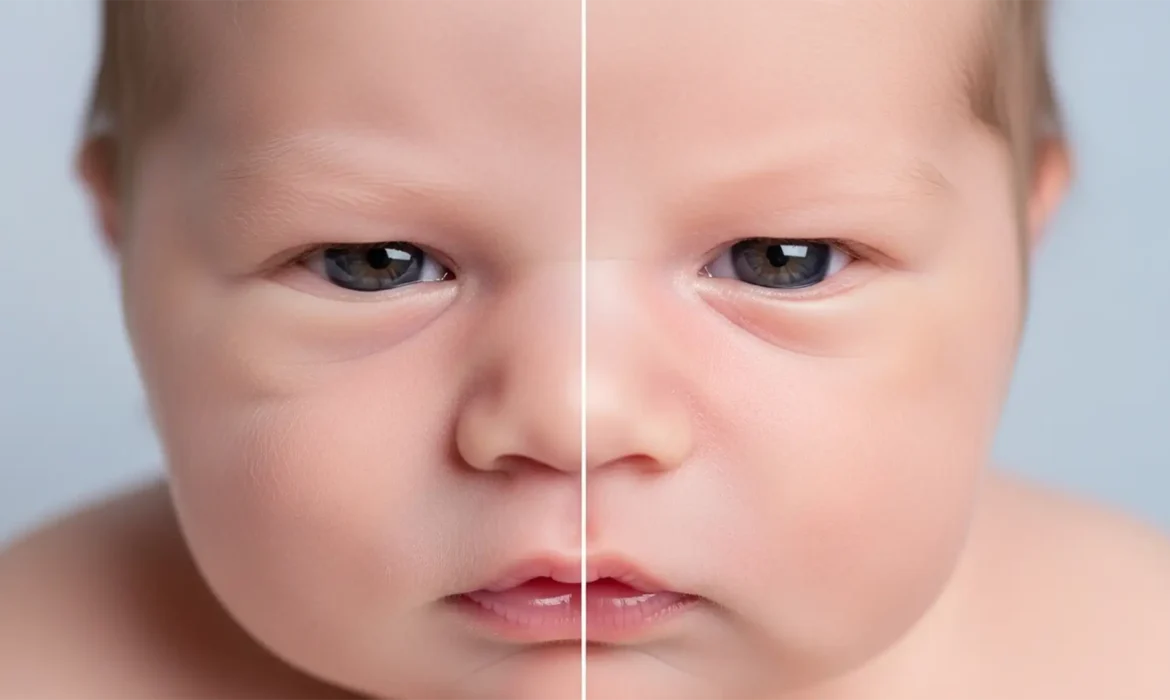
Newborn photography is all about capturing delicate, fleeting details. But when editors open modern versions of Photoshop (v24.x or v25.x) and rely heavily on the Skin Smoothing Neural Filter or an over-applied Mixer Brush, disaster strikes. The baby’s beautiful peach fuzz vanishes. The micro-contrast is destroyed. Suddenly, the infant looks like a waxy, artificial mannequin.
If you are struggling to master newborn skin retouching without a plastic look, you are not alone. The ultimate challenge in infant portraiture is balancing the removal of severe neonatal acne, jaundice color casts, and flakiness while retaining natural dermal texture.
Here is exactly how to fix your workflow to preserve that natural, soft baby skin.
Why Automated Tools Ruin Newborn Skin Retouching
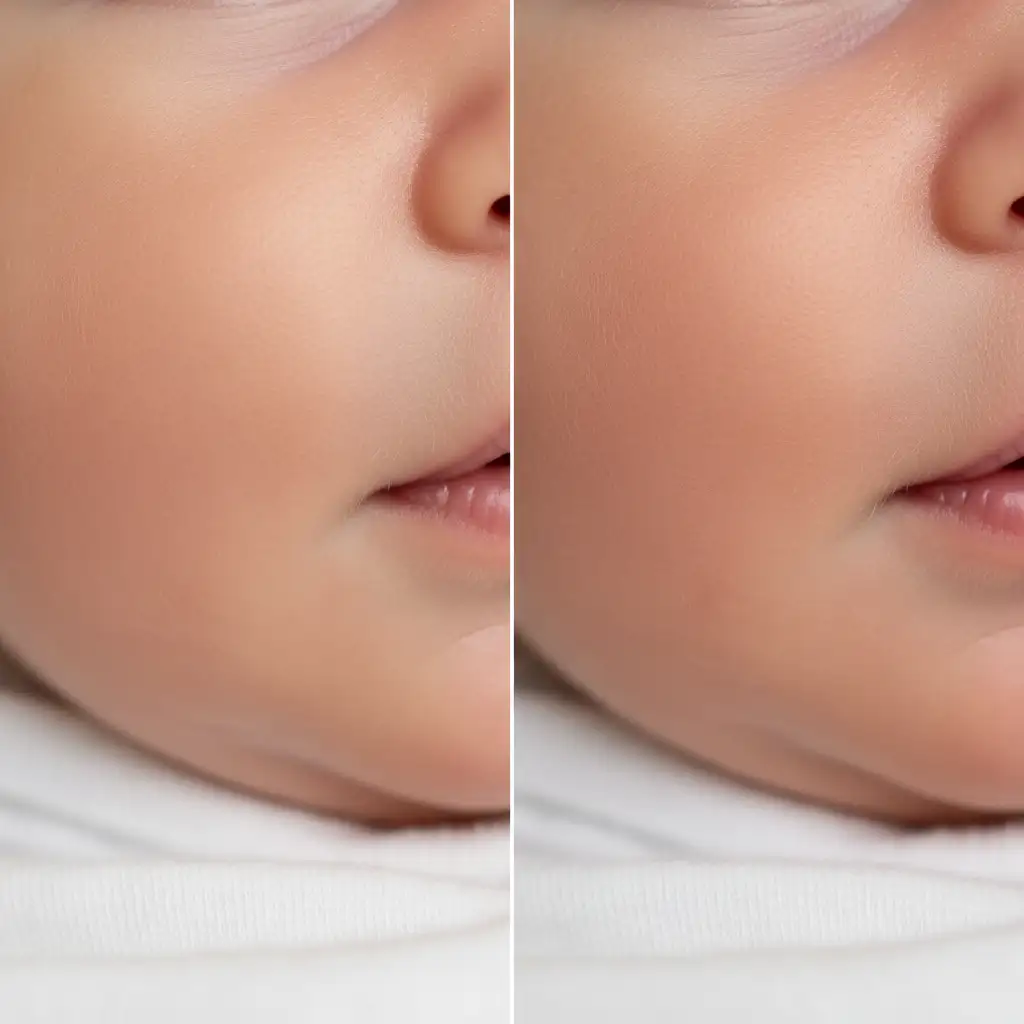
AI-driven tools and heavy-handed brush techniques fail on newborn skin because they cannot differentiate between a blemish and essential skin texture. Infant skin is uniquely covered in lanugo (fine, downy hair) and features a very specific micro-contrast.
When you blanket-apply automated smoothing, you flatten the tonal values. To achieve professional results, you must separate texture from color and tone.
Method 1: The Quick Fix for Minor Blemishes
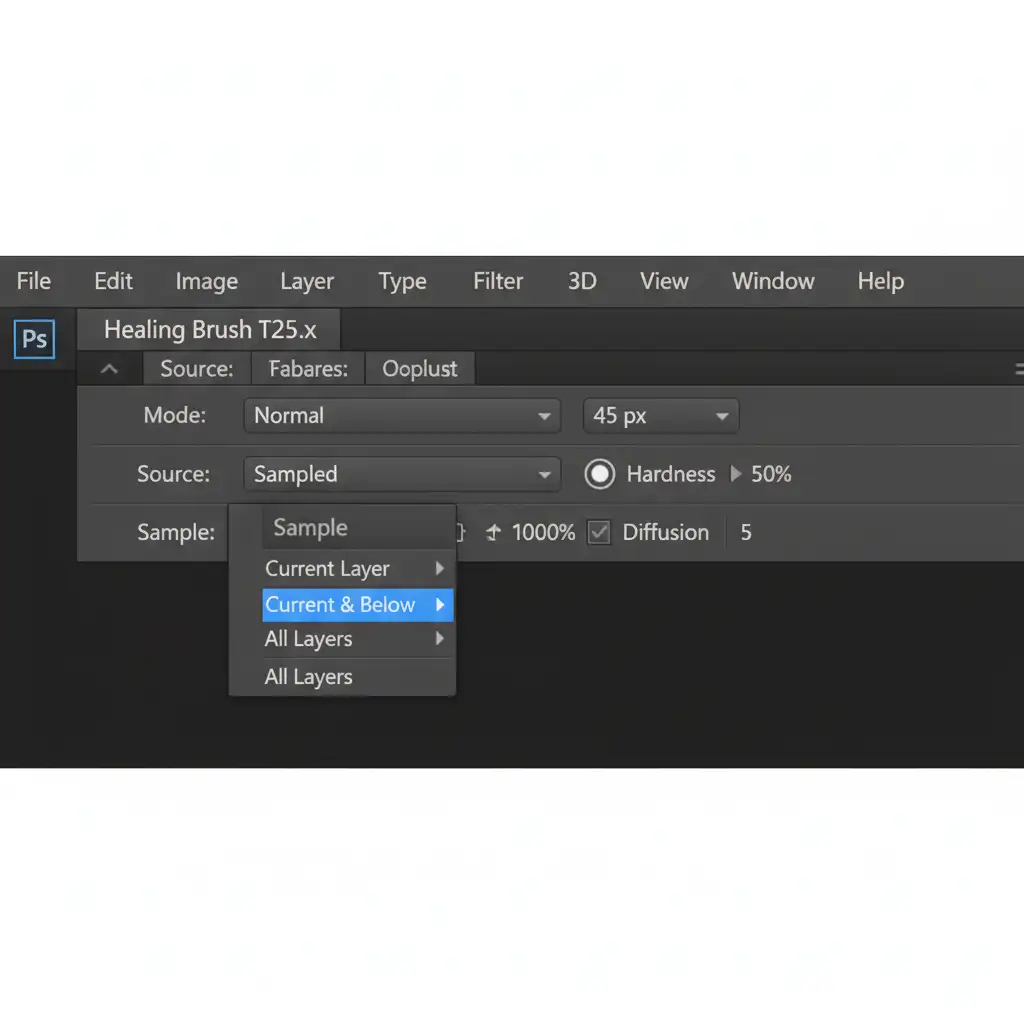
If the baby has relatively clear skin with only a few isolated spots of neonatal acne, you do not need a complex layer stack. However, you must use your healing tools correctly to avoid smudging.
Proper Healing Brush Settings
Never use the Spot Healing Brush for large patches of flakiness or redness, as it will inevitably smear the pixels and create muddy textures.
Instead, use the standard Healing Brush Tool:
- Create a blank layer above your background image.
- Select the Healing Brush Tool.
- In the top settings bar, set your sample mode to Current and Below.
- Keep your brush hardness around 50 percent to ensure the edges blend naturally without looking overly soft.
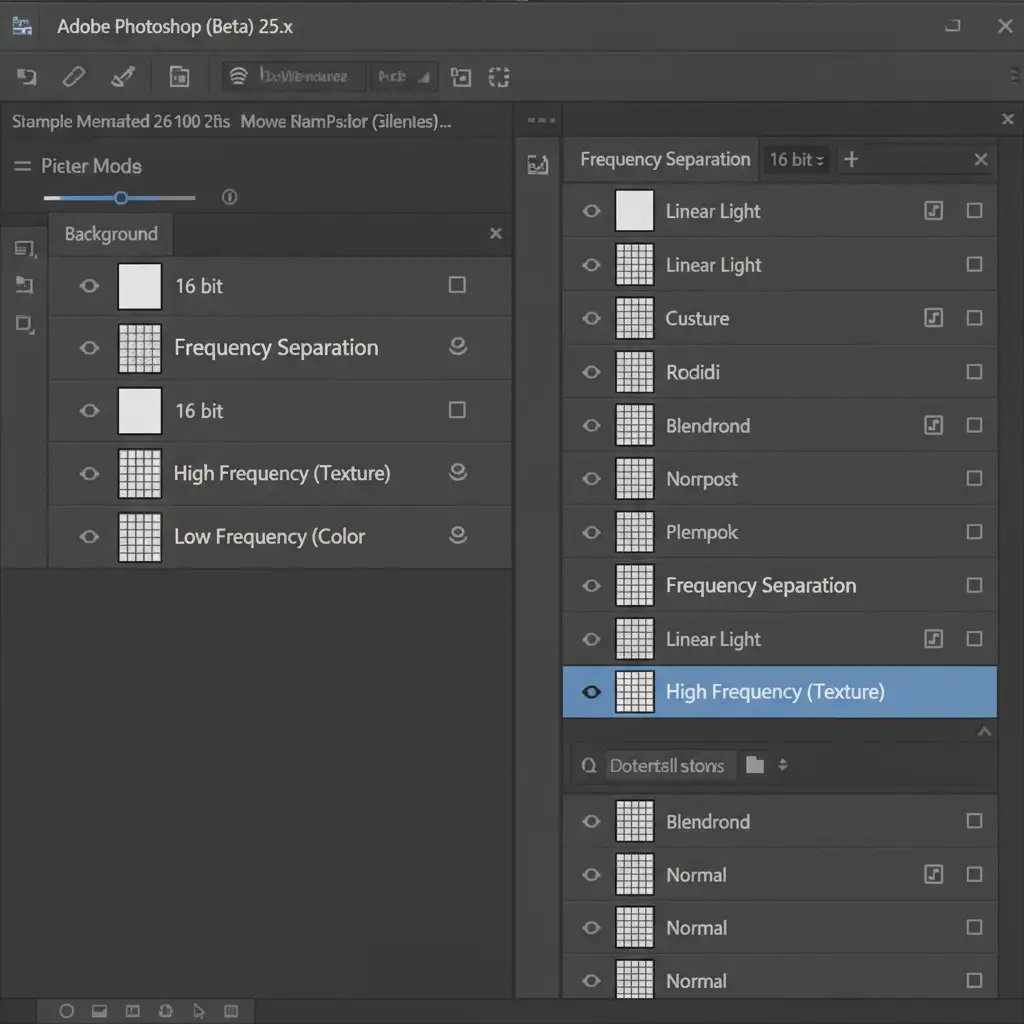
Method 2: The Pro Workaround – 16-Bit Frequency Separation
For babies with severe jaundice, red blotches, and heavy skin flaking, a dedicated 16-bit workflow using Frequency Separation is the industry standard. This technique allows you to fix color casts on one layer while removing physical flakes on another.
Step-by-Step Frequency Separation Setup
- Create your layers: Duplicate your background layer twice. Name the bottom duplicate “Low Frequency (Color)” and the top duplicate “High Frequency (Texture)”.
- Blur the Low Frequency: Turn off the High Frequency layer. Select the Low Frequency layer and apply a Gaussian Blur. Crucial tip: Blur it only just enough to blend the blotchy redness and color casts. Pushing the blur too far is what causes tonal flattening.
- Apply Image to High Frequency: Turn the High Frequency layer back on. Go to Image > Apply Image. Subtract the Low Frequency layer (ensure your settings are correct for a 16-bit document: Invert checked, Blending: Add, Scale: 2, Offset: 0). Change the blending mode to Linear Light.
Retouching the Layers
- For Color: Work on the Low Frequency layer using a soft brush at low opacity to gently even out jaundice and red blotches.
- For Texture: Select the High Frequency layer. Use the Clone Stamp Tool at 100 percent opacity, sampling clean skin texture to stamp over flakes and acne. Because you are only moving texture, the underlying skin tone remains perfectly intact.
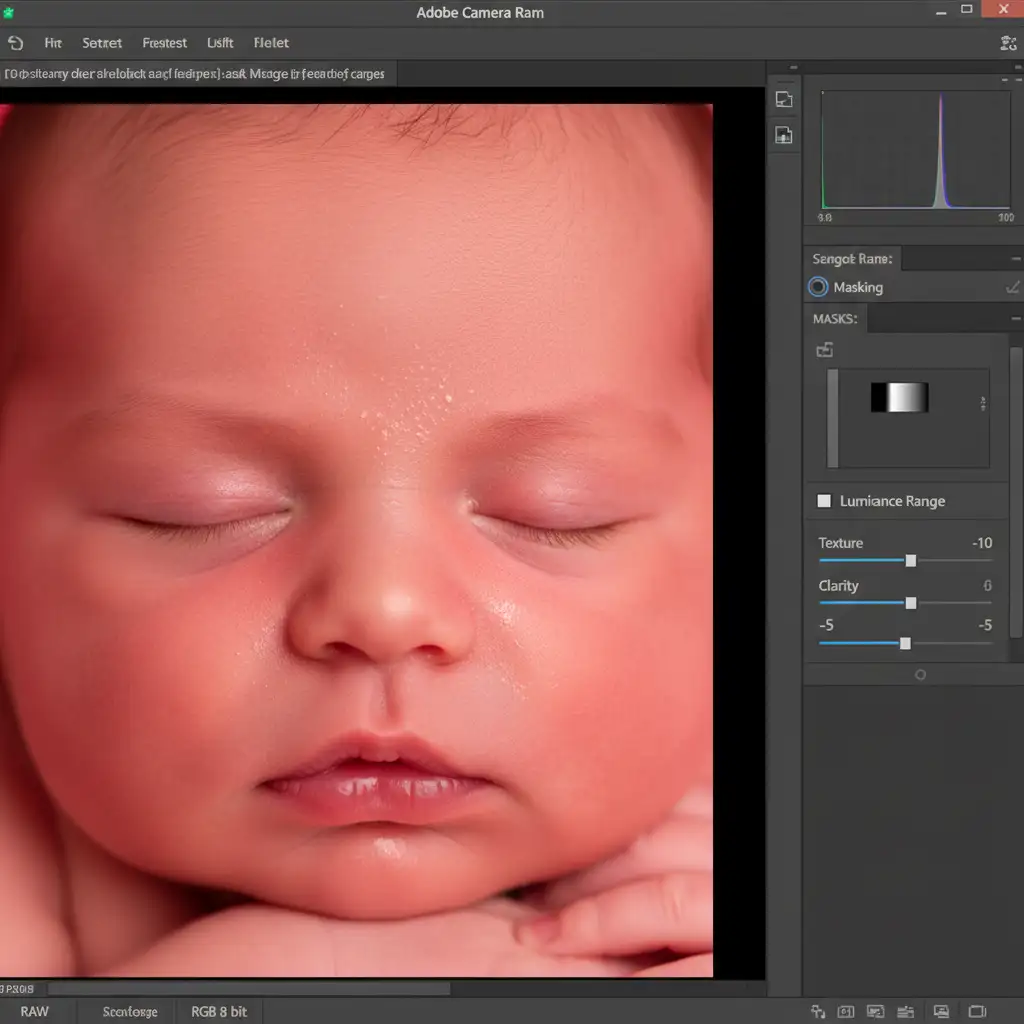
Method 3: Technical Deep-Dive – ACR Selective Luminance Masking
If you want to soften the overall appearance of the skin without touching the Mixer Brush, Adobe Camera Raw (ACR) offers a highly controlled alternative using selective masking.
The goal here is to reduce the harshness of the skin in the midtones while strictly protecting the highlights. If you blur the highlights, you lose the natural specular reflections of the skin, which immediately triggers the “plastic” look.
Executing the Luminance Mask
- Open your image (or a merged layer) in the Camera Raw Filter.
- Select the Masking tool and choose to mask the baby’s face.
- Intersect this mask with a Luminance Range mask.
- Adjust the luminance range so it only targets the midtones, completely protecting the brightest highlights and the darkest shadows.
- In your adjustment sliders, drop Texture to -10 and Clarity to -5.
This micro-adjustment gently softens the skin without destroying the micro-contrast or the language.
Stop Struggling with Batch Edits: Let the Experts Handle It
Achieving flawless newborn skin retouching without a plastic look requires patience, a deep understanding of 16-bit workflows, and a meticulous eye for detail. When you are shooting multiple newborn sessions a week, spending hours zoomed in at 200% on a baby’s cheek simply isn’t a profitable use of your time.
Struggling to perfect that flawless yet natural newborn look across hundreds of images? Outsource your infant photography batches to Image Work India and Cloud Retouch. Our team of professional retouchers specializes in hand-edited, high-end portraiture. We utilize precise Frequency Separation and manual healing techniques to ensure your clients receive breathtaking, natural images—while you get your time back to focus on shooting.
Contact Image Work India and Cloud Retouch today to set up your custom newborn retouching workflow.


