The era of flat ecommerce is ending. As Apple Vision Pro and Meta Quest push spatial computing into the mainstream, online shoppers expect to interact with your products in three dimensions. But here is the massive roadblock: your entire product catalog consists of flat 2D JPEGs.
When you try to drop standard 2D product photos into WebAR or VR viewers, they look like lifeless, paper-thin projections lacking depth, geometry, and realistic lighting. To survive the shift to spatial commerce, you must convert these 2D images into fully optimized, AR-ready 3D assets with accurate PBR (Physically Based Rendering) materials.
Here is exactly how to execute a flawless spatial commerce product image conversion.
Why Standard 2D Photos Fail in Spatial Commerce
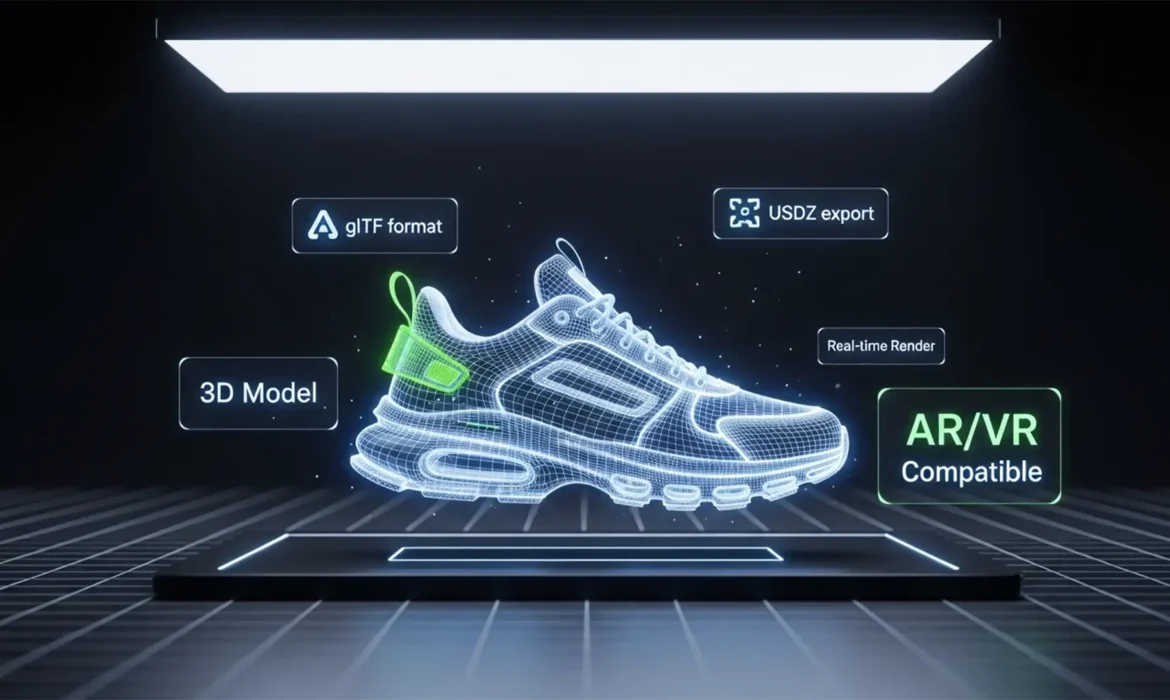
Modern spatial commerce requires 3D assets formatted specifically for AR platforms—primarily ARKit (USDZ format) for Apple devices and ARCore (glTF format) for Android and WebAR.
A standard 2D photograph only captures color. It completely lacks the physical material properties required for a spatial environment to calculate how light should bounce off the object. To make an object look real in AR, you need to generate specific PBR texture maps:
- Albedo Map: The base color of the product without any lighting or shadows.
- Normal Map: Fakes high-resolution surface details and depth (like the bumpiness of leather).
- Roughness Map: Dictates how shiny or matte the surface is.
Without these, your product looks like a cardboard cutout. Here are three methods to convert your 2D images into spatial-ready assets.
How to Convert 2D Product Images into 3D Spatial Assets
Method A: The Quick Fix (AI Image-to-Material)
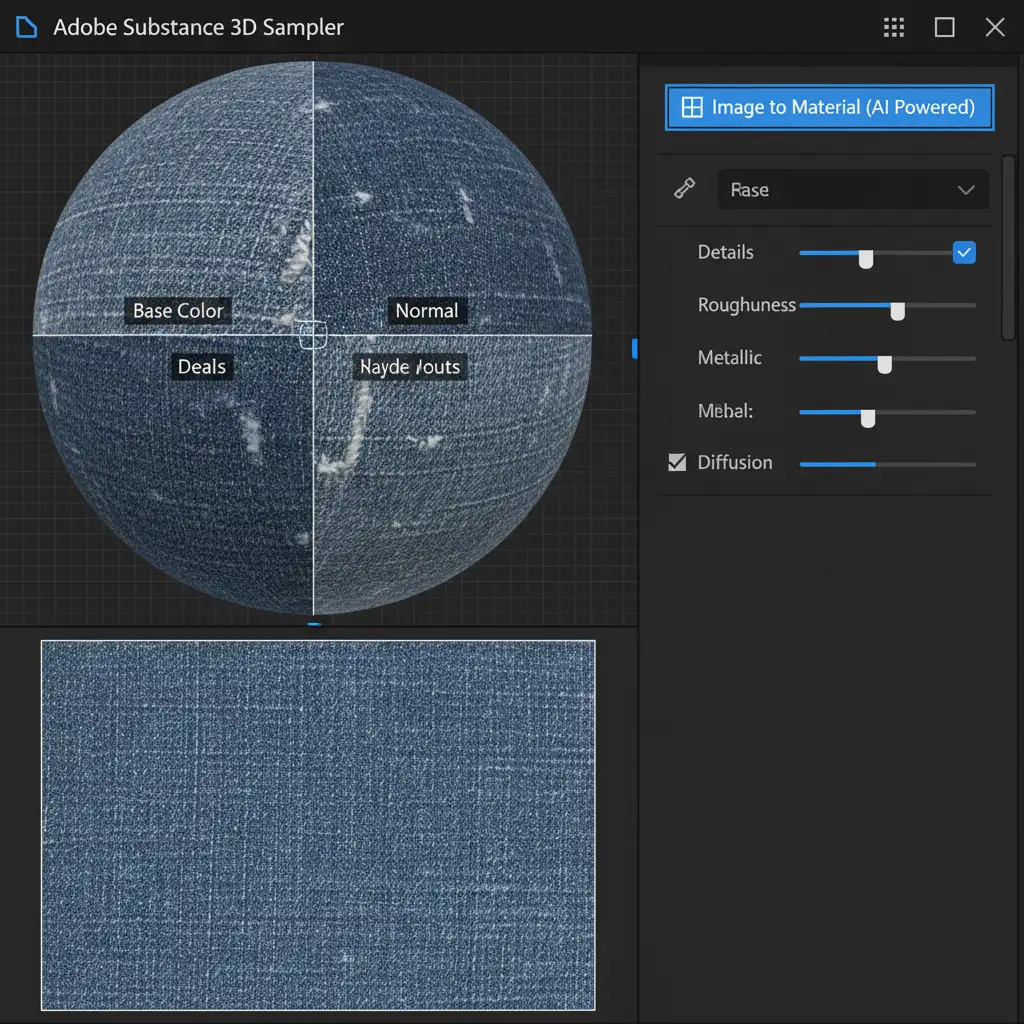
If you need to rapidly generate materials from flat images, Adobe Substance 3D Sampler is the industry standard for AI-assisted workflows.
- Launch Adobe Substance 3D Sampler.
- Drag and drop your high-resolution 2D product photo directly into the application workspace.
- Select the ‘Image to Material (AI Powered)’ option.
- The AI will analyze the image and instantly generate the necessary base color (Albedo), normal, roughness, and metallic maps.
- You can now export this PBR material package and apply it to a basic 3D shape (like a primitive plane or cylinder) matching your product’s silhouette.
Method B: The Pro Workaround (Photoshop Texture Generation)
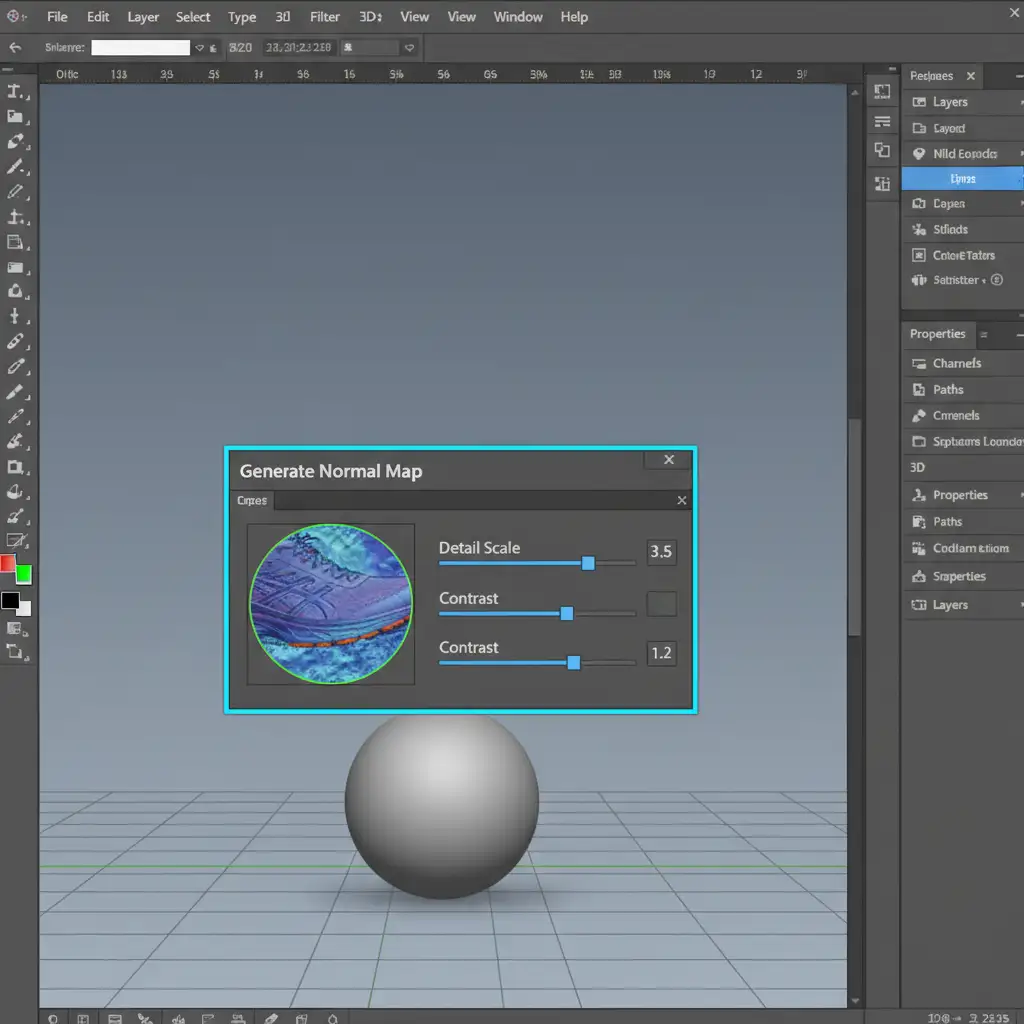
If you don’t have access to Substance 3D, you can manually extract normal and bump data using Adobe Photoshop v25+ and map it onto a 3D object using Blender.
- Open your standard 2D ecommerce image in Photoshop v25+.
- Navigate to Filter > 3D > Generate Normal Map. Adjust the sliders to capture the surface depth without blowing out the details, then save the output as a separate PNG.
- Repeat the process via Filter > 3D > Generate Bump Map to create a height reference.
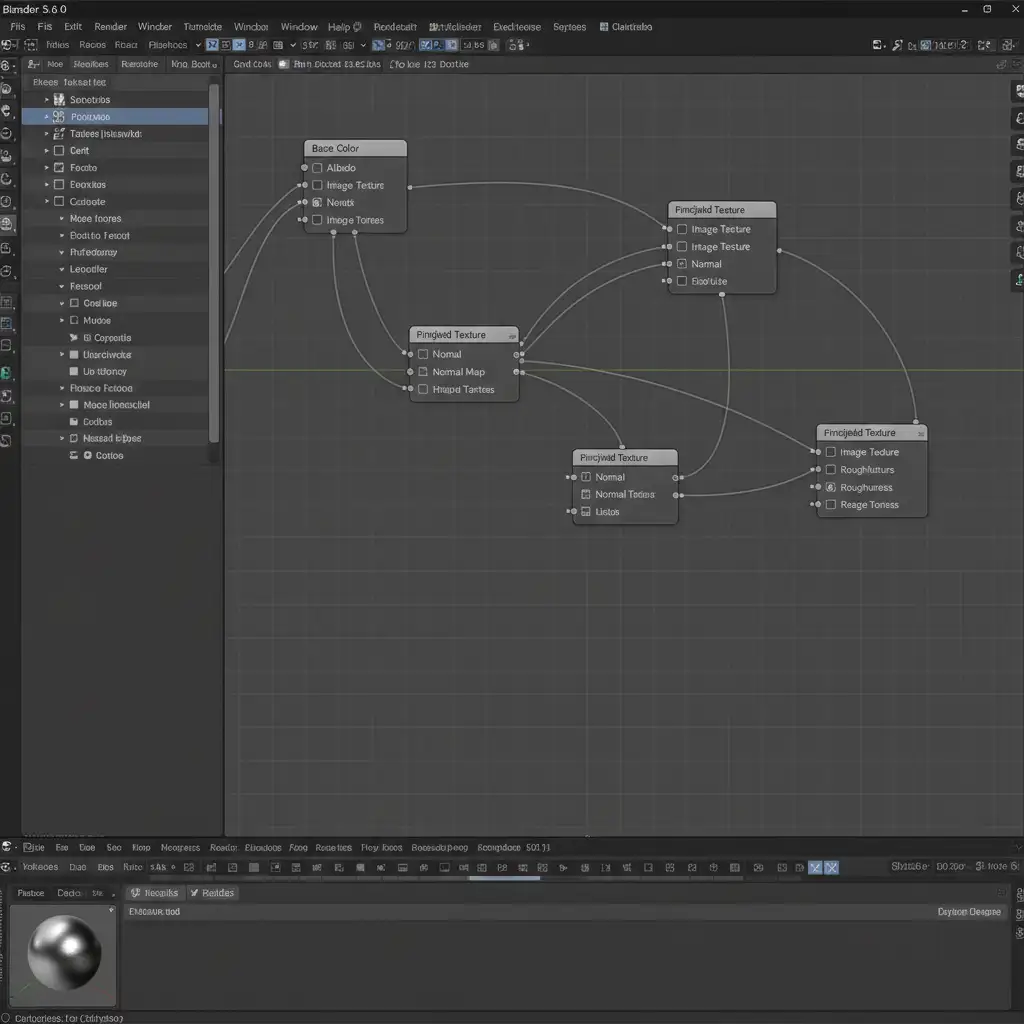
- Open Blender and create a simple 3D object (or a flat plane).
- In the Shader Editor, use your original 2D image as the Albedo (Base Color). Connect your generated Normal Map to a Normal Map node, and plug it into the Principled BSDF shader to fake depth on the flat geometry.
Method C: The Technical Deep-Dive (Photogrammetry and UV Baking)
For complex products where a single flat plane won’t work (like a chair or a backpack), you must move beyond single-image conversion and use Photogrammetry.
- Capture multiple 2D photos of the product from overlapping angles (360-degree coverage).
- Process these images in a photogrammetry tool like Meshroom or Polycam to generate a raw, high-poly 3D mesh.
- Import the raw mesh into Blender. Because raw photogrammetry meshes are massive, you must create a retopologized low-poly mesh.
- Perform UV Mapping (unwrapping the 3D model so 2D textures can be applied).
- Use Texture Baking to transfer the high-resolution details from the raw mesh onto your new, optimized low-poly mesh.
- Export the final model.
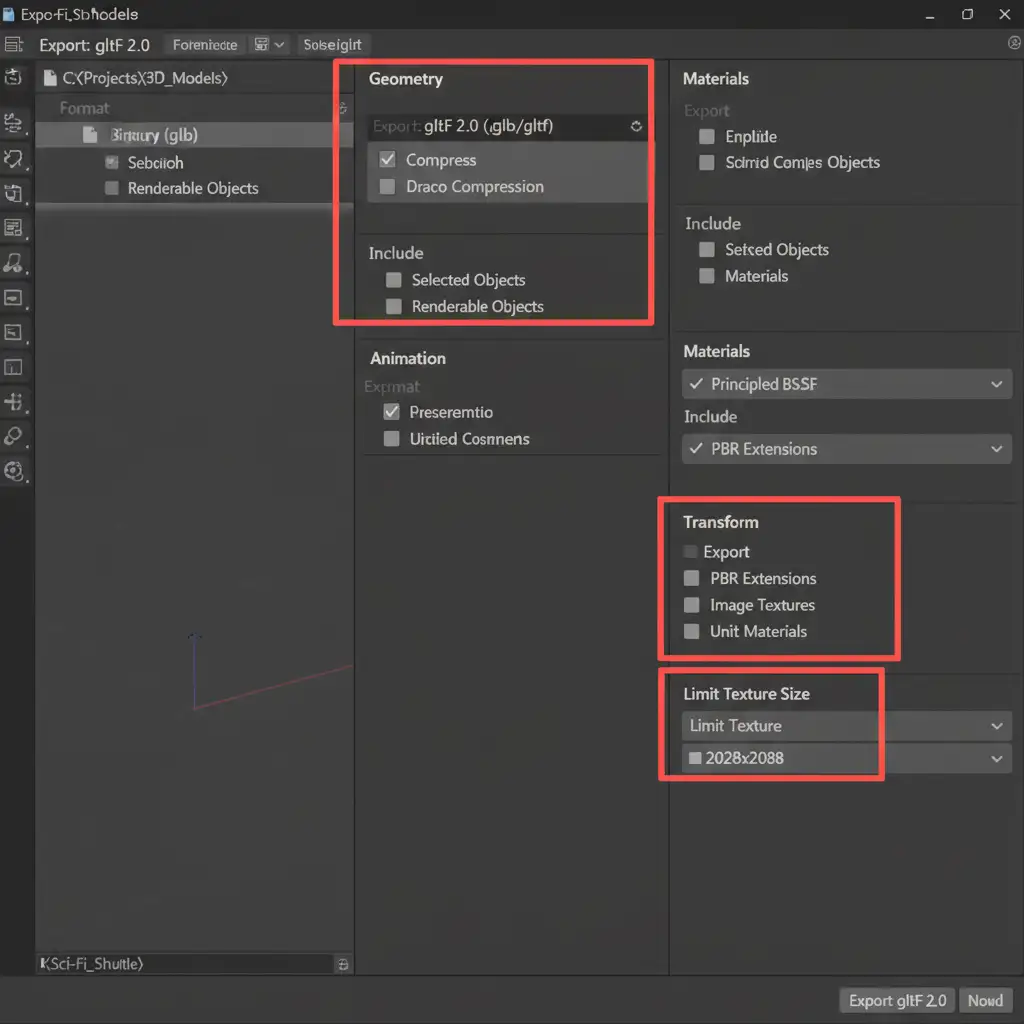
Crucial Export Settings for WebAR
Web AR platforms require extremely lightweight files. Your final asset must be under 10MB. When exporting to glTF 2.0 or USDZ, ensure you check your compression settings. Limit texture sizes to 2048×2048 (or 1024×1024 for smaller items) and enable mesh compression (like Draco for glTF) to ensure fast load times on mobile devices.
Scale Your Spatial Commerce Conversions with Image Work India
Converting a single 2D product photo into an AR-ready spatial asset is a fun technical exercise. But what happens when you have an ecommerce catalog of 5,000 products? Manual texture baking, UV unwrapping, and file size optimization quickly become an operational nightmare.
You don’t have to do this alone. Image Work India and Cloud Retouch specialize in high-volume, pixel-perfect spatial commerce product image conversion.
Our expert team seamlessly transforms your massive catalog of flat 2D imagery into fully optimized, ARKit (USDZ) and ARCore (glTF) ready 3D models. We handle the complex photogrammetry, PBR material generation, and WebAR optimization so your customers can experience your products in immersive 3D space.
Ready to prepare your store for the future of spatial computing? Contact Image Work India and Cloud Retouch today for scalable, high-quality 2D to 3D asset conversions.


