
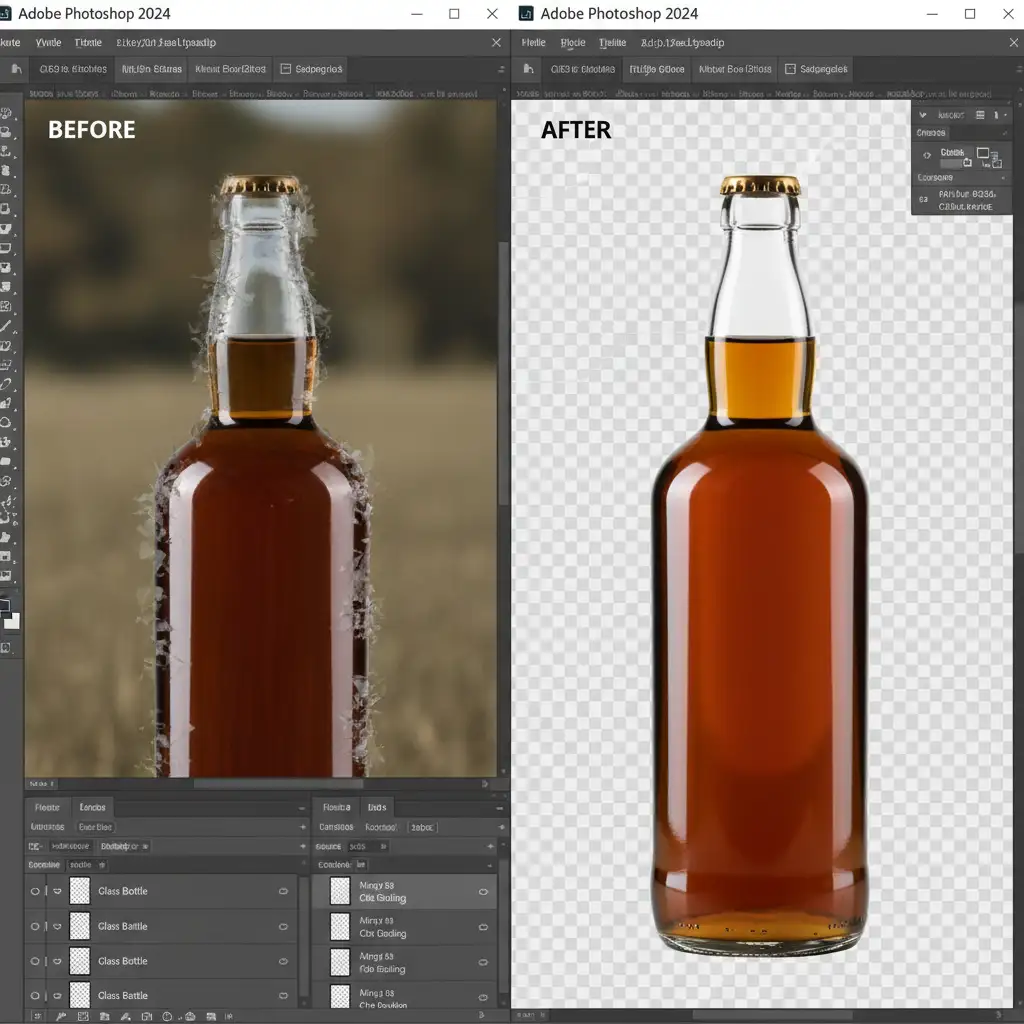
You just updated your software, dropped a stunning product photo of a glass bottle onto your canvas, and hit the “Remove Background” quick action. The result? A muddy, ghosted disaster.
While Adobe’s AI-driven tools like Select Subject are incredible for solid objects, they completely fail when it comes to refractive and transparent products. The AI simply cannot differentiate between the glass surface, internal refractions, specular highlights, and the background environment. Instead of a crisp, transparent product, you get destroyed edge refractions and color spills that render the image useless for e-commerce.
If you want to remove background from glass in Photoshop 2024 like a professional high-end retoucher, you have to ditch the AI and rely on precision manual techniques. In this guide, we will walk you through three industry-standard methods to isolate transparent objects flawlessly.
Why AI Fails at Transparent Object Cutouts
In Photoshop 2024 (v25.x), automated tools struggle with transparency because glass isn’t just one color or texture—it is a reflection and refraction of its environment. When you use automated Select and Mask features, the algorithm attempts to find a hard edge. Because glass bends light, the “edge” often contains the exact color of the background you are trying to remove.
To fix this, we need to separate the object into three distinct elements:
- The hard outer boundary.
- The dark shadows and midtones.
- The bright specular highlights.
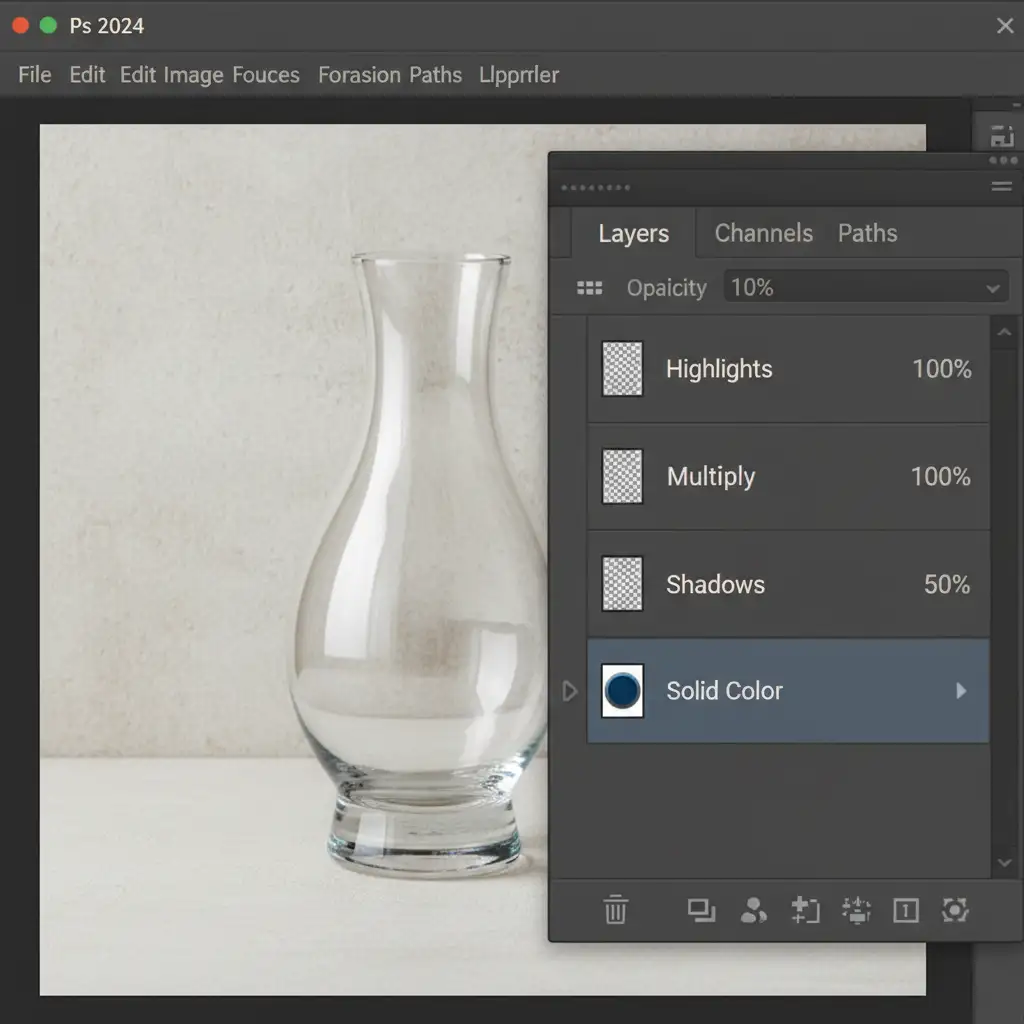
Method 1: The Quick Fix – Using Blend Modes
If you are placing a glass object onto a new, solid background and need a fast result, leveraging Layer Masking alongside Blend Modes is highly effective. This method separates the highlights from the shadows.
Step-by-Step Execution:
- Duplicate your glass layer twice and place your new desired background layer beneath them.
- Isolate the Highlights: Select the top duplicate layer and change its blend mode to Screen Blend Mode. This drops out the dark pixels and retains the bright specular highlights and reflections.
- Isolate the Shadows: Select the middle duplicate layer and change its blend mode to Multiply Blend Mode. This drops out the white pixels and retains the dark shadows and structural edges of the glass.
- Adjust Opacity: Lower the opacity of the Multiply layer (usually around 40-60%) until the shadows look natural against the new background.
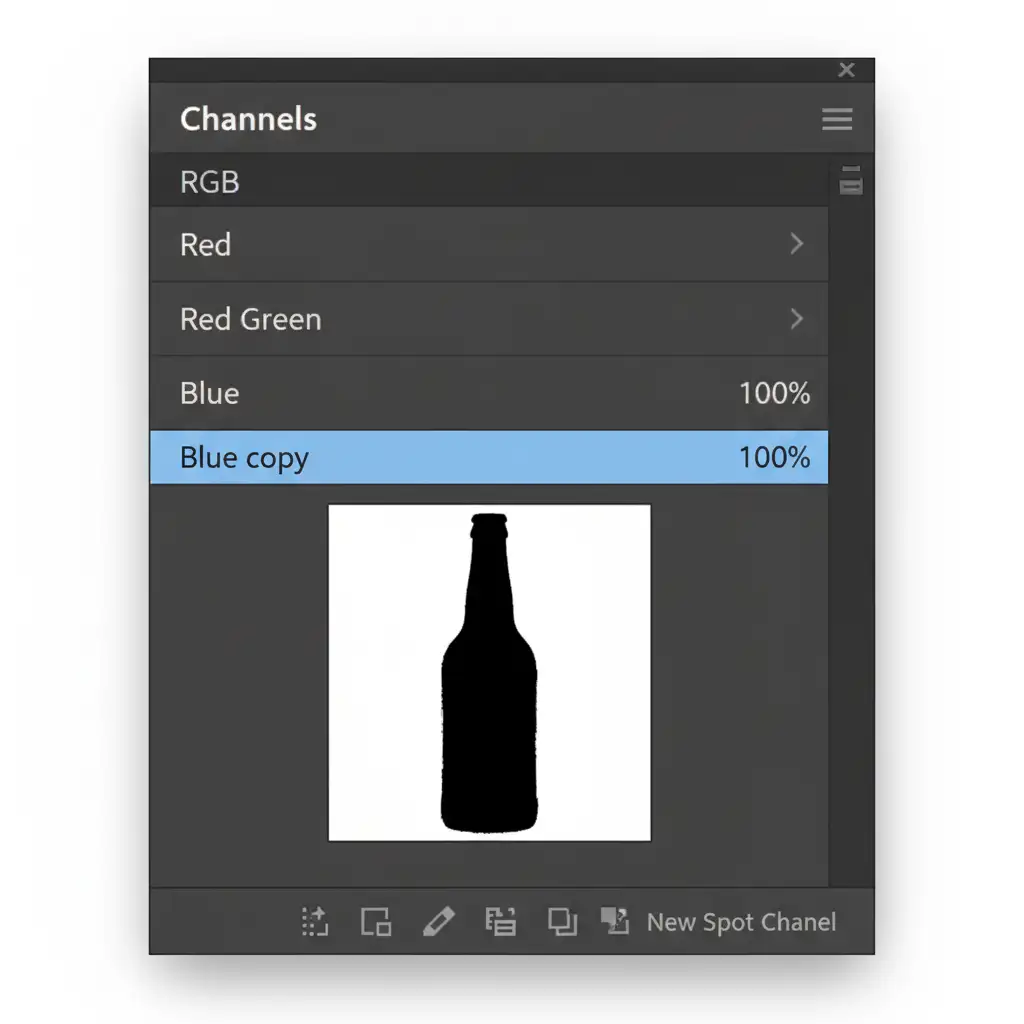
Method 2: The Pro Workaround – Channel Masking & Pen Tool
For e-commerce standard images where you need a transparent PNG, Blend Modes aren’t enough. You need absolute control over the alpha channel. This is where Channel Masking paired with a Clipping Path becomes mandatory.
Step 1: Create a Hard Outer Edge
Select the Pen Tool (P) and draw a precise Clipping Path around the hard outer edge of the glass object. Once closed, convert the path to a selection and apply a Layer Mask. You now have a glass object with a hard edge, but the inside is still opaque.
Step 2: Build the Transparency Mask
- Open the Channels Panel.
- Click through the Red, Green, and Blue channels to find the one with the highest contrast between the glass reflections and the background (this is usually the Blue channel).
- Drag that channel to the “Create New Channel” icon to duplicate it.
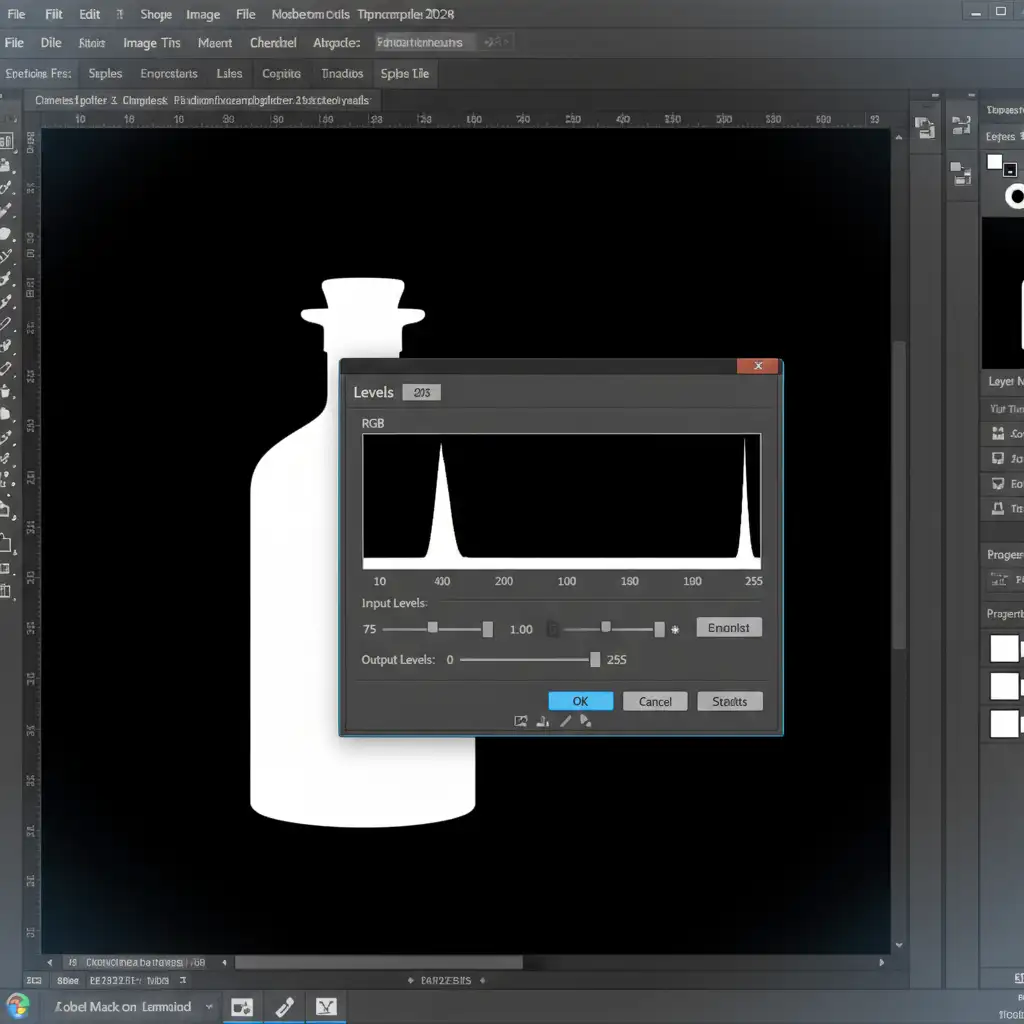
Step 3: Crush the Blacks and Whites
With your duplicated channel selected, press Ctrl+L (Windows) or Cmd+L (Mac) to open the Levels adjustment dialog box.
- Push the black slider to the right to make the background completely black.
- Push the white slider to the left to make the specular highlights pure white.
- Note: In an alpha channel mask, white reveals and black conceals.
Hold Ctrl (or Cmd) and click the thumbnail of your duplicated channel to load it as a selection. Go back to your Layers panel, click your glass layer’s mask, and fill the selection with black to drop out the interior background.
Method 3: The Technical Deep-Dive – Advanced Blend If & Color Decontamination
When dealing with highly complex backgrounds that reflect heavily into the glass, you will face “color spill.” Removing the background leaves behind the old environmental colors trapped in the glass refractions.
Step 1: Smooth Blending with Blend If
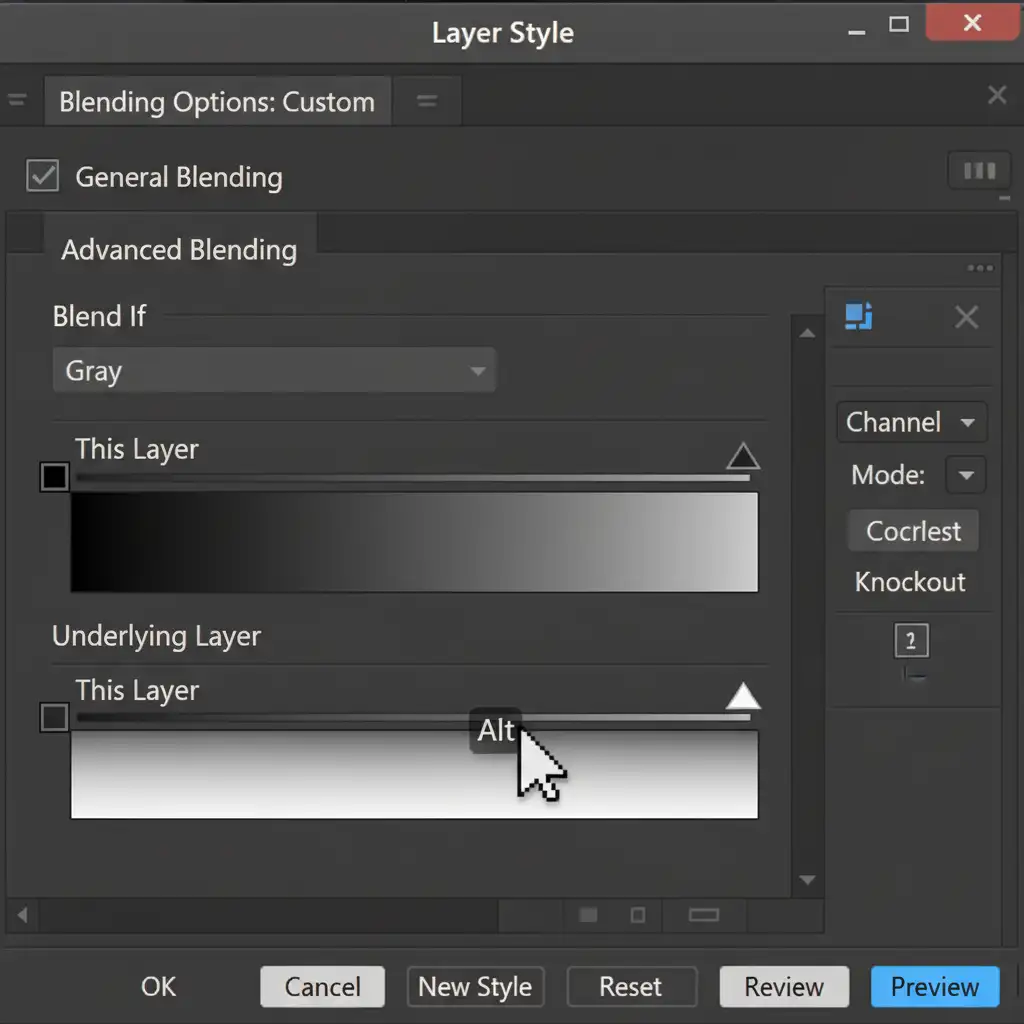
Double-click your glass layer to open the Layer Style dialog box. Look at the Blend If section at the bottom.
- Go to the Underlying Layer gradient bar.
- Hold Alt (Windows) or Option (Mac) and click the triangle sliders to split them.
- Dragging these split sliders allows you to smoothly drop out the background colors from the glass without creating harsh, jagged edges.
Step 2: Color Decontamination
To fix the color spill inside the glass:
- Create a Hue/Saturation adjustment layer and clip it to your glass layer (Alt-click between the layers).
- Select the specific color channel that is spilling (e.g., Greens if the background was a forest) and drag the Saturation slider to -100.
- Adjust the Lightness slider to neutralize the tone so it matches the natural gray/white of clear glass.
Step 3: Rebuilding Lost Highlights
Sometimes, aggressive masking destroys the brightest reflections. Create a new blank layer, set it to Screen Blend Mode, and use a soft, low-opacity white brush to manually paint back the specular highlights along the edges of the glass. This restores the 3D volume and realism of the product.
High-Volume Glass Cutouts? Let the Experts Handle It
Learning how to remove background from glass in Photoshop 2024 is a valuable skill, but executing channel masking, clipping paths, and color decontamination takes significant time. If you are processing dozens or hundreds of transparent product photos for an e-commerce catalog, doing this manually will bottleneck your entire production pipeline.
You don’t have to do it yourself.
At Image Work India and Cloud Retouch, our team of senior retouchers specializes in complex, high-volume image editing. We don’t rely on flawed AI quick actions. We manually draw pixel-perfect clipping paths, utilize advanced channel masking, and meticulously restore specular highlights so your refractive products look flawless on any background.
Stop fighting with Photoshop’s AI limitations. [Contact Image Work India and Cloud Retouch today] for a free trial, and let us deliver pixel-perfect transparent product cutouts that elevate your brand and drive conversions.


