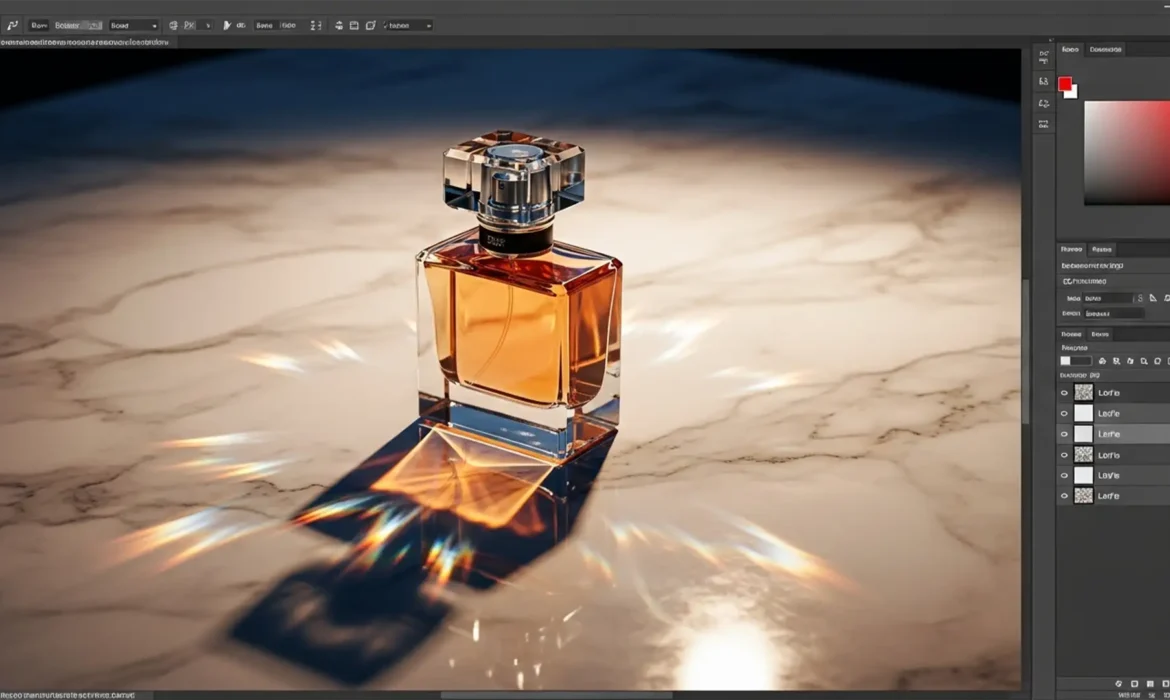
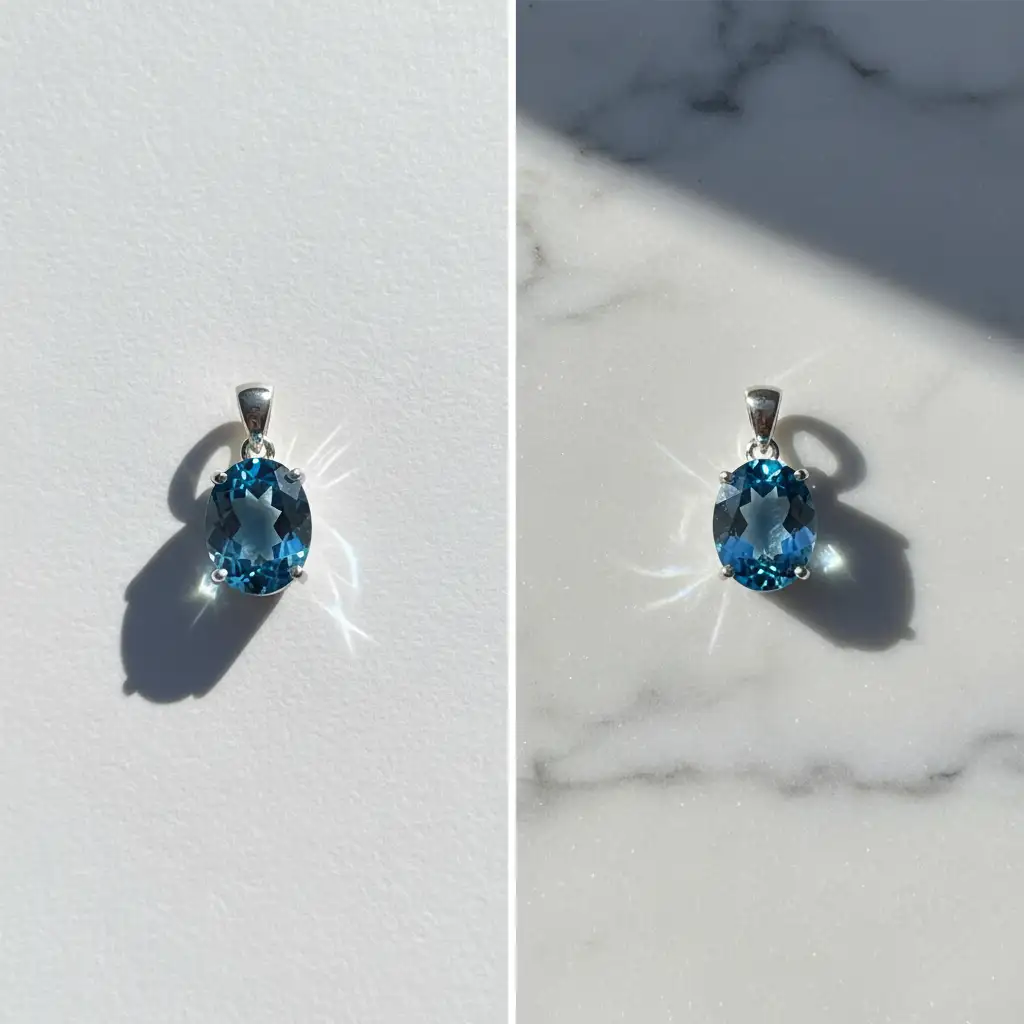
You’ve just spent hours perfecting a clipping path around a complex glass bottle, only to realize the background swap destroyed the natural cast shadow. Trying to manually paint a drop shadow back in? It almost always looks fake. You lose the delicate light falloff, the intricate caustics, and the bounced light that makes reflective objects look grounded.
If you are struggling with preserving original shadows on reflective surfaces in Photoshop v24.x or v25.x, you aren’t alone. Separating shadow luminance from the original background texture is a top-tier compositing challenge.
In this guide, we will break down three professional methods to extract and keep those original shadows perfectly intact, ensuring your high-end product composites look 100% realistic.
The Challenge of Shadow Extraction on Complex Objects
When dealing with glass, jewelry, or metallic objects, shadows are rarely just dark gray shapes. They contain complex data:
- Luminance: The actual darkness of the shadow.
- Chrominance: The color cast from the object and the original background.
- Caustics: Focused light passing through reflective surfaces.
Standard layer masking destroys this data. When you drop a cutout product onto a new background texture, the old shadow takes the old background color with it. The technical hurdle is isolating the alpha channel data so you can map the shadow’s density precisely onto the irregular surface of a new background texture without bringing along the original backdrop.
Here are three ways to solve this.
3 Ways to Extract and Keep Original Shadows in Photoshop
Method A: The Quick Fix (Multiply Blend Mode)
If your original background was relatively neutral (like a white or light gray studio sweep), leveraging basic Blend Modes is the fastest solution.
- Duplicate your original background layer containing the raw shadow.
- Move this duplicated layer directly above your new background texture layer.
- Desaturate the duplicated shadow layer by pressing Ctrl+Shift+U (Windows) or Cmd+Shift+U (Mac). This removes the chrominance of the old background.
- Change the layer’s Blend Mode to Multiply.
- Adjust the opacity to match the lighting intensity of the new background.
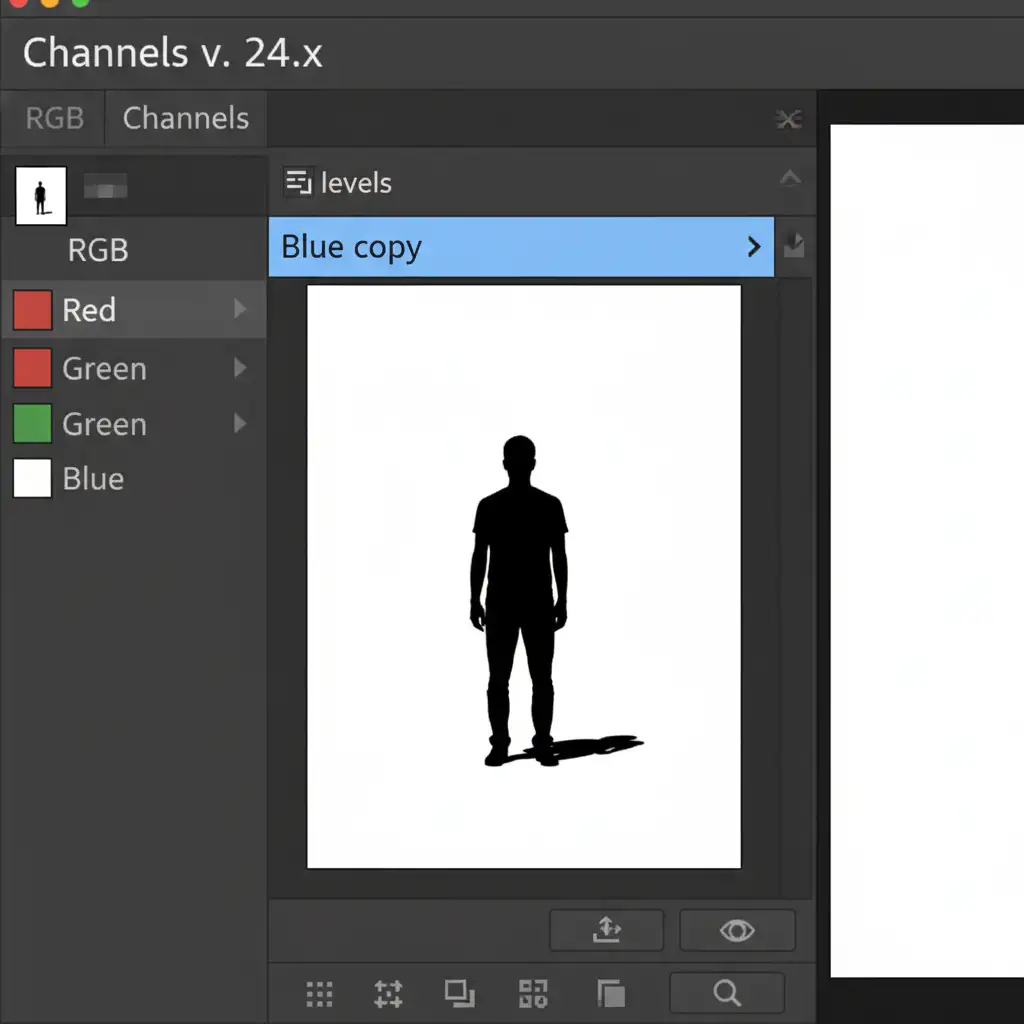
Method B: The Pro Workaround (Channel Masking)
For complex backgrounds where Multiply isn’t clean enough, you need to isolate the shadow using Alpha Channels. This method creates a flawless mask based on luminance.
- Open the Channels panel. Click through the Red, Green, and Blue channels to find the one with the highest contrast between the shadow and the background (this is usually the Blue or Green channel).
- Duplicate that high-contrast channel.
- With the duplicated channel selected, press Ctrl+L / Cmd+L to open a Levels Adjustment.
- Crush the blacks and whites by dragging the outer sliders inward. Your goal is to make the shadow pure black and the background pure white.
- Ctrl-click (or Cmd-click) the duplicated channel thumbnail to load it as a selection.
- Invert the selection (Ctrl+Shift+I / Cmd+Shift+I).
- Go back to your Layers panel and apply this selection as a Layer Masking to a solid color fill layer (sampled from the shadow) or a Curves adjustment layer.
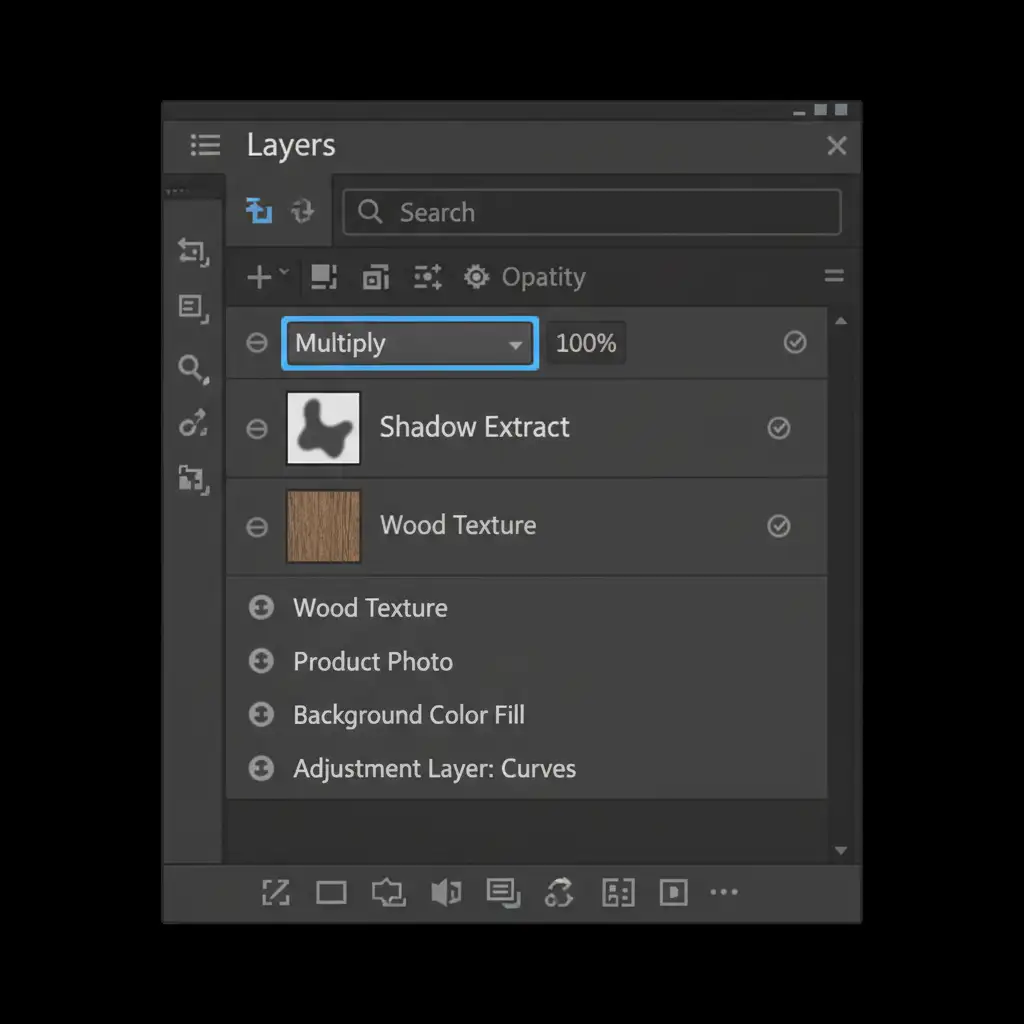
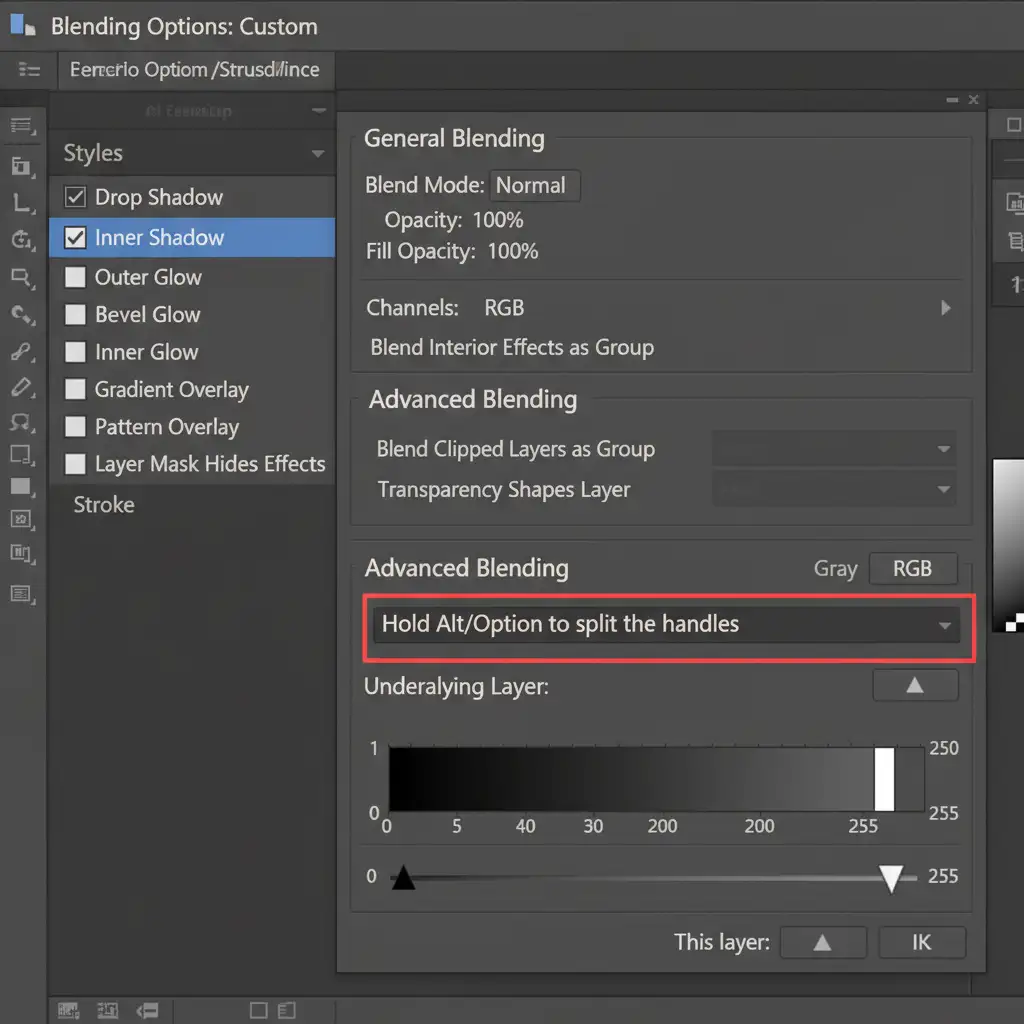
Method C: The Technical Deep-Dive (Blend If and Smart Objects)
When placing a shadow over a highly textured surface (like wood grain or rough marble), the shadow must interact with the highlights and midtones of the new texture. This is where Blend If parameters shine.
- Convert your extracted shadow layer into Smart Objects. This ensures your edits remain non-destructive.
- Double-click the shadow layer (outside the text) to open the Layer Style dialog box.
- Look at the Blend If section at the bottom.
- Go to the Underlying Layer slider. Hold Alt (Windows) or Option (Mac) and click the white triangle on the right side to split it.
- Drag the left half of the split triangle toward the left. This smoothly transitions the shadow into the highlights and midtones of the new texture beneath it, dropping out the old background completely.
- Finally, go to Filter > Blur Gallery > Field Blur and add a subtle blur to match the natural Light Falloff of the new environment.
Why Manually Painted Drop Shadows Fail
You might wonder why you can’t just use the Drop Shadow layer style or paint a black brush with low opacity.
Manually painted shadows lack the physical properties of real light. When light hits a reflective surface, it bounces back into the shadow, creating lighter pockets and sharp caustics. Preserving original shadows on reflective surfaces ensures these micro-details survive the composite.
Outsource Your Complex Compositing to the Experts
Mastering channel masking and Blend If sliders takes years of practice. If you need flawless product photos but are struggling with complex shadows and reflections, you don’t have to do it alone.
Let Image Work India and Cloud Retouch handle your high-end retouching and compositing. Our team of expert retouchers specializes in preserving original shadows on reflective surfaces, guaranteeing perfect natural lighting, realistic falloff, and seamless background swaps on every single cutout.
Stop fighting with fake drop shadows. Focus on growing your business while we deliver pixel-perfect imagery. [Contact us today for a free trial] and see the difference professional shadow extraction makes.


