Mastering the Ghost Mannequin Effect for Sheer & Mesh Apparel
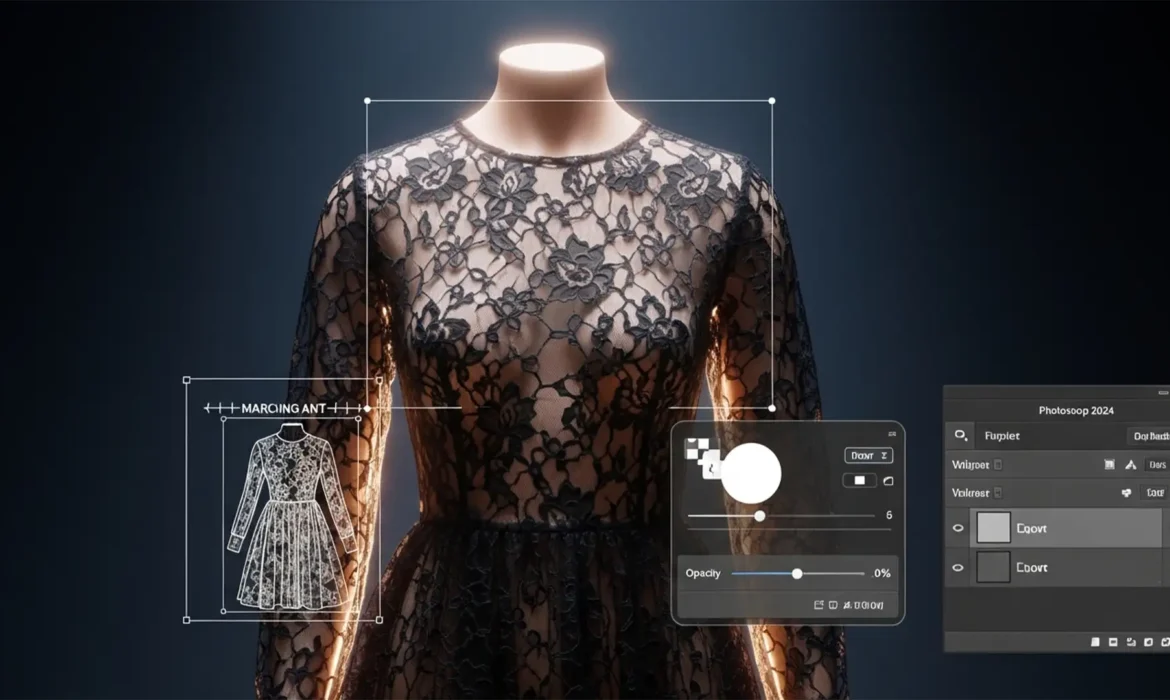
If you shoot e-commerce apparel, you already know the nightmare of editing sheer, lace, or mesh garments. A standard clipping path absolutely destroys the semi-transparent nature of these fabrics, leaving your product photos looking artificially pasted, flat, and entirely unconvincing.
The true technical hurdle? Retaining the exact pixel opacity values of the delicate front mesh while realistically displaying the inner back collar through the fabric—without triggering ugly halo effects or color contamination.
Welcome to our ultimate ghost mannequin mesh transparency tutorial 2024. In this guide, we will show you exactly how to tackle this complex workflow in Adobe Photoshop 2024 (v25.x) using advanced masking and layer-stacking techniques.
Why Standard Ghost Mannequin Techniques Fail on Sheer Fabric
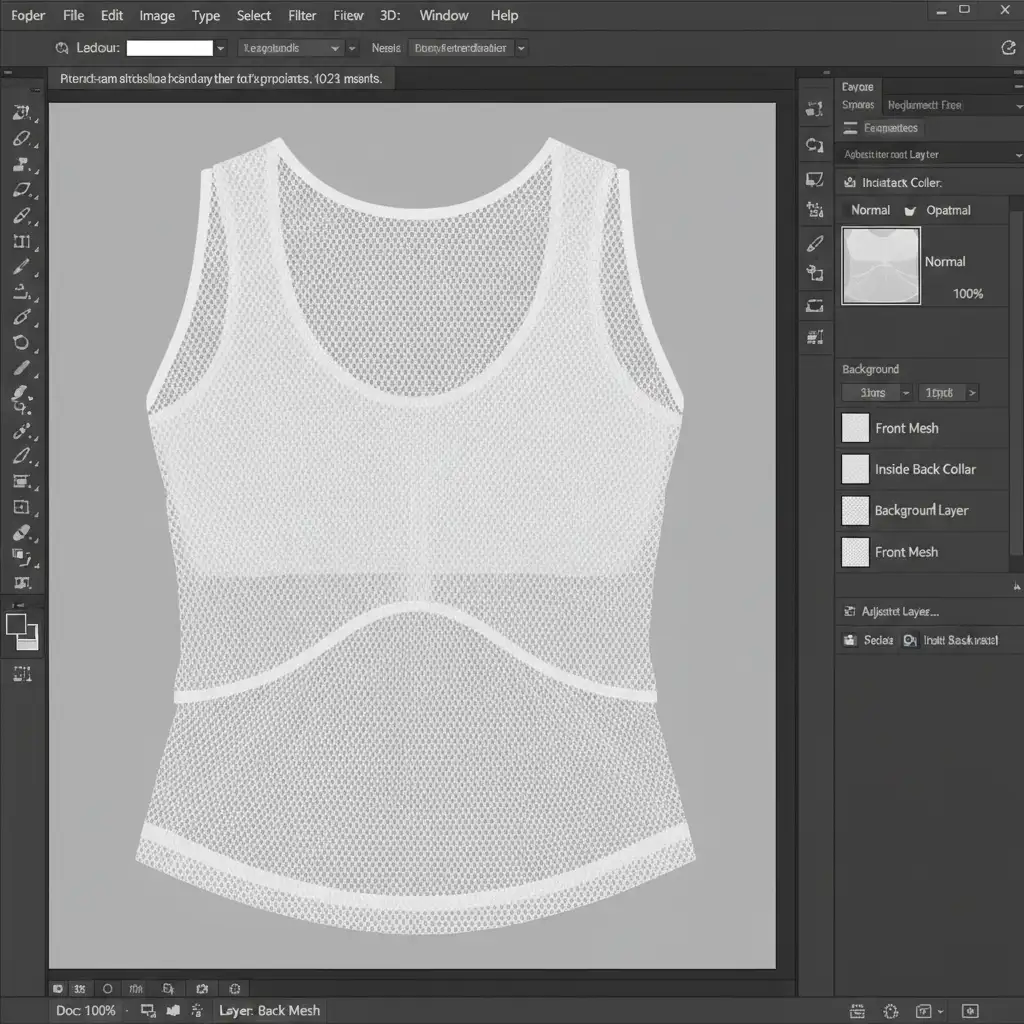
The traditional ghost mannequin process involves photographing the garment on a mannequin, shooting the inside back collar separately, and stitching them together. For solid cotton or denim, basic selection tools work flawlessly.
However, sheer fabrics demand absolute opacity preservation. You cannot simply use the Select and Mask workspace to cut out holes in lace. To achieve a high-end e-commerce standard, you must extract the delicate thread lattice while maintaining natural transparency over the interior collar shot.
Let’s break down the three distinct methods for mastering this in Photoshop 2024, ranging from a rapid fix to a high-end technical deep-dive.
Method A: The Quick Fix Using Blend Modes
When you are processing hundreds of SKUs and need a rapid, non-destructive editing solution, leveraging Blend Modes is your best starting point.
- Open your document and place your front mesh shot and the inside back collar shot on separate layers.
- Carefully align the front and back inner collar layers so the necklines match perfectly.
- Select the front mesh layer. If the mesh is light-colored, change the Blend Mode to Multiply. If the mesh is dark-colored, change it to Screen.
- This instantly blends the background through the fabric, dropping out the contrasting pixels.
Method B: The Pro Workaround with Channel Masking
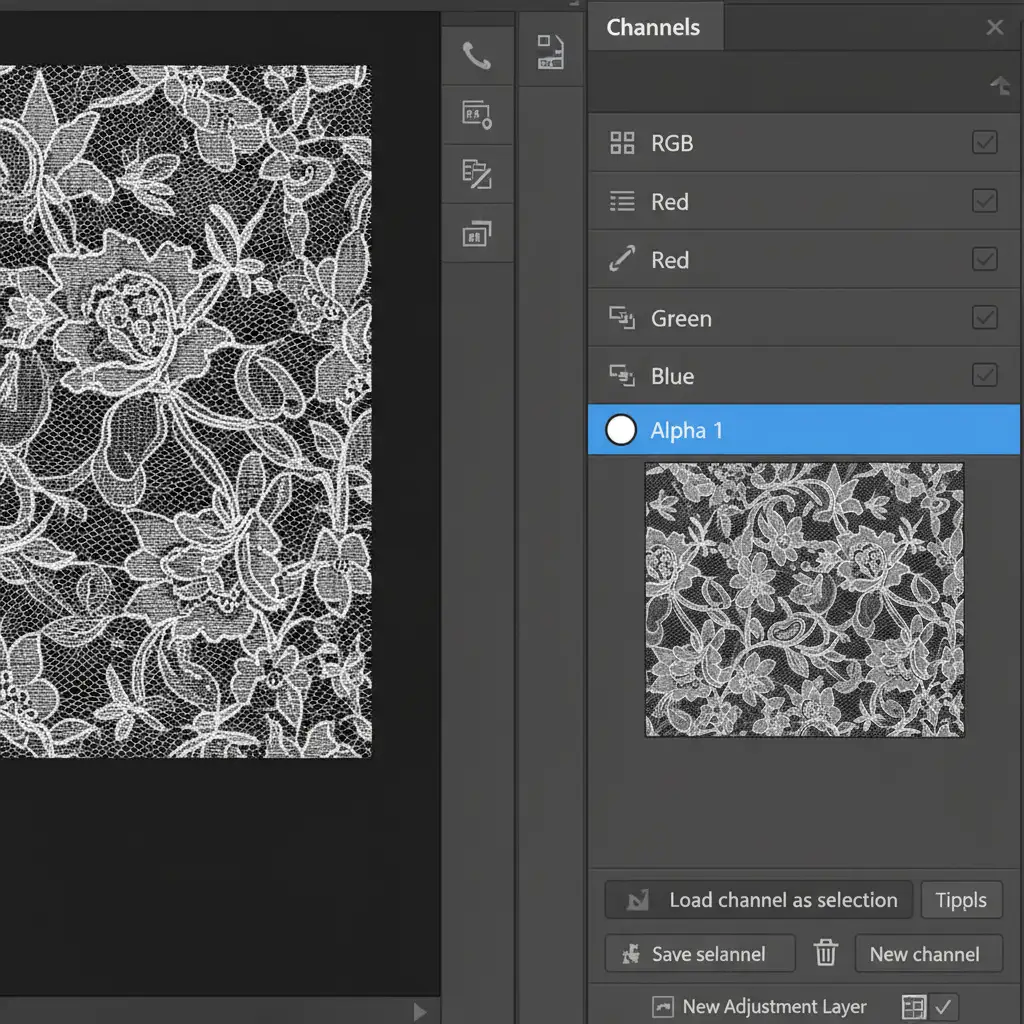
While Blend Modes are fast, they can sometimes cause unwanted color shifts. For true professional-grade opacity preservation, you need to utilize Channel Masking. This method extracts the exact tonal values of the fabric.
- Navigate to the Channels panel. Click through the Red, Green, and Blue channels to find the one with the highest contrast between the mesh threads and the background.
- Drag that channel to the “Create New Channel” icon to duplicate it, creating an Alpha Channel.
- With your duplicated channel selected, press Cmd/Ctrl + L to open the Levels adjustment.
- Crush the blacks and whites by dragging the outer sliders inward. Your goal is to make the background pure black and the mesh threads pure white (or vice versa, depending on the garment color).
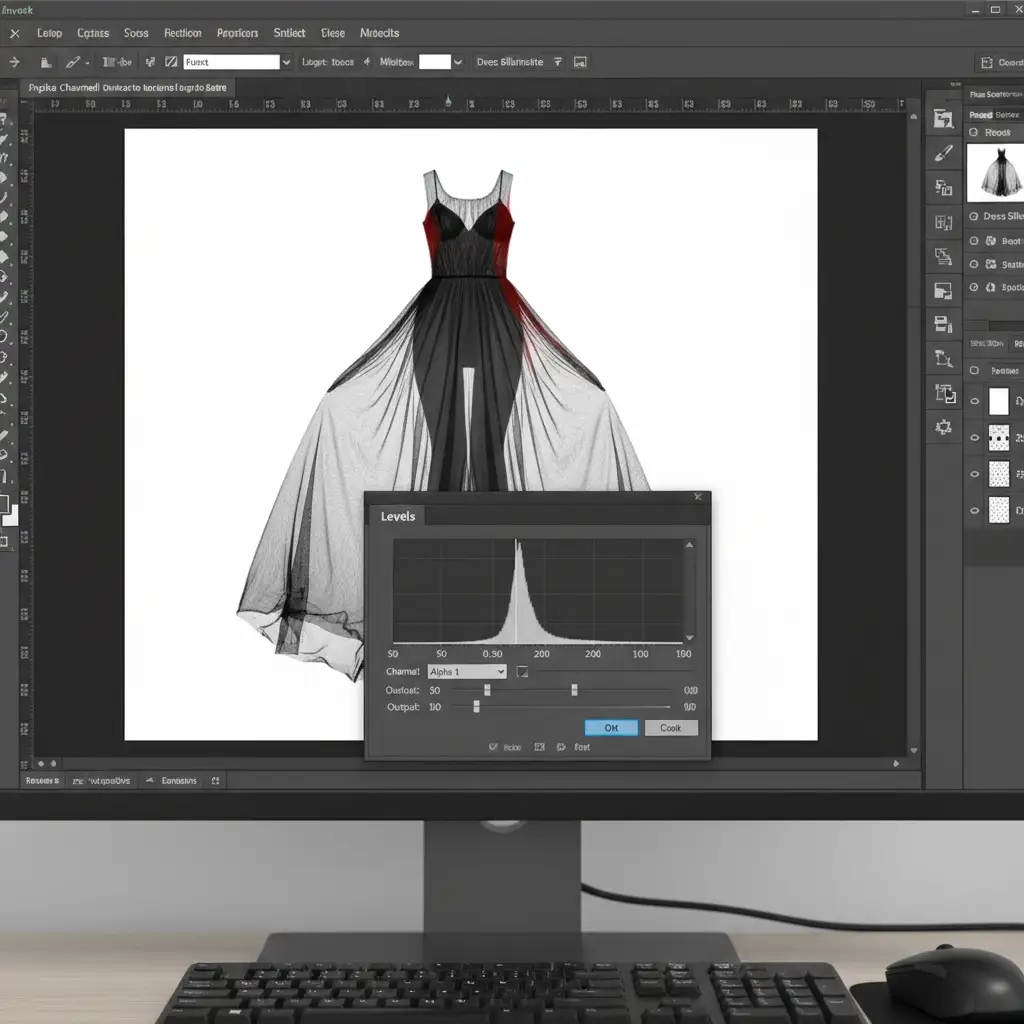
- Hold Cmd/Ctrl and click the thumbnail of your adjusted Alpha Channel. This loads a perfect Luminosity Selection based on the exact transparency of the fabric.
- Return to your Layers panel, select the front mesh layer, and click the “Add Layer Mask” icon. The inner collar will now show through the mesh with pixel-perfect realism.
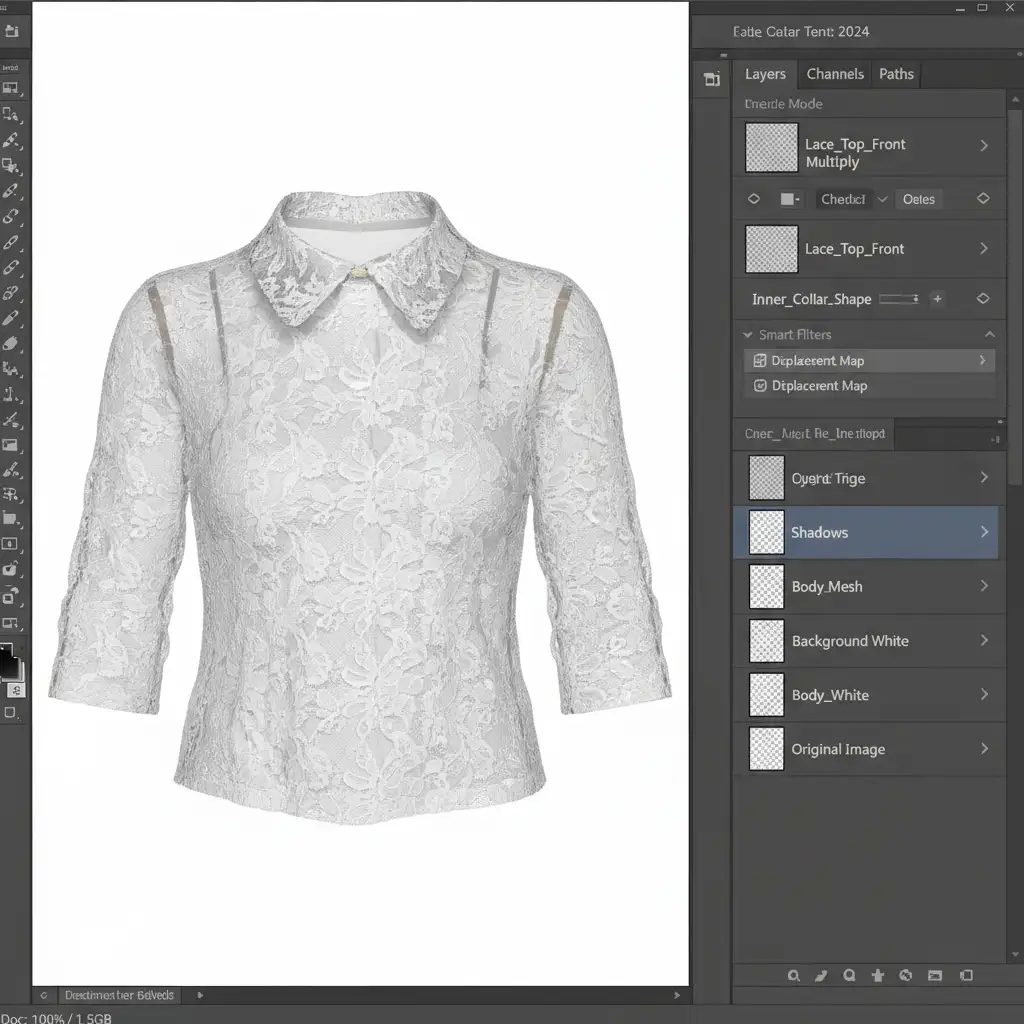
Method C: The Technical Deep-Dive Using Displacement Maps
To achieve absolute, uncompromising realism, the back collar shouldn’t just sit flat behind the mesh. In reality, sheer fabric subtly distorts whatever is behind it due to the optical refraction of the threads. We can recreate this using a Displacement Map.
- Before applying your mask, save a flattened, high-contrast black-and-white copy of the mesh fabric as a separate .psd file.
- Build your layer stack using the Channel Masking technique from Method B.
- Select your inner collar layer. Navigate to Filter > Distort > Displace.
- Set the horizontal and vertical scale to a low number (e.g., 2 to 5) and select the .psd file you just saved.
- This warps the back fabric to perfectly match the optical distortion of the front mesh threads, resulting in an incredibly lifelike 3D effect.
Scale Your E-Commerce Retouching with the Experts
Mastering the ghost mannequin effect for sheer, mesh, and lace clothing requires painstaking, pixel-perfect masking. While this workflow yields stunning results, executing it flawlessly across hundreds or thousands of SKUs drains valuable time and studio resources.
You don’t have to tackle this alone. Scale your e-commerce imagery effortlessly by partnering with the elite retouching teams at Image Work India and Cloud Retouch. Our specialized post-production experts are masters of advanced channel masking, opacity preservation, and complex ghost mannequin compositing.
Ready to elevate your apparel photography without the editing headache? Contact Image Work India and Cloud Retouch today to streamline your post-production workflow and deliver flawless, conversion-ready imagery to your customers.If you shoot e-commerce apparel, you already know the nightmare of editing sheer, lace, or mesh garments. A standard clipping path absolutely destroys the semi-transparent nature of these fabrics, leaving your product photos looking artificially pasted, flat, and entirely unconvincing.
The true technical hurdle? Retaining the exact pixel opacity values of the delicate front mesh while realistically displaying the inner back collar through the fabric—without triggering ugly halo effects or color contamination.
Welcome to our ultimate ghost mannequin mesh transparency tutorial 2024. In this guide, we will show you exactly how to tackle this complex workflow in Adobe Photoshop 2024 (v25.x) using advanced masking and layer-stacking techniques.


