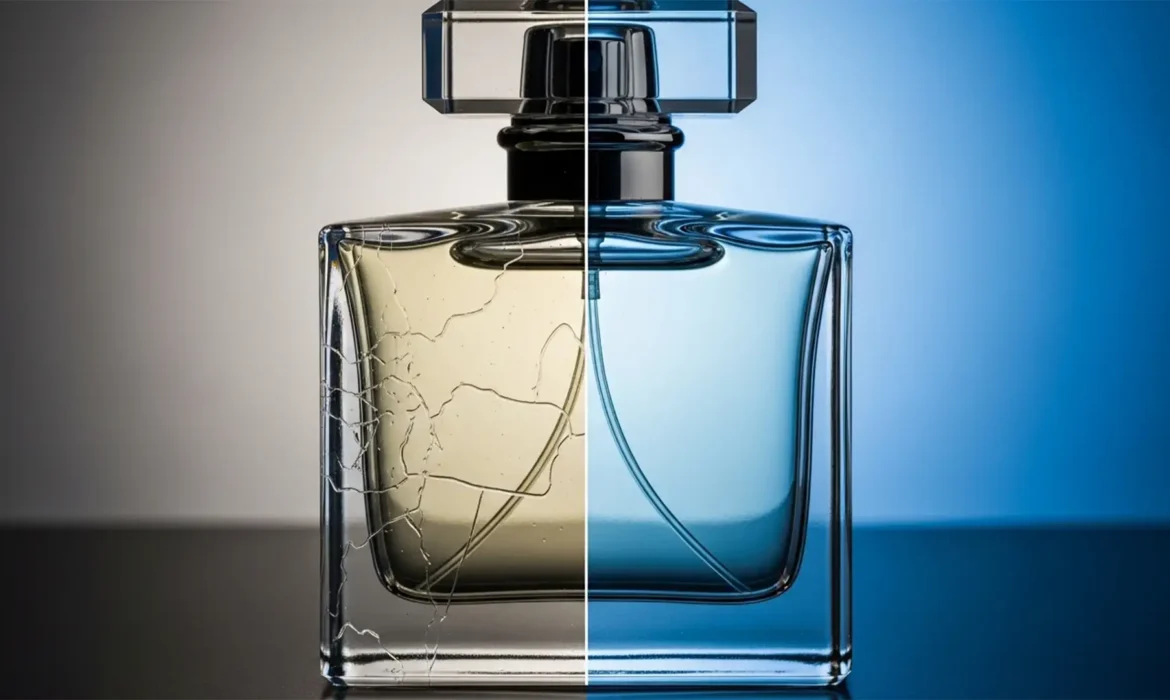
You clicked ‘Remove Background’ in Photoshop, expecting a clean, ready-to-publish product shot. Instead, your transparent glass bottle is ruined by jagged aliasing, opaque gray blocks, and ugly edge halos bleeding from the original backdrop. Sound familiar?
While automated masking tools are incredible for solid objects, they fail miserably at separating refractive surfaces from complex backgrounds. If you are tired of delivering subpar ecommerce visuals, it is time to step away from the 1-click buttons. Here is the exact manual retouching workflow to fix AI background removal artifacts on transparent glass and achieve pixel-perfect product photography.
Why Photoshop AI Struggles with Glass Transparency
In Adobe Photoshop v25.x (2024), AI-driven tools like ‘Select Subject’ and ‘Remove Background’ rely heavily on contrast ratios and edge detection algorithms.
When these algorithms process transparent or refractive glass, the AI engine cannot differentiate between the background pixels and the glass surface itself. Current AI models cannot accurately calculate the refractive index of physical objects. Furthermore, they cannot cleanly separate specular highlights and shadows from the original backdrop.
This technical limitation results in three common AI artifacts:
- Jagged aliasing on smooth curves.
- Edge halos carrying the color of the old background.
- Opaque gray or white blocks where natural transparency should exist.
To fix this, manual intervention is required.
3 Professional Workflows to Fix AI Glass Artifacts
Depending on the complexity of your product and the background, you can use one of these three professional retouching methods to restore genuine transparency.
Method A: The Select and Mask Quick Fix
If your glass product has a relatively simple background, you can salvage a poor AI selection using Photoshop’s built-in refinement tools.
- Make your initial AI selection, then open the Select and Mask workspace.
- Select the Refine Edge Brush Tool from the left toolbar.
- Carefully paint over the transparent sections and jagged artifacts where the AI failed.
- Navigate to the Output Settings on the right panel and check Decontaminate Colors. This is crucial for removing edge halos bleeding from the old background.
- Set the output to a New Layer with Layer Mask and click OK.
Method B: The Pro Workaround (Pen Tool & Blend Modes)
For high-end ecommerce retouching, relying on brushes isn’t enough. You need the precision of vector paths combined with layer blending to recover lost reflections.
- Select the Pen Tool (P) and draw a precise Pen tool clipping path around the hard outer edges, solid cap, and base of the glassware.
- Convert the path to a selection and cut out the product.
- To restore the internal transparency, duplicate the original unedited glass layer and place it above your new cutout.
- Desaturate this duplicated layer (Ctrl/Cmd+Shift+U).
- Change the layer’s blend mode to Screen blend mode. This drops out the dark background and perfectly preserves the white specular highlights.
- Duplicate the original layer one more time, desaturate it, and set it to Multiply blend mode to recover the deep shadows and structural lines of the glass.
Method C: The Technical Deep-Dive (Channel-Based Masking)
When dealing with highly complex backgrounds, the most accurate way to separate glass is by creating a custom Alpha channel based on luminosity data.
- Navigate to the Channels panel. Click through the Red, Green, and Blue channels to find the one with the highest contrast between the glass highlights and the background (usually Red or Blue).
- Drag this channel to the ‘New Channel’ icon to duplicate it.
- Press Ctrl/Cmd+L to open the ‘Levels’ dialog box.
- Adjust the sliders to crush the blacks and boost the whites. You are essentially creating a custom luminosity mask where white equals 100% opacity and black equals 100% transparency.
- Ctrl-click (or Cmd-click) the duplicate channel thumbnail to load it as a selection.
- Return to your Layers panel, invert the selection if necessary (Ctrl/Cmd+Shift+I), and apply this as a layer mask for flawless, artifact-free glass transparency.
The Final Result: Pixel-Perfect Transparency
By utilizing channel masking for genuine transparency, precise clipping paths for crisp outer edges, and blend modes to recover lost reflections, you completely bypass the limitations of AI background removal. The result is a natural, highly realistic glass product that can be placed on any background without a single gray block or jagged edge in sight.
Outsource Your Complex Glass Retouching
Manual masking is the only way to effectively fix AI background removal artifacts on transparent glass—but it is incredibly time-consuming. If you are processing hundreds of product shots for an ecommerce catalog, spending 15 minutes on a single bottle simply doesn’t scale.
Struggling with complex glass and reflective product retouching? Let the experts at Image Work India and Cloud Retouch handle your high-volume image editing. Our dedicated team of professional retouchers specializes in pixel-perfect transparency, advanced channel masking, and seamless background removal.
Focus on growing your photography business or ecommerce brand, and leave the tedious pixel-pushing to us. Contact Image Work India today for a free trial and see the difference professional hand-drawn clipping paths make.


