
What Is Bounce Rate and How to Reduce It
Every business owner wants to create a website that will attract leads and generate sales. It is important to measure your site’s performance using various metrics. One of the most important metrics is bounce rate. This article will tell you what it is and how to reduce this indicator to increase traffic.
What is the bounce rate?
Google defines bounce rate as “a session with a single pageview on your site. ” In other words, rejection is a situation in which a user came to your site but did not click anywhere and did not go to other pages. Such sessions are divided by the total number of visits to the site. And the result of the division is the bounce rate. A high bounce rate indicates that a large number of visitors close your site immediately after visiting, without interacting with it in any way. The reasons for this can be very different:
- Poor design that makes a business website look unprofessional
- Inconvenient interface
- Misconfigured targeting ads make users’ expectations from the site not match the actual content. This can happen if you have chosen the wrong target audience or used irrelevant keywords.
Google users can take advantage of built-in analytics to measure bounce rate.
Why measure bounce rate
The bounce rate is a great illustration of how performing the site is. The higher this metric, the more the level of interaction with the site drops – and with it, the sales.
Example: You have opened an online T-shirt store. The store’s landing page has “View collection” and “Buy” buttons. A high bounce rate means that a large number of visitors have not clicked on any of these buttons. which means they have not moved to the next level of the sales funnel. Another important aspect is the impact of bounces on SEO… A high rate signals search engines that a site is poorly optimized for users. As a result, the site goes to the bottom lines of search results, which negatively affects traffic and can be detrimental to small businesses.
What is considered a good bounce rate?
There is no universal number – it depends on the industry and the type of site. For example, for an online store, a low bounce rate is much more important than for a blog. After all, the goals of these two sites are completely different. For a landing page without buttons and links, an extremely high bounce rate is allowed – because of the page design, even interested users do not need to click anywhere. It is also important to remember that bounce rates depend on which device the site is viewed on. The study shows that the average bounce rate for desktop users is 42%, while the bounce rate for mobile devices is 16 percent higher.
In general, the rate should be no more than half of the traffic – however, even then, it is worth reducing it for the good of the business.
How to lower your bounce rate
- Check your download speed. On average, you have a few seconds to grab a visitor’s attention. If pages load too slowly, it annoys the user and is more likely to go to the more optimized sites of competitors. There are several ways to increase your download speed: reduce the number of media files, skip animated images, limit the number of fonts, and much more—detailed instructions in the guide to speed up the site.
- Improve UX / UI Design. Inconvenient navigation is a common cause of high bounce rates. Users may not find the button they want or the content they are promised. Make sure all the important sections on your site are easy to find at a glance, and the call-to-action buttons lead you where you need to go.
- Set up your targeted ads correctly. Sometimes business owners make promises in their advertisements that they can’t deliver, leading to higher bounce rates. For example, some companies advertise their products as free – when it is only a free trial in reality. Such ads can increase traffic but at the same time increase bounces – after seeing that they have been misled, users will be frustrated and leave the site. Remember – direct advertising leads to more stable conversions and increases brand credibility.

How to Use the Persona Method in Product Analysis
Determining the target audience and their behavior is one of the most important stages in creating a product, developing an application or website. The thorough analysis allows you to make smarter decisions and create a product that truly meets users’ needs and covers their pain.
Product designers have developed several techniques for audience assessment and user portrait definition. One of the most popular is the persona method. It is used during the product research phase, even before the actual design and development of the interface begin.
The persona method is a simple and powerful UX research tool, but it isn’t easy. Let’s figure out what they are, why personas work, create them, and effectively put them into practice.
What does the term “person” mean in UX research?
A persona, aka a character, is a generalized but realistic description of a typical or target user of a product; that is, an archetype, not a real living person. Characters should be described as real people, but they should not document every aspect of an imaginary person’s life. In other words, this is the characteristic of the most likely site visitor.

What is the unique method?
The unique method is a qualitative research method. Its goal is to create multiple characters with the characteristics of potential product users. Simply put, each character is a collective image of one group of your target audience.
Why do a user portrait?
Creating a user image will help you get to know your audience better. You will be able to more accurately identify their key problems, needs, goals, and pain points. Ultimately, this will lead to a better user experience, making the product more valuable and attractive to the target audience.
You can make smarter, more informed decisions about your product based on your user profile. For example, which features might be useful to users, which logos they will respond to better, or which text they understand better.
Examples of people
Essentially, personas are “sketches” of real people. For a company in the print industry (say, a bookstore), you can model the following characters:
- Roman, 42 years old, teaches literature at St. Petersburg State University and uses the Internet only to check to receive assignments from students by mail and fill out electronic forms. It connects exclusively to the network from a home computer via a broadband connection. I have never made purchases via the Internet, preferring to place orders by phone.
- Lena, 28 years old, business analyst, an active Internet user for the last ten years. Use everything you can go online-MacBook, iPad, or your iPhone.
Thus, potential clients of the company are completely different types of people with completely different needs.
In some cases, it can use simulated personas in this form. However, fully developed characters have a more detailed description indicating the goals for which they will go to the company’s website.
For example, Roman will visit a site because he wants to read a review of a new book by Yuval Noah Harari, and a blog on this site is run by one of the teacher’s best students.
How to create a user portrait
Before creating personas, you should at least have an idea of your target audience. It would help if you had at least minimal preliminary research in the form of surveys, focus groups, in-depth interviews, etc. It is recommended to make up to 4 people, as a larger number can lead to defocusing, which will only interfere with decision-making.
Step 1. Conduct qualitative and quantitative user research.
Start by collecting data about your users (or potential users). This can be done in various ways, using qualitative and quantitative research methods. Combining both approaches will result in a more balanced and accurate result. However, this will depend on several factors: your resources, how much time you have, and where you are with your product. It is best to start research as early as possible.
Examples of quantitative research
Online surveys: This is a fairly simple and affordable way to research users, especially if you are self-employed and don’t have the resources a larger company might have. You can use basic tools like Google Forms and share your survey on suitable social media groups. These polls can include both multiple-choice questions and open-ended questions for extended answers.
We recommend that you put the most important questions at the beginning; this will increase the likelihood of getting a complete and thoughtful answer. Ask what the user’s problem is and what they expect from the product.
Web Analytics: Analyze certain factors such as the number of visits per page, time spent on the site, the path of visitors through the site where problems arise, etc.
Examples of qualitative research methods:
User interviews: this is an opportunity to ask questions and get detailed information about the experience of using your product from real people.
Focus groups are group interviews in which a small group of participants from your target audience discusses their experience with a product.
Contextual interviews allow an opportunity to observe how someone uses your product in their environment without asking pre-planned questions or giving them specific tasks.
There are different methods, but these are usually one-on-one sessions that involve observing the user’s experience with a product (or prototype product) and identifying their problems.

Step 2. Organize your research
Structuring the received data into an understandable and clear document can be no easier than getting the data itself. However, you will likely already be beginning to feel your audience and their problems by this point.
Data analysis and visualization allow you to see patterns in user behavior from different segments and compare their characteristics. The process and form of imaging will depend on the type of examination.
Graphs are great for quantitative research. They will give you a clear idea of trends that you can incorporate into your portrait.
There are several options for qualitative research. While there are many online UX research tools and websites out there, a simple method for visualizing data is to use stickers. Transfer quotes from users to your notes and group similar or recurring insights. For example, multiple users may have flagged the same problem, product flaw, or goal. Putting them together will help you see trends and thus gauge your audience.
If you have collected many detailed answers, put them together and insert the resulting text into the word frequency counter. So you will find out what language your audience speaks and whether there is general data about hobbies, interests, demographics, etc.
Step 3. Decide on the number of characters
You already have a clear understanding of the audience and the subgroups that make it up at this stage. If there are many such subgroups, select the four most important ones, and for the rest, find overlapping characteristics and use them as an additional one. There is no unnecessary data, so you can always refer to this other group for clarification if you have difficulty making decisions.
So you have four groups. Now describe the collective user image for each of them. Make sure there is a clear distinction between the groups. You can classify them, for example, by age, technical ability, motivation to use the product, the problem the product is covering, and other characteristics.
Step 4. Describe the image.
Name and Photo: Choose a name and photo that matches the person’s nationality and location. Avoid stock photos and overly generic names.
Demographic data and statistics: age, marital status, work, residence, education, experience, etc. This data should be based on prior research, unlike the name and image.
This includes goals, pain points, behavior, and opinions. This will make it easier for you to understand users’ motives and answer the question, “Why will they use your product?”
For example, the motivation for using an app to find apartments may be to spend less time visiting apartments. The problem with the same application may be that, in real life, the apartments do not correspond to the photographs and descriptions that appear on the Internet.
This should be a short sentence that summarizes the user’s needs the most. Although this is fiction, one should justify such a statement with the research results.
Continuing with the apartment finder application example, a quote might be something like, “I want to find a new apartment quickly, and for that, I need an effective tool.”
Step 5. Render the user image.
The turn has come for the last but no less important step-to draw up a final document for each person. Use mockups from the Internet to structure your information. The purpose of such a document is to be understandable by any of the team members who work on the product designers, developers, illustrators, marketers, copywriters-they will all do their part based on this research. They should have a clear idea of who they are making the product for and how their role affects their lives.
The user image will guide the design, development, and promotion of a product. You will make decisions that will ultimately become a ready-made interface with it.

Hashtags: Why Are They Needed and How to Benefit from Them
On the one hand, a hashtag is just a hash mark on the keyboard. On the other hand, it is a symbol of the digital age. Thanks to him, various social movements appeared, for example, #MeToo and #BlackLivesMatter, and people began to use this sign-in daily communication. In this article, how hashtags appeared, what value they have, and how to use them.
How did hashtags come about?
The history of the hashtag began in 2007 when former Google designer Chris Messina proposed using the hash sign to organize messages on Twitter – the social network was still gaining momentum. So, the hashtag has become a tag, a keyword or phrase that makes it easier to search by topic and content.
The new feature was first used by attendees at the August South by Southwest festival in Austin. Messina suggested using tags to follow the event on Twitter without being distracted by other feeds.
In October, wildfires that struck California sparked a surge in hashtag popularity – people used them to share news and stay updated.
In 2007, the most popular hashtag was used more than 9 thousand times, and ten years later, users posted 125 million hashtags every day.
Hashtags opened up a new dimension on Twitter – the company developed an automated hashtag search engine, and soon other platforms began to use the tag.

Why are hashtags important?
A hash mark in front of a word makes a hyperlink out of it. Thus, each hashtag becomes an anchor that allows you to find and group posts from the same topic on social networks.
It is important to note that different platforms give outposts by hashtags in a certain sequence.
Twitter: It shows all posts that have a hashtag. The user decides whether to read only the popular ones or watch the newest ones.
Facebook and Instagram. Above are the posts that are the most popular and have the most likes, comments, and saves.
Hashtag types
1.Profile Navigation
Anton is a popular travel blogger. He has traveled to many countries, knows all the pros and cons of each location, has become an expert on how to get through a long airport transfer, and loves to share life hacks.
In 2017, Instagram provided an opportunity to subscribe to hashtags.
Every day he publishes at least one post with useful information. To make it easier for subscribers to have the desired overview, he created headings by country and hashtags in each thematic publication.
2.Geographic
Such hashtags are tied to a place – most often a district, city or country. Use them if you provide services or sell products through your account. For more efficiency, glue the service name and geotags.
3.Branded
These are hashtags mentioning the brand name. With their help, you can search for UGC and track its reputation, work with negativity and respond to reviews about the company. If you have launched a contest or challenge, then using hashtags, you can track all participants in the activity.
Masha goes through a writing marathon of 2 weeks long. Every day she writes a post and at the end puts the hashtag #marathon_day_2, thanks to which mentors can find her post and leave a comment.
Hashtags for Instagram
Instagram is the most reliable social network for hashtags, and you can use up to 30 in one post. Put hashtags at the beginning of the post if it’s a rubricator or at the end if they don’t carry a functional load.
To hide hashtags from a post, add them in the first comment – this will not affect your search in any way.
In addition, you can attach a hashtag to a story, and there is a special sticker for this. By clicking on it, you will see all the stories under this hashtag and be taken to the thematic feed.
To go to the hashtag feed directly, enter the query through the “#” search, for example, # freshyagodyspb. You can also subscribe to this hashtag there – then posts with its mention will appear in your feed along with other subscriptions.
Hashtags for Twitter
As intended, the Twitter hashtag is a label for sorting posts by category. A fountain of tags is not welcome here, as in Instagram, so the optimal number for one post is 1-2 hashtags.
The platform has a separate section, “Trending Topics,” that lists popular hashtags. This section is constantly changing – the set of tags depends on geolocation, current events in the world and the number of mentions of the keyword by users. For example, during the US elections, the most frequently posted tags were #Trump and #Biden.
Hashtags for Facebook
You can use hashtags on Facebook, but it’s not very useful. At the most, show your involvement and knowledge of the current schedule. One or two hashtags per post are more than enough.
Hashtags for TikTok
A new and so popular social network with its own rules of the game. The very essence of the site – viral videos and challenges show that hashtags are an important promotion tool. Without it, the video will not appear in the thematic feed and will not receive the possible coverage.
Beyond reach, it shape communities. If a user often watches videos with the same hashtags, TikTok will show similar content at the top of the search results.
The same is true for brand hashtags – for example, the cosmetics brand Glossier uses the hashtag #glossier to bring all the lovers of the company’s products into a single community.
Challenges and jingles. I was hoping you could think of the extremely popular self-isolation track I’m bored in the house. The number of views on only one #boredinthehouse tag is 4.7 billion – that is, more than half of the world’s population.
Hashtag rules
- Write hashtags in one word without spaces. In writing, you can use letters, numbers, underscore, emoticons.
- Short and catchy hashtags are the key to success.
- To be more effective, hashtags must be relevant and contain keywords that people can use to search for information about a product or company.
- The search involves hashtags posted by the company in its post or the comment below. The company’s hashtags are not included in the comments of other accounts in the search.

What Is Conversion, and How to Calculate It?
It’s not enough to create a website – you need to make sure that it fulfills the tasks you set. And one of the essential metrics that measure website performance is conversion. This article will tell you what a conversion is, how to calculate it, what conversion rates can be considered successful, and how to optimize your site so that more visitors make purchases and click on links.
What is conversion?
Conversion is how a site visitor takes the action you want. Depending on the site’s purpose, this can be buying a product, registering for an event, downloading an application, subscribing to a course, or any other action that turns a visitor into a potential customer.
How to calculate conversion
Before calculating the conversion, decide on the user’s action on the site. As we wrote above, such an action can be purchasing a product or service, registering, or even subscribing to your newsletter.
Here is the conversion formula used to calculate:
[ number of visitors who took the desired action ] / [ total number of visitors ] = conversion rateIn simpler terms, you need to divide the number of visitors who took action by the number of all site visitors.
Here are some examples of how to calculate conversion rates:
Example 1: Tickets for a concert
Imagine that you are a concert promoter and decide to create a website that sells tickets for a show online. In this case, the conversion is the number of people who visited the site and purchased tickets. To calculate the conversion, you need to study the site statistics. For example, in March, 1,176 people came to the site, 56 of them bought tickets to the concert. Based on the formula above, you carry out the following calculation.
56 / 1,176 = 0.048, or 4.8%
This means that the conversion rate in March was 4.8%.
Example 2: Fitness site
In this example, you are a fitness trainer looking to expand your client base. To do this, you have created a website where you offer a free weekly workout checklist. All visitors need to do to receive an index is leave their email address. This will give visitors free workout information and new recipients for future marketing emails. In this case, the conversion is the users who left their mail. You can see that 635 visitors came to the site in July, of which 21 people sent an email.
The same conversion formula is used here:
21 / 635 = 0.033, or 3.3%
In this case, the conversion rate in July was 3.3%.
What is a reasonable conversion rate?
What is a good conversion in marketing? How do you know if a website is performing well or if you urgently need to optimize it for better results? There is no universal answer to this question. A satisfactory conversion rate depends on the industry, business goals, audience behavior, and location. However, the approximate figures are as follows: for areas like hi-tech, finance, healthcare, and so on, a range of 2 to 5% is considered a reasonable conversion rate. For eCommerce, the metrics are lower – from 1.84 to 3.71%. Conversion rate is a way to measure website performance and motivate yourself to new successes. Therefore, choose ambitious yet achievable numbers when setting your target conversion rate.
Also, keep in mind that conversion rates are only relevant for sites with good traffic. For example, if your site is visited by four people a month, and one of them takes the desired action, the conversion rate will be an unimaginable 25% – but such statistics are utterly useless for measuring site performance. First, focus on attracting many new visitors, and only then start calculating the conversion.
Where to see site statistics
Google Analytics. You can set conversion goals and track their progress in real-time on this service. Google Analytics has a lot of valuable metrics, including the number of visitors to your site.
Built-in analytics tool. For example, Cloud Retouch analytics is available to all platform users. With its help, you can track user behavior: for example, compare the actions of new and regular visitors. Plus, you’ll receive personalized recommendations for improving conversions and other metrics.
How to increase conversion
- Create a landing page. The advantage of a selling landing page is that nothing distracts the client from purchasing a product – unlike a multi-page site with a considerable amount of information. Be sure to write down the product’s benefits and add a call to action button.
- Improve UX. Clear and legible text, intuitive navigation, and the ability to buy in a couple of clicks make the user experience more comfortable and, therefore, increase the likelihood of conversion.
- Add a solid call to action. Make sure your site has a button with a relevant CTA. For example: Buy Now, Register for a Course, or Subscribe. Make it as easy as possible for the client to take this or that action.
- Optimize your mobile version. More than 50% of user traffic comes from smartphones and tablets, which means your mobile version should work perfectly for a good conversion. Reduce the number of elements and make the buttons more prominent and visible.
- Chat with users via live chat. By adding a live chat feature to the site, you can quickly answer any questions – which means increasing loyalty and, as a result, getting more potential customers.
- Add reviews. Positive testimonials from your previous customers will help build more trusting relationships with your visitors and nudge them towards a purchase or other action you want.

What Is CRM System
Website creation , a well-thought-out marketing strategy, competent promotion in social networks – all this helps a small business to attract more customers.
However, the growing popularity of the brand creates new challenges. Large numbers of clients are difficult to manage – especially if you keep records in a notebook or Excel spreadsheet.
This is where a CRM system will help you – a comprehensive solution that allows you to account for customers, manage sales, automate business processes and simplify analytics and reports. In the article we will tell you what CRM is, what are its advantages, and how to understand if it is time to implement such a system in your business.
What is CRM and how does it work
CRM (Customer Relationship Management) is a customer relationship management system. Traditionally, this acronym refers to an approach that uses analysis of customer preferences and behavior for more effective lead generation and sales. However, more and more often, CRM means not just a method, but tools and programs that help to achieve the desired result.
CRM is an essential part of small business management. It allows you to collect all information about potential and current customers in one place. This is very important because this information is usually scattered across different platforms: for example, on social media, on a website or mail, or in marketing presentations. In addition, CRM provides useful tools like live chat, marketing automation, or contact management. All this helps to more effectively lead the buyer through the sales funnel from the first contact to the purchase.
Why do you need CRM
Here are some important signs that it’s time for you to use CRM:
- You have accumulated too many Excel tables with reports that do not add up to a coherent picture
- It’s hard for you to track shopping behavior across platforms
- Your marketing and sales teams are mired in routine tasks and don’t have a single business strategy
- You are struggling to convert leads and retain existing customers.
An example of using CRM in small business
Anna bakes custom-made cakes. In the first couple, she had 5-10 clients a week – so she herself took orders through her Instagram account, negotiated the details, paid and delivered the cakes. But over time, orders increased to 200-300 per week, a catering service was added to the cakes, and they had to hire bakers and drivers, create a website , rent a workshop and open a physical bakery.
Managing clients manually became difficult: they forgot to contact one client, another did not specify special wishes, and the third brought the wrong cake. Plus, Anna spent all her time on process management, and she did not have the strength to come up with a new menu. In order not to lose clients and unload herself and her employees, Anna implemented CRM. Now each order is processed according to the same scheme.
1. The customer places an order on the bakery’s website, and the task “Contact the customer within ten minutes” appears in the CRM. If the manager misses the task, Anna will receive an automatic notification.
2. The manager contacts the client, helps to choose the filling and appearance of the cake, learns special wishes, information about allergies and other important details. After that, he transfers the task to the next stage – “Payment”.
3 . CRM automatically generates a document for payment, taking into account the size and details of the order. The manager sends the document to the client, and after payment transfers the task to the “Preparation” stage.
4. The shop manager appoints a responsible pastry chef and transfers the task to him. All customer wishes have already been recorded in the CRM – so the pastry chef does not waste time clarifying the details of the order.
5. After the cake is ready, the pastry chef moves the task to the “Delivery” stage. The driver receives an automatic message with the address and time of delivery, as well as the customer’s phone number. After the order is delivered, the driver marks it in the CRM, and the order is considered complete. After completion, the order is saved in the database. Anna can use the order archive for all sorts of analytics: the effectiveness of managers, the amount and number of orders, determining regular customers and the most popular dishes, and much more.
Benefits of using CRM
Improved analytics
Any prosperous business is a huge amount of daily updated information that is almost impossible to keep in mind. CRM not only brings this information together, but also makes it more understandable and structured for perception.
Deeper understanding of customers
CRM collects information about customers and leads from different sources and brings it together on a single platform. This allows you to create an effective marketing strategy that is more targeted to customer needs.
Superior service
CRM stores customer information – including contact details, purchase history, and special requests. This means that when communicating with the sales department and other business representatives, the client does not have to repeat what he needs over and over again. The buyer will feel as if you know their needs in advance – and this in turn will lead to an increase in customer loyalty and reputation in general.
Sales growth
Because CRM provides comprehensive insight into customer behavior, it is easier for marketers and sales teams to join forces and communicate correctly with a customer based on their position in the sales funnel. This is positively reflected in the conversion rate.
Better customer retention
Customer retention is just as important as customer acquisition. According to research , a 5% increase in customer retention increases sales by 25-95%. CRM allows you to improve and speed up communication with customers, and as a result, expand your loyal customer base.
Facilitate workflow
CRM helps automate routine tasks such as abandoned cart emails or payment confirmations. This relieves the workflow and leaves more time for strategic tasks.
Improved communication between departments
A single database and a step-by-step system of tasks allows each department to feel part of a global process. Using CRM increases productivity and eliminates confusion in team processes.
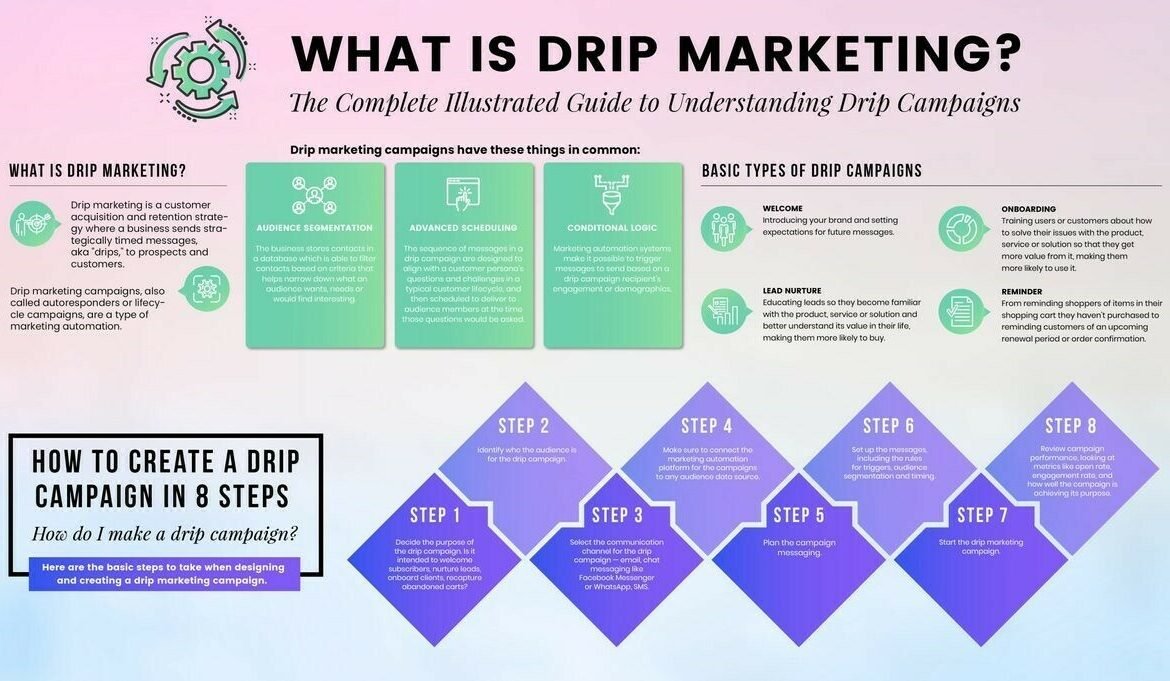
What Is Drip Marketing and How to Apply It
Effective lead generation is a complex process that involves many different marketing tools, including drip marketing.
The term “drip marketing” originated as a direct translation of the English term “drip marketing” and is a scheduled automated email campaign. The goal of this strategy is to drive traffic to the site , increase user engagement, and, as a result, conversion.
We’ve prepared a comprehensive guide to help you launch an effective email marketing campaign and get the most out of drip marketing.
What is a drip campaign?
A drip campaign is a form of marketing automation that is most commonly used in digital marketing. With this method, a series of predefined ones is sent to your contacts over a long period.
The sending time of each email is based on certain triggers. For example, you can schedule the first email to be sent to users after they subscribe, and the second one 3 days after.
Drops have several advantages:
- They help you gently develop relationships with customers, gradually increasing their interest, rather than annoying with a lot of content. Since such emails are personalized, they are more attractive to users, which ultimately affects an increase in conversion and a decrease in the number of unsubscriptions.
- Drip marketing boosts user engagement by keeping them from forgetting about your brand. Well-written emails with a convenient and unobtrusive sending schedule increase customer confidence and help guide them through the sales funnel.
What platform to use for drip marketing?
Creating a drip email directly from your site’s dashboard is perhaps the most convenient way. With this approach, all information about your business, reports and email data will be concentrated in one place.
Types of drip marketing campaigns
Welcome Emails: Create automatic welcome emails when a new user signs up, subscribes, or requests a free trial. Let them know that you are happy to meet them and tell us more about yourself, your brand and its philosophy.
Sales funnel: Create a series of emails that nudge potential customers to purchase. Submit brochures, demo, trial access. Ask them to share their tasks to better understand how to cover their needs.
User Engagement: These are emails that invite users to return to the site. For example, an email “We miss you” to subscribers who haven’t interacted with your brand for a while, or an email “You might also like it” – it will tell you about products and services that may be of interest to customers.
Abandoned Cart Reminder: Sometimes customers leave their carts not because they don’t want to buy products, but because they were distracted or something more important happened. These users should be reminded of their purchases because they are the hottest leads closest to completing an order.
Renewal Reminder: Send renewal reminders to customers if your product is a subscription. If the renewal occurs automatically, notify users in advance that the money will be debited soon. If not, notify them that their subscription is about to expire and remind them to pay to continue using the service.
Confirmation Emails: Send a letter of appreciation for your purchase, confirmation of receipt of payment, and an invitation to continue shopping.
Guides: Create a series of letters, each one about a specific subject. For example, turn your blog content into an SEO course where a specific section is covered in a separate email.
How to set up a drip campaign
- Define your main goal
- Define your target audience
- Plan your campaign
- Create engaging content
- Launch a campaign
- Optimize your strategy
01. Determine the main goal
Perhaps you want to get new customers or you want to draw attention to your brand. Regardless of what you’re aiming for, it’s important that you have a clear goal in mind when designing a drip campaign.
Think about what you want your audience to do by the end of the drip campaign. Have you bought a product, subscribed to the newsletter, or have started to visit the site more often?
If it’s still difficult for you to decide, see which of the following goals may be relevant to you:
- Product promotion
- Increase in sales
- Increasing brand awareness
- Increased engagement
- Increasing the number of subscriptions
02. Define your target audience
Digital marketing is not a universal story; It works best when messages to users are personalized. To make your emails more personal, segment your target audience into segments so that you can more easily understand what the main message should be for each user group.
Market segmentation is the division of an audience into different types of customers based on their common characteristics. For example, this can be location, age, interests, behavior on the site, and more. Based on this data, you can create triggers that will determine which emails certain users receive.
For example, you can create an abandoned cart trigger. In this case, your segment could be people who have not returned to their order for 24 hours or more. You will then create an email drip specifically for that segment in order to complete the shopping process.
03. Plan your campaign
At this stage, you should know what the purpose of the mailing is and which groups of people you will be sending them to. But how many emails do you need to create? And how often do you need to send them? On the one hand, you want your audience to be engaged and engaged. On the other hand, don’t annoy them with too much content.
Effective mailing is from 4 to 10 letters with an interval of 3 days to 2 weeks between messages. You can set a gap of 3-4 days between the first emails to interact with users immediately after the trigger. Then postpone sending emails for a longer time to avoid overwhelming customers with information.
04. Create engaging content
For your letters to be opened and read, they must be interesting and informative.
Clear title. The most important action a user must take is to open the email. Without this, even the most beautiful content will disappear under a ton of other emails and sink into obscurity. To prevent this from happening, the subject line should be bright and interesting.
Personalization. Letters that were written specifically for a specific group of people are much more popular than those that were written for everyone and therefore impersonal.
Tone of voice. Brands, like people, have personality. Help your clients get to know and love your project by creating a memorable brand. Determine how you want to communicate with clients – relaxed or professional, using slang and humor, or, conversely, strictly and to the point.
Brevity. In the era of 15-second videos, you don’t need to write long letters – most likely they will not be read, or they may not even start reading when they see the length of the text. Keep your message short and clear, and link to your website or blog for more details. Exception: courses by email. In this case, the user already knows that the letter will not be short and will definitely read it to the end.
Include a CTA: Every email you write should include a call to action that guides readers towards the end goal. It should be a prominent button with the text “Start Now”, “Download” or “Register”.
05. Start your campaign
After you’ve created your emails and finalized your strategy, it’s time to send them to your audience. Since the process is automated, all you have to do is set an initial trigger and specify the number of days between emails.
06. Optimize your strategy
As with any good marketing campaign, you must continually adapt your strategy for better results. If your campaign hasn’t met its goal, you may need to change audience segments, adjust content, or change the timing of emails.
For example, if the open rate is low, try changing the subject line. For low conversions, check the button or call-to-action text. Continuous analysis and optimization of your campaign will help you achieve the best results and increase your sales.
How to Become a Youtube Blogger: Step by Step Instructions
Wondering how to become popular on YouTube? Let’s be honest: it’s not as easy as ten years ago. You need to launch your YouTube channel and create unique content that is unlike the videos of competitors. They attract hundreds of thousands of subscribers, and with them – lucrative contracts with companies and brands. So if you are sure that a YouTube blogger is your calling, it is not too late to open and develop your channel. This article will show you how to become a YouTube blogger: defining a niche and launching SEO and audience engagement plans.
How to become a YouTuber:
- Determine What Success Is For You
- Choose a niche for video blogging
- Develop a launch plan
- Create an original YouTube channel
- Optimize your SEO
- Stick to a content creation plan
- Get down to business
- Enrich your knowledge in the field
- Engage your audience
- Advertise your channel through the site
- Explore Youtube analytics
1. Determine what success is for you
Before becoming a YouTuber, decide how to measure your channel’s performance. The obvious answer might be “money,” – but it’s a poor indicator of success. If your job brings money but doesn’t bring you joy, you are unlikely to feel successful.
Increased views or subscribers and monetization can be good indicators of success. Concentrate on any of these goals, and take everything else as a nice bonus.
2. Choose a niche for vlogging
Youtube is full of diverse content. Choose which videos you want to shoot: educational, entertaining, or inspirational.
Think about how to make your content unique. For example, if you decide to devote a channel to one topic, become an expert in it. Let viewers get to know you better. So subscribers will follow you not only for information on the topic but also because they like you as a person. Think about who your audience is and speak the same language as them.
You don’t have to narrow your blog down to one topic. Broaden your horizons and upload videos of your interest.
3. Develop a launch plan
Before becoming a video blogger, you need to prepare to launch a channel. Create a checklist and make sure your training is up to the level you are applying for. For example, buy a good camera, light, microphone, and sound recording software. A smartphone camera is also a good option if you’re not on a budget.
Create a realistic timetable for new videos and stick to it at all times.
4. Create an original YouTube channel
The visual design of the channel is very important. The avatar and profile header must be of a certain size. Check out our social media sizing guide. It might make sense to use a logo maker for the pictogram.
Try to create a unique visual style that will become recognizable to your subscribers over time.
5. Optimize SEO
You have spent time and effort creating content. You need to set up your SEO properly for as many subscribers as possible to see it.
By using the right keywords, you can get users to see your videos on the recommendation list.
See what words are used to find videos similar to yours. Try changing the words a little and see how the search result changes. Research relevant keywords and their popularity – and see what phrases competitors are using.
Here are some tips for finding keywords for YouTube:
- Use keyword search tools. For example, Ahrefs or Google Keyword Planner.
- Explore the hot topics in your industry on Quora and Google Trends platforms.
- Use the main keyword 3-4 times in the video description. Also, include it in the title of your video for mobile search optimization.
- Check analytics. See what keywords your channel is searching for to make more videos on this topic.
6. Stick to your content creation plan
To be successful on YouTube, you need to be consistent. The “virality” of a video is largely a matter of luck, but regular work on content will bring success in any case.
Create a schedule for new videos to be released and stick to it. That way, subscribers will know when to expect the next video, and you’ll have to stick to your schedule responsibly.
Warn your subscribers if you want to shoot a video on an abstract topic. It will be strange to see a travel video from your vacation in Bali or a review of a love story on the culinary channel.
7. Get down to business.
Long introductions annoy absolutely everyone. No one has time to listen to a five-minute explanation of what you’re going to show in 30 seconds. Get to the point as quickly as possible – especially if you’re creating a how-to video,
Tell what the video will be about in a nutshell and start the demo. If you still need to develop thought and tell a story, leave that for the last couple of minutes. The audience will be grateful to you.
8. Enrich your knowledge in the field
Regardless of the channel’s topic, you need to develop and update your knowledge constantly. Stay tuned for news and updates, see what your colleagues and competitors in the industry are doing. This will keep your content fresh and relevant.
9. Engage your audience
Subscriber engagement is a big part of becoming a Popular YouTuber. For this, it is not enough to “like” and respond to comments. Live stream on YouTube. That way, you can interact with your audience directly and show them a live, unedited version of yourself.
Live streams are also great for answering frequently asked questions.
In addition to YouTube, use other social networks to interact with subscribers. This will help you broaden your audience and show that you are open to communication.
A couple of tips for growing your audience:
- Motivate to subscribe to your pages on different social networks.
- Advertise the new video release on all platforms. Be sure to add the link.
- Create a blog to keep you interested.
- Set up your email newsletter to announce new vlogs and news.
- Start a podcast to share ideas in a different format and advertise your YouTube channel through it.
10.Advertise the channel through the site
The advantage of creating a website for your channel is complete independence and control over your content. The site allows you to do everything the same as YouTube, but without restrictions.
Using cloud retouch Video Maker, you can easily sync your YouTube feed to your site. You can even sell and rent your videos and create monthly subscription plans. All the necessary settings are in the templates for creating a video site.
11. Explore YouTube analytics
There is no limit to perfection. Using channel analytics, you can monitor the performance of your videos and identify weaknesses. Learn audience demographics with YouTube Analytics to better engage with them. It will also help you understand why some videos are more successful than others.

Interesting Facts About 20 Famous Logos
What makes just a good logo legendary? Big dreams, creative minds, and, of course, exciting stories. Some iconic logos appeared almost by accident, some have undergone radical changes over the years, and some are fraught with secret messages that you never knew existed.
If you’re thinking about creating a logo online, take inspiration from iconic brands and learn 20 fun facts about world-famous logos.
1. Amazon
Amazon founder Jeff Bezos personally oversaw every stage of the logo creation – from the first draft to the final version. Designer Turner Duckworth introduced a modern version of the logo in 2000. The logo represents the company’s name with a small but memorable detail – the orange arrow, which has become the symbol of the brand.
Fun fact: The Amazon arrow has two meanings. Firstly, it starts with the first letter of the English alphabet – A and ends with the last – Z. The message hidden in the logo: “Amazon sells any goods from A to Z” (which is equivalent to the Russian “from A to Z”).
In addition, the arrow also symbolizes the smile that appears on the faces of Amazon customers when they receive a long-awaited package.
2. Disney
Any child from 3 to 90 years old knows the Disney logo – florid and quirky, as if from an old book of fairy tales. In 1995, the famous castle silhouette was added to the logo, which by 2006, thanks to the efforts of Pixar, became more voluminous.
Interesting fact: it is generally accepted that the company’s logo is an exact copy of the signature of its creator Walt Disney. This is not entirely true. The logo is indeed a stylized version of the company’s founder’s handwriting – but the signature itself was changed by Disney so often that it was impossible to copy it.
Disney relic collector Phil Sears wrote: “The Volt deliberately changed his signature over and over again – just as he changed the face of Mickey Mouse. Each decade, Disney’s murals have been significantly different from previous versions. “
3. Nike
Nike’s Swoosh is perhaps the most famous sports logo. Brand owner Phil Knight wanted to create a logo to symbolize dynamism and speed. In addition, it was important for Nike to differentiate itself from Adidas, the company’s main competitor.
The young designer Carolyn Davidson was the creator of the Swoosh, inspired by the wing of the Greek goddess of victory, Nike, for the logo’s shape. Phil was not impressed with the logo, but the owner accepted the job due to the tight deadline, saying he would “warm to the logo over time.”
Fun fact: Carolyn received only $ 35 for her logo work, roughly $ 200 at the current exchange rate. However, in the 80s, the company’s management presented her with a gold ring with diamonds and a block of shares, the value of which currently exceeds $ 4 million.
4. McDonald’s
McDonald’s golden arches are so popular that they have become an independent pop cultural phenomenon and a symbol of the entire fast-food industry.
Over the years, the logo of fast-food restaurants has gone through a series of redesigns, the last of which was carried out by the German agency Heye & Partner in 2003. The modern logo is minimalist, with a dominant yellow and a subsidiary red, often accompanied by the slogan “I’m loving ‘it.”
Interestingly, although the first McDonald’s restaurant was opened in 1937, golden arches as an interior element appeared only in 1952. They became part of the logo even later – in 1961 when businessman Ray Kroc acquired the restaurant chain.
5. Gucci
Gucci created the first version of the logo in 1933 – 12 years after founding the brand itself. The fashion house’s symbol was two intertwined G’s, to which a red and green ribbon was added in the early fifties – a tribute to Gucci’s Italian roots. The last modification of the logo took place in 2015 – then, both letters G were turned in the same direction.
Interesting fact: the logo was created by the son of the designer, Aldo, who imprinted on it the initials of his father – Guccio Gucci. In addition, the logo has one more meaning: the intertwining Gs symbolize the clasps of the bracelet.
6. Chupa Chups
The legendary brand of Spanish lollipops, takes a special place on our list – after all, the famous surrealist Salvador Dali volunteered to create a logo for it. He chose the bright red and yellow palette and decided to place the logo on the top of the lollipop – where it will always be visible.
Interesting fact: the brand’s name comes from the Spanish verb chupar, which means “to lick.”
7. Coca Cola
Another logo that needs no introduction. Despite minor changes, the Coca-Cola logo has remained largely unchanged since its inception in 1886. The font used in the logo is so recognizable and unique that it is easily recognized even when translated into other languages.
Interesting fact: the logo was created by the accountant of the company’s founder, Frank Mason Robinson. He convinced the management that double “C” would look spectacular in promotional materials.
8. Google
Designer Ruth Kedar created the original logo for the world’s most famous search engine. Her work was a Google symbol for 16 years until it was replaced by a more modern version in 2015.
The Google logo is a design element and a wholly interactive experience. To celebrate holidays and important dates, the company turns its logo into doodles, which are unusual images, animations, and even small full-fledged online games.
Interesting fact: the blue-yellow-red palette of the logo with a prominent green L, as conceived by the creators, symbolizes rebelliousness and unwillingness to play by the rules.
9. Instagram
Now it seems almost unbelievable, but initially, Instagram positioned itself as an app for professional photographers. Therefore, the first version of the logo was voluminous, white, and brown and resembled a vintage camera.
However, the app quickly gained popularity and became home to many users, including bloggers, celebrities, and well-known brands. Therefore, in 2016, Instagram got a new logo – modern, bright, and concise, which should be the case for an application with an audience of one billion people.
Fun fact: The first version of the logo was designed by the app’s CEO, Kevin Systrom.
10. Dove
The logo of the famous cosmetics brand appeared in the mid-fifties. Following his example, you can see how the trends in logo design have changed over the decades: the font became more elegant and thin, and the silhouette of the Dove became minimalistic and streamlined.
Interesting fact: the logo’s colors – white, blue, and gold – symbolize tenderness, purity, and luxury. This is a logical part of the brand’s identity – after all, Dove, for example, was one of the first to use non-model women in advertising.
11. Lego
The Lego logo went through a series of radical changes that we decided to show all versions of the logo, starting with the first one.
The Danish constructors appeared in 1932, but the usual red-yellow-white look was acquired only in 1973 when the company began to supply products to the United States. Lego opted for vibrant colors and frivolous, almost cartoon-like typography to please American kids.
The logo was last updated in 1998 – the font became denser, and the colors even more saturated. The rounded letters in the logo are a reference in the form of details of the designer itself.
Fun fact: The word Lego itself is an abbreviated version of the Danish phrase leg godt, which roughly translates to “play well.”
12. National Geographic
A logo can be called truly successful when its elements become no less recognizable than the overall composition. In the case of National Geographic, such a detail is a yellow rectangle, which, even without the verbal part, evokes associations with the legendary magazine.
Interesting fact: the rectangle was chosen as a logo for a reason. It follows the shape of a magazine page and copies the photographs’ format that made the brand famous. The yellow color of the logo represents the sun, which illuminates every place on earth – just like National Geographic does.
13. Audi
The four rings on the Audi emblem symbolize the four companies of the concern: Audi, DKW, August Horsch, and Wanderer. Initially, the logo of each of the companies was located inside each circle, but over time they disappeared, leaving only laconic geometric shapes.
Fun fact: In 1995, the Olympic Committee filed a lawsuit against Audi over the similarity of the two logos. The carmaker won the trial and retained its famous emblem.
14. Facebook
The Facebook logo has remained largely unchanged since its inception in 2005. Why fix something that works – especially in the case of a social network with a daily audience of two billion people?
The capital letters in the logo hint at Facebook’s ease of use. Saturated blue is also not chosen by chance: it is associated with optimism and IT companies in color psychology. The auxiliary white color adds freshness and dynamics to the composition.
Interesting fact: The New Yorker magazine claims in its article that Facebook creator Mark Zuckerberg chose the blue and white palette because of his deuteranopia – a form of color blindness in which yellow, red, and green colors merge.
15. Guinness
The Guinness logo is one of the finest in the beer industry. The brand emulated the 14th-century national harp known as “O’Neill” to highlight its Irish heritage.
Interesting fact: the same harp is the national emblem of the Republic of Ireland. Since Guinness was the first to trademark, the country had to unfold its harp the other way around to avoid copyright issues.
16. Starbucks
The most popular coffee shop chain began its journey in the port city of Portland – hence the marine logo with a mermaid siren in the center. The first version of the logo was brown, and the image was based on a Scandinavian engraving from the 16th century. However, in the late 80s, designer Terry Heckler completely transformed the logo: it became green, symmetrical, rounded, and had much less detail.
Fun fact: Terry Heckler made the logo too symmetrical; therefore, to give the siren a more human appearance, during the next rebranding in 2011, the designers changed the shape of her nose.
17. Cirque du Soleil
As with Starbucks, the original Canadian circus logo was a hand-drawn image: a multicolored tapestry with a rising sun. However, logo design trends have not spared him either: the modern version of the Cirque du Soleil logo is a minimalistic round sun emblem with rays diverging in different directions.
Fun fact: The sun in the logo represents the first Hawaiian sunrise seen by circus founders Guy Laliberte.
18. Bronx Zoo
The Bronx Zoo is a place with more than a century of history, home to over 4,000 animals in an area of 100 hectares. Its logo is as famous as the zoo itself: two majestic giraffes surrounded by a flock of birds. Shades of ocher and brown refer to the landscapes of the African savannah and other places where no man has set foot.
Fun fact: This logo is an ode to love for the wild and New York. If you look closely at the spaces between the legs of the giraffes, you will see the famous panorama of Manhattan.
19. Apple
The Apple logo is so famous that a whole book has been written about it. It fully reflects its philosophy – simplicity, functionality, and innovation.
The first version of the logo resembled an old engraving and depicted Isaac Newton sitting under an apple tree. However, designer Rob Janoff presented a multicolored image of a two-dimensional bitten apple a year later. In the late nineties, the logo became monochrome to reflect Apple products’ conciseness further.
Interesting fact: usually designers provide several logo options – however, due to tight deadlines and lack of a brief, Rob Yanoff provided the company’s management with only one, which eventually went down in history as one of the most famous logos in the world.
20. Ford
The first version of the Ford logo was more like a biker club emblem: an ornate black and white coat of arms with heraldic ornaments. But already in 1912, a corporate oval appeared on the logo, and the font became more calligraphic. A gradient was added to the composition in the mid-seventies to make the image more voluminous. Since then, the logo has remained virtually unchanged – which is important for a company that prioritizes reliability and tradition.
Fun fact: In the 60s, the renowned modernist designer Paul Rand took over the company’s rebranding and designed the logo for IBM and other companies. However, Henry Ford II did not accept the version of the logo created by Random, considering it “too modern.”
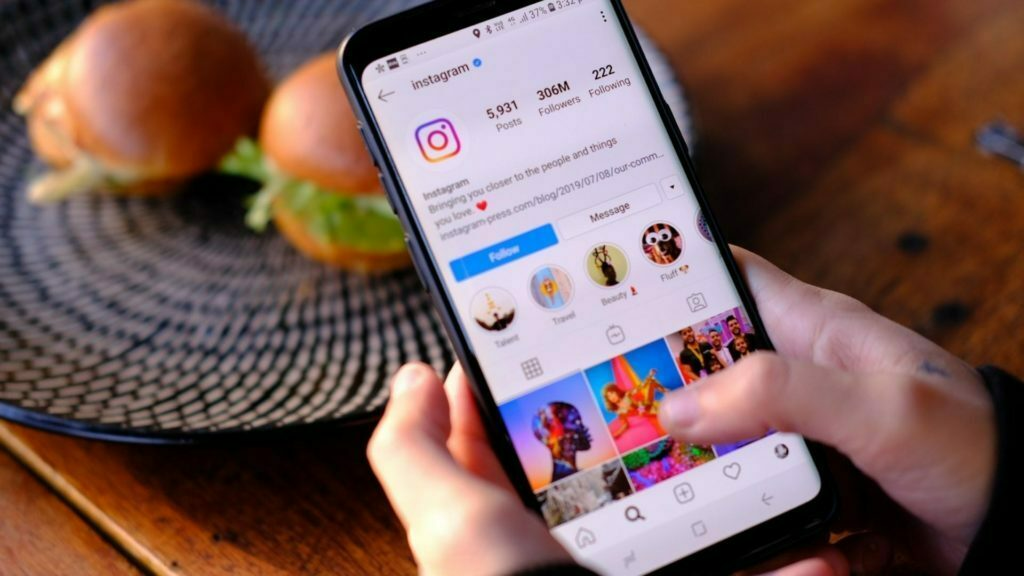
How to Use Instagram to Promote
Instagram has long ceased to be just a feed with photos of cats, children, and food. It is now a powerful communications platform, brand development platform, and sales tool.
Collected a checklist of 8 points to help lead your account to success!
- Profile header design
- Engaging subscribers
- Creation of creative content
- Join collaborations
- Add action buttons
- Create a consistent style
- Use hashtags
- Upload Videos to IGTV
1.How to design a profile header
The profile header on Instagram is the first thing that users who visit your page see. Therefore, it is important to use this space wisely, as it is after reading this part they decide whether to stay or leave.
Name
Do not confuse account name and nickname. The name is the bold line in the profile header. Instagram works with organic search, so enter keywords in this line by which customers can search for you or your business. They also determine the main theme of the profile. Important: the name string is 30 characters long.
Here are examples of names on Instagram:
FLOWER DELIVERY MOSCOW – good
Pottery school “Clay” St. Petersburg – good
Everyone can draw – it’s bad.
What’s wrong with the last example? The fact that the functionality of the search bar is not involved here, by which potential customers and future subscribers can find you. Nobody will search for drawing courses for the phrase “Everyone can draw.” Most likely, future artists will use the version “School of Drawing in Vologda.”
You only write your own first and last name in a line when you are a famous person, or you have a strong personal brand, and people are looking for you that way.
Description
The profile header is 150 characters long and supports active links with # and profile links with @.
Tell us about yourself or your business here – add the most important information that the user needs to know when working with you. Specify delivery times, hours of operation, payment methods. Or describe the areas in which you are working and your advantages.
Let’s continue with the example of the pottery school – this may be its description:
- Create your pottery
- Masterclasses, courses, children’s parties
- Gift certificates
- Online booking of lessons 24/7 on the website
We used 132 signs and shared everything a potential client needs about our pottery school.
Writing each phrase on a new line for visual harmony and better perception is better. The main thing is not to knock everything together. If you indent on Instagram itself, the text will stick together. To divide the text into paragraphs, you need a secret space.
Copy this space for Instagram here:
⠀ – space is at the beginning of this line, before a dash.
Highlight, copy and paste into your text.
Contact details
Indicate your contacts – the audience should immediately understand how to contact you. Add a direct link to the website, phone, and mail.
If you have an offline business, for example, a beauty salon, then write the address – it will be clickable, and customers can quickly find you on the map.
2.How to Engage Followers on Instagram
Let’s start with the theory, namely how the Instagram algorithms work and how the user’s feed is formed. Six factors affect the order in which content is served:
1. User interest in the content
2. User relationship with the content creator
3. Relevance
4. The frequency of opening the application by the user
5. Number of user subscriptions
6. User activity on the platform
The Instagram feed does not just give out random account posts to which the user is subscribed. It considers their interests – the more the algorithm is confident that they will like the proposed post, the more likely it will show it to the user.
The more the photo is commented on and liked, the more people will see the post. The higher the engagement, the higher the likelihood that the next post will attract more attention. More coverage means more potential customers. We have collected 5 Instagram engagement techniques that will help bring your profile to the feed of all subscribers.
Questions. We recommend starting with simple questions that involve short answers. So you get to know your subscribers better and understand whether it is possible and necessary to move on to difficult questions for deep reasoning and discussions. An example of a post with a question from our pottery school: We are preparing a master class, where we will make plates ourselves and paint them. The next meeting in Paris is the place of power of our teacher Masha. What is your favorite city?
- Advice. But don’t give advice, ask for it! After all, people love to share experiences, and commenting on posts is one of the best places to do this. We came with a guest lesson to St. Petersburg. Share your favorite places, locations, bars, and museums in the comments; we will be very happy for recommendations!
- Games. Offer subscribers an easy-to-login game directly or indirectly related to your profile. For example, a post on a bookstore account. Have compiled a list of the top 100 books for 2021! Let’s play and find out who will read what exactly next year? Write in the comments a number from 1 to 100, and we will write the title of the first line of it.
- Marathons. Yes, on the one hand, they are already bored, but on the other, this is an effective mechanic that should not be neglected. This is a common mechanic for personal accounts, but businesses can use it successfully too.
- Contests. They cause less excitement than a year and a half ago, but they still work and attract interested participants. The terms of the competition must be clear and simple.
3.How to create creative content
Instagram is a platform where creative content is particularly well received. It is a place of inspiration created not only by marketers but also by talented users.
Use quality images. Users are already accustomed to seeing beautiful photographs created by professional photographers. Follow trends and fit them into your account style.
Do not create creativity for creativity because the purpose of the business page on Instagram is to attract potential buyers. Before diving into a creative concept, study your followers see how they interact with your posts and stories. Then, determine what business problems you want to solve and start to get creative.
4.Participate in collaborations
Collaborating with brands and bloggers is a great opportunity to grow your audience and attract the attention of potential buyers.
Collaborations are also beneficial because the subscribers of the brand or blogger with whom you cooperate already trust him and will be much more loyal to you.
There are two options for mutual promotion:
- creation of a joint product and its further promotion to increase sales;
- Cross-marketing is when two (or more) parties promote goods or services under their brands from each other.
Imagine the family-run flower shop Flora, which has teamed up with a manufacturer of handmade chocolates. Together they have developed gift sets that promote everyone on their profile and website. This is an example of a joint product.
Now let’s take the example of cross-marketing. Ivan is a photographer who specializes in wedding photography. Lisa is a makeup artist. They advertise each other on their profile since both have an audience with approximately the same characteristics, interests, and values. This was an example of cross-marketing.
Collaboration forms for Instagram promotion:
Mutual PR of brands or people who work in related fields. An excellent option for representatives of creative professions. An effective type of collaboration since the target audiences of the parties coincide.
Collaboration with the brand. For example, artists create illustrations for a well-known brand on a specific topic and mark the company’s profile in publications and stories. In this way, the artist’s audience learns about the company, its products, and opportunities from a trusted person.
Collaboration with a blogger. Continuing the topic of recommendations and trust, one cannot mention influencers’ opinion leaders. Subscribers listen to their recommendations, so brands need to find a blogger with the audience they need and promote their products through them. Marks in publications and photos, polls in stories, and promotional codes are the tools that help a brand acquire new fans.
5.How to customize buttons on Instagram profile
The buttons in the profile header will make the client’s path to the office or salon even shorter – thanks to them, he can immediately call or send an email.
To use the buttons on Instagram, you need to go to a business account or connect an author account. Then you will have access to the platform’s advanced functionality, including buttons.
What buttons can be added to a profile
- Subscribe or Subscribe;
- Write – to send a message to direct;
- Contacts – when you click on it, a panel appears with buttons “How to call,” “Email,” or “Write SMS”;
- Down arrow button – Shows related and recommended accounts.
How to add buttons “How to call,” “Write SMS,” “How to get” in Instagram
After switching to a business profile, you can add or change communication methods in the settings. Click on “Edit Profile” and go to “Communication Methods.”
Enter the data you want to add here.
- Email address – the button “Email” will appear in the profile. The address”.
- Phone number – the button “How to call” or “Write SMS” will be displayed – depending on your choice.
- Address – a button “How to get there” will appear, or the specified address will be displayed at the end of the profile description.
6.How to create a consistent ribbon style
Instagram is a social network for visuals who love their eyes. Therefore, aesthetics and a harmonious publication style are essential to the success of your profile. A unified account style is the details that unite the entire visual component of the profile. Such a detail can be a similar color scheme, corporate fonts, a creative concept, the frames’ location, illustrations, or frames.
Options for the location of photo content in the Instagram feed
Chessboard. It is important to alternate posts according to a previously accepted gradation, such as illustration – photography – collage or black and white image – text – bright image. The gradation can be any and depends on the scope of your business, profile goals, and publications.
Vertical or diagonal rows. To bring this concept to life, you need a photo planner to make your shots look good with each other.
Columns or rows in a line. The approach is the same as in the previous method. Here, all attention is focused on three images that follow each other. A great way to show a product in full size and then in detail.
Framework. A great tool to help you pull your content together. You can experiment with colors and textures, but we recommend sticking to the principle “less is more” because the focus should be still photographs and not their frames.
Puzzles. This is a simple tile design option. Looks great for minimalistic product photography. Cut the picture in a photo editor for 9 or 12 frames, and then upload it to the tape in the correct sequence.
7.How to use hashtags
We have written a detailed article on how hashtags can help you promote yourself on social media, but we will list the main points here anyway:
- use hashtags to make it easier to navigate your profile
- create a branded unique hashtag that you will assign to your posts
- put hashtags, which are keywords, so that users can find you through a hashtag search
- use hashtags when running contests or marathons – this will make it easier to follow participants + this is a point to fame
8.How to use IGTV
First, let’s answer the question: what is IGTV, and why is it needed? This innovative feature appeared in 2018 and immediately became popular with brands and bloggers.
IGTV is an app built to download vertical videos up to 60 minutes long for users with a blue checkmark and 10 minutes for everyone else. Instagram TV emerged as an add-on to Instagram to enable users to post long videos.
Creating a channel on IGTV makes it possible to attract a large audience, interest it and provide interesting and useful information in a convenient and understandable format.
Tiktok: What It Is and Why Everyone Is Curious About It
Proponents of the alien invasion theory were wrong – the world was captured not by aliens but by TikTok. The platform for creating and sharing short videos didn’t just shoot but blew up familiar social media templates. Donald Trump has tried to ban it in the US, Louis Vuitton and Saint Laurent run shows there, and museums popularize science through short videos. Is this a new trend or a whole era? Let’s look at it below.
How TikTok appeared
The company’s founder is Zhang Yiming, a 36-year-old entrepreneur from China who is reasonably compared to Mark Zuckerberg. In 2012, he formed the technology company ByteDance, the parent company for many technology projects, including TikTok.
Douyin, a local app owned by ByteDance, was launched in 2016 and immediately captured the hearts of over 100 million Chinese users. But the owners did not want to be limited to one country and were aimed at international markets.
So a year later, ByteDance launched a copy of the Douyin app in Indonesia and called it TikTok. Then there was a merger with the Musical.ly platform, and the Chinese video service gained worldwide popularity.
With over 104 million downloads in 2018, TikTok has become the world’s most popular app, overtaking YouTube, WhatsApp, and Messenger.
The number of users of the video platform is 689 million people, and in India, the monthly audience has reached more than 20 million users.
What is TikTok
TikTok is a short video-sharing app. They last no more than 15 seconds, the feed is endless, you do not need to concentrate and read the signatures. Yes, this is not the most intellectual pastime, and you can get stuck for the whole evening, but the platform’s success is not in stupid videos but in the same way the content is presented.
The main audience is Gen Z. Almost 70% of users are between 16 and 24 years old, making TikTok’s youngest audience. Remember – Facebook and Instagram were social networks for students and young people that their parents did not use. The growth of these sites and the increase in the average age of users indicate that the development path of TikTok may be the same.
How TikTok works
Many creators of content applications have long realized that users sometimes do not know what they want to listen to, see or read. Zhang Iming is one of them. He implemented the idea of a “smart tape” in one of his first projects and has constantly been developing it since then, simplifying people’s lives with the help of artificial intelligence.
The company does not disclose the algorithms for the application, but some of them can be understood by using the service for some time and having an idea of the work of Facebook and Instagram.
To display content, the platform uses artificial intelligence, which considers the location and interests of the user. The application analyzes the content and compiles a personalized feed with a relevant and interesting selection. It considers how many times the video was watched, how long it was viewed, how many people left comments, liked, shared, or saved to favorites.
Over time, TikTok begins to understand user preferences better and offers content similar to the one they liked.
Video moderation also occurs – first, videos check neural networks recognize certain algorithms or behavior patterns to detect potentially malicious and dangerous content. Then real people are involved in the verification – in each country. Its team does it. Videos are removed for violating community guidelines. When the video has passed all the stages, it is passed to the recommendation feed, gaining views.
An additional type of content moderation is complaints that users leave. Along with the provisions common to all social networks prohibiting incitement to hatred, bullying, and propaganda of terrorism, TikTok does not include overly explicit videos, nude bodies, and even the spoken or the written word “sex.”
Why is TikTok so popular?
Content creators are attracted by the unique format, simple video filming and editing, and the speed of content distribution. Videos quickly go viral, gain millions of organic views, and TikTokers turn out to star in a week without a major production investment.
The creation of videos does not take much time and effort, which allows you to produce a lot of content and gain momentum in popularity. YouTube, which until recently was the main supplier of new celebrities, does not have such functionality, so users leave for TikTok.
TikTok in India
The application came to us, and the whole world was greeted warmly by the target audience and a little frivolously by brands and companies. It should be noted that soon the attitude of business towards it changed, and it became a powerful platform for advertising and promotion.
In February 2019, TikTok was in fourth place in terms of usage time – the average user spent 13 minutes a day there.
At the same time, the average age of the Indian-speaking audience of the service is older than the world – 45% of users are people between the ages of 25 and 44. More than 30% of people under 21 consider TikTok their main social network.
The monthly number of active users of the TikTok short video service in India has reached 20.2 million.
TikTok has developed several media formats successfully used by large Indian companies. After a third of the publications were published, users recognized the product in the comments, and the number of views exceeded 5 million.


